I'm working on a plate design to sort .380 ACP, Makarov, and 9mm cases from one another based on case length. Hopefully will have something posted up this weekend if anyone is interested.

|
   
   
|


|


I'm working on a plate design to sort .380 ACP, Makarov, and 9mm cases from one another based on case length. Hopefully will have something posted up this weekend if anyone is interested.
very interesting. Never thought of that being a possibility.Originally Posted by dwwright

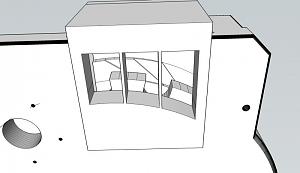
It's still in design, but basically I'm creating a new base plate with slots for each size (9x17, 9x18, 9x19) with a step for each to ride and hopefully tip off into the correct slot in the base. Anything shorter (.22, .25, .32) could drop out the hole normally used for the drop tube. Longer ones I need to add something to kick them off the collator plate or prevent them from up-righting into the holes. I also still need to draw up some kind of funnel system to connect to direct sorted brass to their final destination.
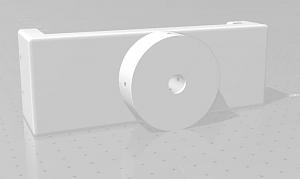
I was able to get a prototype printed tonight and mess with it a bit. I've got some modifications to do/try, but found it worked fine in small batches. The chrome plated brass is 9mm, the other is .380
Just ran 3 tests with some masking tape to guide the brass to it's bucket. Each time all went to it's correct bucket.
However more than a handful of brass and things got dicey. The current design doesn't allow much play and it has to run pretty flat to get the brass to topple, so when there is too much brass in the cup it tends to ride up in between brass in the collator and jamb it. I have a couple of ideas to try, but hopefully will work it out this week.
Outstanding and inventive and to already have an actual "working" setup is pretty cool.
Agreed, very awesome and a working concept model too.
I made some progress, but still not consistent when there is a lot of brass in the cup. I need to mount the feeder to keep the angle consistent mostly. I also still have some brass getting caught when it's between the notches of the collator plate, I may need to add some small ramps there to keep any from riding up with the brass that has fallen into that plate.
It would also help if I got the speed controller put on this feeder as it's running at about 10 or 15 rpm currently and with 3 different sizes to sort it may be running too fast for the short time it has to drop into it's slot that 50mm wide plate, which individually are about 14 mm wide.
Could someone explain to me how this side mount is configured?
I see that its using this printed piece, and there looks to be screws in each of the holes around the circular part, but what is on the inside to allow it to mount?
I looked at the bf_v2_mount_hang_var_bf_side_WH120, it appears to use 4 screws to bite into the threads of the bolt, just 4 little screws holding this together. I wouldn't recommend it, this design is much better, bf_v2_mount_3_4_inch_squared_WH120
If you want to use round 1" OD, then check out my re-mix
https://www.thingiverse.com/thing:3531187
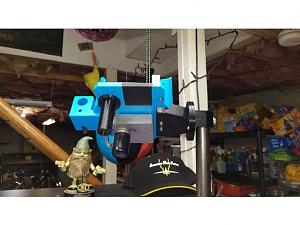
Yea I ended up going with that mount. I guessed it was just as you said, screws biting on the threads of a bolt, which I feel wouldn�t be secure enough.
Sent from my iPhone using Tapatalk
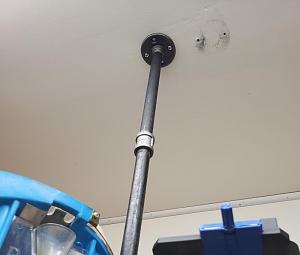
Ruebarb, I like that mount design.... I used the 1" round tube adapter of Mike's... But nothing 1" I could find fit it. I ended up getting 3/4 black pipe and a floor flange and put a couple washers inside the 1" fitting to make everything work..... Mounted it to my ceiling above my 1050. Yup it was too far right the 1st shot...... But this is "my room" so I didn't get a beating
I may print your adjustable one and see if that works better for me.
Spackle & caulk are our friend, hide most mistakes.
Interesting approach, I never thought of mounting from the ceiling. If you try mine, let me know how it works for you, thanks
I finally got my feeder up and running, just need to find a spring for the little flipper finger thing.
If anyone would like the files for the cable cover, under the bullet feeder, or the Jig I used to line up the holes on the 3/4 in rod, you can find them here: https://www.thingiverse.com/thing:3520214
https://drive.google.com/open?id=1LU...Ko-eAZ_DieVBwt

Last edited by ProMSL; 04-20-2019 at 11:55 PM.
I just used a ball point pen spring..... worked perfect
I've read all 35 pages and got an Ender 3 coming tomorrow. Can't wait to start making this!
No issues printing the collator with my Ender 3 - Just be certain to get your slicer settings ironed out before starting in on a 30 hour print.
These are the settings I was planning to use. Any recommended changes? btw, the cubic subdivision infil is listed since I read that it is very strong (also reduces print time a bit).
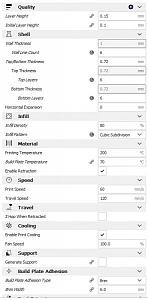
Assuming you�re printing with a .04 nozzle, I think that�s the size that comes with an ender 3, you should change your layer height to .16.
Sent from my iPhone using Tapatalk
But even more so print out a calibration cube, adjust your printer correctly, and do a couple test prints before you start on a long print. Also print out a temperature tower for the filament you�re using.
Go ahead a google it and it�ll make sense to you.
Sent from my iPhone using Tapatalk
Just an FYI I was able to get the feeder to reliable flip cast bullets (power coated) Lee 6-Cavity Bullet Mold 356-125-2R 9mm Luger, 38 Super, 380 ACP (356 Diameter) 125 Grain 2 Ogive Radius using the bf_v2_adj_turning_plate_big_cal_double_slide.stl
 Posting Permissions


| BP | Bronze Point | IMR | Improved Military Rifle | PTD | Pointed |
| BR | Bench Rest | M | Magnum | RN | Round Nose |
| BT | Boat Tail | PL | Power-Lokt | SP | Soft Point |
| C | Compressed Charge | PR | Primer | SPCL | Soft Point "Core-Lokt" |
| HP | Hollow Point | PSPCL | Pointed Soft Point "Core Lokt" | C.O.L. | Cartridge Overall Length |
| PSP | Pointed Soft Point | Spz | Spitzer Point | SBT | Spitzer Boat Tail |
| LRN | Lead Round Nose | LWC | Lead Wad Cutter | LSWC | Lead Semi Wad Cutter |
| GC | Gas Check |

 Reply With Quote