I must say i am truly impressed. I have learned a few new tricks.

|
   
   
|
|


I must say i am truly impressed. I have learned a few new tricks.
As do I! I have always found that what some find elementary - others find novel. I wish I could learn just one "elementary" trick each and every day.Originally Posted by RED BEAR

I shared that one because I have found that if one person doesn't know something - chances are there are more.
Sent from my Pixel 3 XL using Tapatalk

Hey pastera
I downloaded and printed your design. You have one for a 45 acp case?
And I love the spacer idea. Going to work up a few different ones. 44 acp 45 colt 38 spc And 233.
Sent from my SM-G960U using Tapatalk
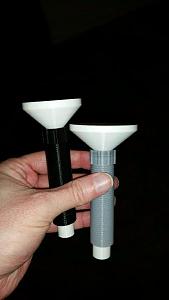
Made and printed some press mounted powder funnels. It works for every case I can think of from 223/25acp to the 50s.(selling them too try to recoop the cost of the 3d printer but I am just super proud of this so showing it off now hehe)
Works great in progressive presses too, so you can keep some speed and keep all your hands free for the powder side without sneezing and dropping all over the desk. (yep...)

About 5 years ago I introduced my Primer Guard primer catcher for the Rock Chucker Supreme loading press. It was a real hit with quite a few, but now I have what I believe is the best fix for the primer problem with this press. This fix eliminates not only the primer catching problem, but also the primer residue buildup on the press. Here's a link to the video on YouTube.
https://youtu.be/3myRaFCMBNY
Your Feedback is appreciated
Johnny V
NRA Benefactor
Member GOA, NAGR & Life Member OGCA
CCW OH & PA
Great idea!!! Where does one purchase such an item?
Sent from my Pixel 3 XL using Tapatalk
Great idea!
I find myself grieving over the fact that I have not learned how to use a 3d printer OR a CAD program. I wish I was 12 yrs old now. I know what I would study.

Tall feller here, needed to get the Ideal 45 sizer up off the bench. Didn't have the plate for the InFab riser so I made one out of some oak I had laying around.
A long cold winter here (snowing right now aamofact) and I had the template, oak and hardware and made 4 more. Anyone wants one, send me a PM and I'll send it, they're just takin up space here...
Brass Tumbler - more detail on build
http://castboolits.gunloads.com/show...bler-Unplanned
Just saw this - Not certain which part you are asking for? a 45 ACP pusher, spacer or both?
let me know and I'll post up some new models (not a lot of work for a different case once I build a model based on parameters - enter rim diameter and case height)


As I described in the reloading equipment section. Case "holder" for a collett crimper for a 38 Long heeled bullet
...
Hope this inspires, like you guys inspire me!
Mike
-Mike
Lordy, I would post a picture of mine.... it's on a 3 foot 2x4 so you can use a clamp to temporarily hold it to the table. Surprisingly effective and equally ugly, yours is Beeyootiful!
Mike
-Mike
I built a high/low speed powder dispenser/trickler, it has a dial adjustment on low to vary for different powders and conditions.
Quando omni flunkus, moritati

Well, this thing I made isn't exactly a for loading, but will come in handy for testing.
I guess you can use the same idea to build a portable loading station.
Once upon a time I found plans for a knock down shooting bench where all the pieces got cut from one sheet of 3/4 " plywood. After building it I found it a bit wobbly. The long piece that supported the table and seat was to limber. I even added bracing on the long piece. It still wobbled. I even use tent stakes and rachet straps to tie it down. That helped but was a PITA when setting up.
I used parts of the thing for some other projects.
I then got a small fold up plastic topped table. It wasn't to bad and was easy to set up.
The top of the plywood bench still had the part that sticks out to rest the butt of the rifle on and some of the top.
I cut this up so I had the stick out part and some of the top. Used pieces of the top to extend the part out enough so I could bolt it on the fold up table. Not bad, but still not good.
I had some scrap lumber left over from building the side racks on my trailer. Mostly rough cut 1x4's .
I started but cutting a couple pieces of the 1x4 to a bit longer than I wanted to make the legs. I wanted the legs to angle out to add stability.
To do this I laid the two pieces of 1x4 one on top of the other. Moved one end out so it slightly over lapped the other. Pic #1.
At the other end I drew a mark on the lower board, Pic #2.
I then took this board over to the cut off saw and laid it on the saw and turned the blade over to match the line. It came to about 7*. Pics #3 and 4.
I spent a bunch of time trying to do a compound cut with 7* on both the angle and tilt of the blade. What a pain to get right and have the ends come out even.
After screwing up a bunch I realized I could screw the two boards together then cut the angle. On cutting with one side shorter I had to put a block under the short side so the cut was straighter. Pic #5
You can then measure out the length you want the leg and cut it off the same way but with the leg on the other side of the saw. No pics for that, I figured most could figure that out.
Once I got the legs all done I started on the side and end rails. I started by cutting a 7* bevel along the edge of the board. When screwed to the leg it came out pretty much even so the top would set flat on both the ends of the leg and the rail. Pics #7.
Again I started with trying the compound 7* cut and tilt then realized after screwing up a few times I only needed the 7* cut.
When you make the legs you might want to make lefts and rights. That way when you look at it from the from the front or where ever both legs look right. Either have the seam on the front or side of the legs. You'll see that in the pics.
Once I got the legs and rails together I took the parts I had that bolted to the table and trimmed up both sides so the were mostly straight I placed it on the rails and centered it up with the right amount of overhang on my side of the bench and cut of the extra on the other side so I had about 2" over hang there.
I then centered it up and screwed it down. I figured I could fill in the sides with what ever I had even if it was pieces of inch boards.
One of the things I built out of some of the parts of the plywood bench was a truing stand. I rebuilt the rear wheel from the Harley, Found a couple broken spokes.
Any way the base of this stand was a almost square piece that looked pretty close to the size it would take to cover the sides of my bench. I took apart the stand and set it on one side of the bench. It was just the right length one way and looked like it might cover most of the other side.
I drew a line on the bottom of this piece along the edge of the rail. Put it up on the table saw and cut on the line.
Took the one piece that fit over and screwed it on the bench. I then put the other piece on the other side to see how much it lacked, to my surprise it fit like I had planned it that way.
The length and width of my bench was just what ever it cam out to be. The center piece I just cut kinda straight and even. Then that other scrap piece when cut in half fit great.
I doubt I could have planned that out ahead of time.
Anyway the rest of the pics show the bench from different angles to show the top and how the legs angle out to add stability.
I hope you enjoy the pics. It was a bit of fun building it.
I could think of a way to show how stable it is.
I have thought about adding bracing across the back and on the end so I can add a shelf. I can then stack some boxes of lead ingots to add weight to make it even more stabile.
Leo
More pics. These should have given you a good idea of what I slapped together out of scrap lumber. I hope this gives you ideas about what you can do with stuff taking up space..
If it don't set level like I need because of uneven ground some of my other scrap can work as shims under the legs. Or I could build a short set of legs with slots and matching holes to make adjustable legs.
This is made from rough cut so won't last forever. You could get treated and have it last longer. Made from 2x lumber will make it stronger but heavier.
So you can take this rough piece of stuff and make it as you want.
Leo
Last edited by 44magLeo; 05-20-2020 at 04:51 PM.

That bench should b great to shoot from.
Good job!
I used some more of my excess lumber to build some crates to hold lead ingots.
I had them stacked about 50 lbs. to a cardboard box. They don't hold up well when moving them around to get to the box underneath. The plastic 30 cal. ammo cans might not hold up well either. Steel 30 cal. cans would work but I don't have any and don't really want to lay out that much money.
I built some crates kinda like you see in craft stores that are decoration as much as to hold something.
I started by placing ingots on a piece of the 1x4 lumber I had to see how they fit.
On a 4 inch wide piece, 3 fit side x side and as many as you want long. I chose 3 long.
I found that Lee ingots are longer than Lyman ingots. The pics show this. Once I saw how they fit I cut pieces a bit longer than that plus 3/4 inch. The extra 3/4" is to fit into dadoes cut in the uprights.
The uprights I cut about 7 1/2" long. I used my table saw make a cut 3/8 " deep 3/8 " up from the bottom on the uprights. I then moved the fence over about 7/8 inch to make another cut.
Compared this to the thickness of the bottom. Adjusted so the two cuts were just far enough to let the bottom fit. I then cut the stuff between the cuts out to make the dado.
If you have a dado blade or router you could use that too.
I then drilled some holes in the dado to screw the sides to the bottom. I then cut a 2x4 into 3/8" thick pieces and cut them to fit across from end to end. Some glue and nails to hold them.
In the pics I left one side open to see how they went together, as well as how the ingots stacked inside. Once the pics were done I added the pieces on the other side.
I make Lee and Lyman 1 lb. ingots and I have molds from here that make 2.5 lb. ingots. I have pics of both in the crates. I added handles at the top to make picking them up easier and they set up about 1/4 inch to lock them into the top of the one below.
The first pics show how they fit together and stack up. The rest show how the ingots stack. In the one pics you can see how the Lee ingots are longer than the Lyman.
The 1 lb. ingots with 9 on a layer and 8 high make 72 lbs. The Cast Boolit ingots at 6 across and 4 the other make 24 at 2.5 lbs. for 60. I guess 4 more can lay on top for another 10 lbs. for 70 total. That's about enough for me to pick up and move around.
If I add the bracing on the bench to hold these crates in can add a lot of weight easily.
Leo
I redesigned my ingot crates. The ones I first made get a bit wobbly after you get them more than 3 high.
I had some 1/2 ply wood that I cut to 7 inches long and 6 1/4 wide for the bottoms, this lets me have two rows of 5 in each layer.
I used the 1x4 for the ends trimmed to match the 6 1/4 edge of the plywood. These I cut tall enough for 5 layers. This gives me 50 in each crate. Strips for sides same as before.
This gives me a crate about 9 inches long and 7 1/2 wide, 5 1/2 tall. The larger 2.5 lb. ingots from the Cast Boolit mold stack in the new crates even better. I get 20 of this in a crate. So either size ingots give me 50 lbs. in a crate. The tall crates if stacked full of the small ingots gave me 63 or 72 depending on if Lyman or Lee in each. The Lyman is a bit shorter length wise and a bit wider than the Lee, but the Lee is a bit thicker. You get more of the Lyman in the tall crates. 7 layers of 9 ingots of Lee for 63 ingots, the Lyman give me room for an extra layer for 72. That's getting a bit more than I like to haul around. I could just cut them shorter but the count will not come out an even 50. with 9 on a layer it comes to 45 or 54. The 50 each makes counting easier.
These being shorter and wider stack better. I think I might tear the first ones down to rebuild into the second size crate.
These slide in better on the shelf I built on the legs on the bench.
Sorry no pics yet.
Leo
Last edited by 44magLeo; 06-04-2020 at 01:21 PM.
I was out in the shed and found a piece of 5/8 in plywood I forgot I had. I used this along with my first crates to build more of the second style crate.
I took some pics to show the difference in the crates and how the Lee ingots fit and how the Lyman ingots fit.
Both give me 50 in each crate. I didn't get a pic of how the Cast Boolits ingots fit. They fit four to a layer with about the same amount of gap either way I stack them in. I can get 5 layers. This gives me 20 ingots at 2.5 lbs. for a total of 50 lbs. of these per crate.
The first two pics show the crate from top and the side. The other two are showing the way the ingots fit.
The Lyman have a snug fit at the ends of the rows, but have a larger gap between the rows.
The Lee leave more gap at the ends, but have less gap between the rows. There is a difference in the height of the ingots in the stacks. The Lyman leaves room for about 3/4 of the next layer, the Lee leaves about 1/2 a layer room.
Leo
 Posting Permissions


| BP | Bronze Point | IMR | Improved Military Rifle | PTD | Pointed |
| BR | Bench Rest | M | Magnum | RN | Round Nose |
| BT | Boat Tail | PL | Power-Lokt | SP | Soft Point |
| C | Compressed Charge | PR | Primer | SPCL | Soft Point "Core-Lokt" |
| HP | Hollow Point | PSPCL | Pointed Soft Point "Core Lokt" | C.O.L. | Cartridge Overall Length |
| PSP | Pointed Soft Point | Spz | Spitzer Point | SBT | Spitzer Boat Tail |
| LRN | Lead Round Nose | LWC | Lead Wad Cutter | LSWC | Lead Semi Wad Cutter |
| GC | Gas Check |

 Reply With Quote