Midway said today (3/31) is the last day of the sale. Better get yer name on one if you want it.

|
   
   
|


|


Midway said today (3/31) is the last day of the sale. Better get yer name on one if you want it.
Last edited by Beagle333; 04-02-2017 at 09:03 AM.
KE4GWE - - - - - - Colt 1860, it just feels right.
I want one but I don't need one. I was wondering when the sale ended. Well I put another coat of stain on and it looks just about where I want it. The LMF stain sure goes along way! Didn't have any wiskering after first coat. Looking forward to working in some oil and watching the color and figure come out, prolly my favorite part of finishing wood. Now I just have that pesky trigger guard to mess with.
Www.muzzle-loaders.com has the gpr flintlock kit for $475 + $2 shipping.
I'm glad I saved $110 through Midway. Got 5 coats of oil rubbed into stock yesterday. Put a sixth on this morning, slowly but surly it's sealing up the grain. Didn't use a wood sealer after stain, figured I'd just take my time a do it with the totw oil. Maybe I'll finish trigger guard today.
Ok, I stopped at 6 coats of oil. I actually had to take off the 6th coat as it was to heavy a coat and didn't dry, just gummy. Used some turpentine, then hand rubbed in the last coat and it looks real nice! Assembled the gun, had to jb weld the fore end cap on as it was loose after pinning on. Realized that the back mortise for trigger guard was excessively deep, or I didn't take the wood down enough. The front mortise for trigger guard was 1/2" short, which would have allowed the rear flat of trigger guard to sit into it's mortise, either way I didn't catch this earlier on, it might not even be an issue....basically I made a filler piece for rear mortise and glued it in. Last step is filing and finishing trigger guard and she's all done. I'll post some pics when I'm done.

So where do you get the all leather ones?Originally Posted by 54bore

Well I got the trigger guard polished up last couple days, plum browned it tonight 3 coats. Got it sitting with some oil on it overnight. Tomorrow I'll slap her on and she'll be all done Clark! I'll post some pics. Now I need a RB mold. Had a blast building it. The gun really turned a corner for me when I stained and sealed the stock. Thinking about a pistol kit next.


good deal duckey! now go on and post us some pix, please!
Here yah go.
Recap...laurel Mountain Forge American Walnut Stain x2 coats. Track of the Wolf original oil finish x6 coats. Birchwood Casey Plumb Brown 3-4 coats ( diferant parts took color differently).
sweet job, indeed!

sweet reward for all yer hard work.
Very nice work!!!
KE4GWE - - - - - - Colt 1860, it just feels right.
Thanks. I am sad the project is over, but there is a cure for that! I may do a couple more coats of oil on the stock and polish the brass on the ramrod a little more. I have the bug. Right before I started this project I bought a subscription to Muzzleloader Magazine to get me in the mood. What a great publication and man those guns in there are truly works of art. Just gotta get to the range now and test her out.
muzzleloader is an excellent mag, i just got 4 years worth of back order copies, every one is a gem.
a final break in the weather shaping up for me next week = range time at last. got a gaggle of guns to baptize.
duckey, don't forget to swab out the GPR ante-chamber.
You did a Very nice job!!
It'll be mayish before I get to range. I did clean out the anti chamber after you mentioned it. It wasn't to bad but did hav some proofing gunk in. there. Put another coat of oil (7th) on the stock today. Trying to seal up the grain a bit more.
Last edited by duckey; 04-06-2017 at 06:11 PM.
rfd....what size round ball u like shooting in these guns? Lee has a .530 and .535. I'm thinking about the .530.
.530 callahan bag mold ball, .015" patch strip that's been rubbed with gate feo #1 grease lube and then heat gunned into the cloth weave. i also lightly coned the muzzle, for easier ball seating. i make new ramrods, too - but also grind down the bell on the stock rod ferrule parallel and use it for ball seating, with a jag at the muzzle end. this allows ball loading with a rod up 'n' down motion, no awkward flipping around of the rod.
Well I had my first casting session in over a year! yesterday I cast about 100 or so 224 gn .530 RB's in hopes of shooting my new GPR kit that I finished this winter. I have also made lubed some .010 and .015 patch material I bought through TOTW with my Beeswax/lard/olive oil mix. I took apart my GPR yesterday and gave all the mortises a few coats of tracks original oil finish to seal everything up. Also rubbed in two more coats of oil on the stock. I am still seeing open grain if i look close enough. I have about 8 coats of oil on it now.
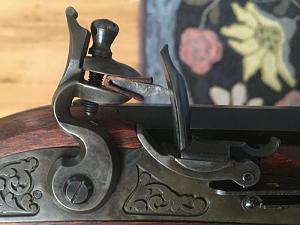
Well the wife and kids were gone for the weekend so I went to the range and shot my GPR that had been sitting in my safe for a while just waiting to be shot. I started with 50 grains of Schutzen black and a couple grains in the pan, no ball.....and touched it off. Had ignition! I started with 70 grains with a .010 patch lubed (beeswax, lard, and olive oil). Didn't like the fit in the muzzle so I used a .015 patch. I went up to 80 then 90 grains of powder, setteled on 90 then slowly filed front sight down as I was hitting low. I finally put one darn near the X and stopped filing. I fought with ignition the entire day...it was ether no or little spark or a flash in the pan with no boom. It was a hot and humid day in the 80's. I ran a couple patches down the barrel every 2-3 shots. A few times I just could not get ignition and had to the pull lock off and unscrew the touch hole plug and sprinkle a few granules of powder into it, after that it would fire. I used the propper sized flint as mentioned on this thread, English flint from TOTW. I positioned flint as discussed on this thread accordingly, switched out flints with new flints sometimes with good results for a few shots but no consistency. The frizzen looks a tad worn out in my opinion. I have attached a few pics. My targets shows (orange and white target) the shots that are the lowest are from 50 yards bench rested using 70 then 80 grains, the upper shots are from my .50 cal percussion. The cardboard target shows one shot on the x and 4-5'shots lower right with 90 grains. I had 2 hang fires and then a few cases of the flinch and pulled shot.. Lastly is my frizzen. Feedback welcome. The blue tape on orange and white target is covering up .223 holes (had to recycle a target as I was all out of fresh ones). All the orange dots are from the .54 GPR (lower holes) and .50 cal TC Grey Hawk). When I pulled the touch hole liner out after failed ignition it was never fouled, I could see day light through it. Also I did clean out the proofing gunk from anti chamber as instructed earlier in this thread.
Last edited by duckey; 06-27-2017 at 07:23 PM.
 Posting Permissions


| BP | Bronze Point | IMR | Improved Military Rifle | PTD | Pointed |
| BR | Bench Rest | M | Magnum | RN | Round Nose |
| BT | Boat Tail | PL | Power-Lokt | SP | Soft Point |
| C | Compressed Charge | PR | Primer | SPCL | Soft Point "Core-Lokt" |
| HP | Hollow Point | PSPCL | Pointed Soft Point "Core Lokt" | C.O.L. | Cartridge Overall Length |
| PSP | Pointed Soft Point | Spz | Spitzer Point | SBT | Spitzer Boat Tail |
| LRN | Lead Round Nose | LWC | Lead Wad Cutter | LSWC | Lead Semi Wad Cutter |
| GC | Gas Check |

 Reply With Quote