RepackboxRotoMetals2MidSouth Shooters SupplyLee Precision
Load DataInline FabricationTitan ReloadingWideners
Snyders Jerky
Page 1 of 2 12 LastLast
Results 1 to 20 of 36

Thread: Making a Drive Band Cutter (opening a mold)

  1. #1
    Boolit Master slughammer's Avatar
    Join Date
    Mar 2005
    Location
    SE PA
    Posts
    787

    Making a Drive Band Cutter (opening a mold)

    Making a Drive Band Cutter (opening a mold)

    I made a 2 drive band cutters to open up the cast diameter of my (2) cavity Lyman 311041. My mold was dropping at .309 and I wanted it larger to fit the .312 throat of my Savage 340. I made the first cutter .090 long for opening the three main drive bands. When I decided to make a second cutter and open the shorter drive band at the crimp groove, I figured I’d take some pictures and share with my friends.

    I started by cleaning my work area, anything that had fallen on the floor was picked up and put back on the work bench!
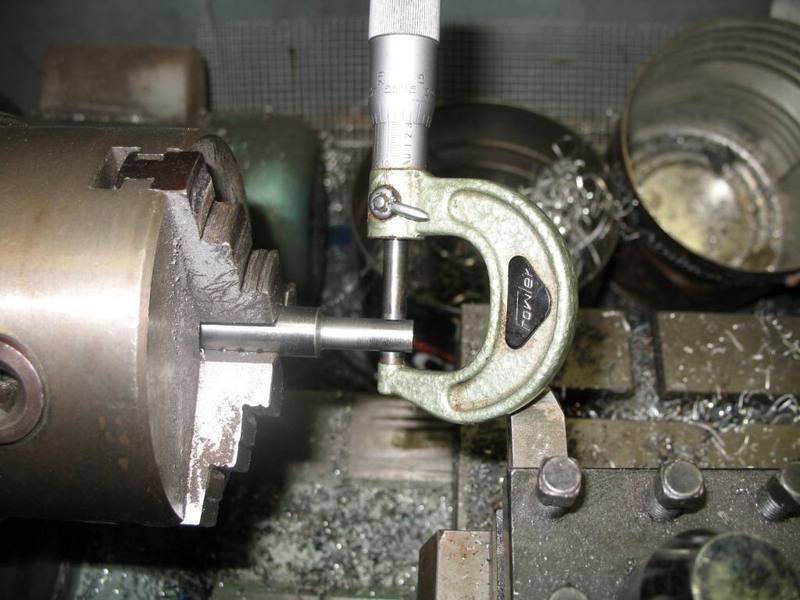
    Then I chucked up a 3” piece of ½ “ O-1 drill rod and turned about an inch of it to .319 dia. After that, I used a file and then sand paper to take it down to a nice smooth .3160.


    I back cut for the shank to .236 dia. (this is .080 smaller, I plan on cutting teeth .035 deep, When setting the milling head, I wanted to “touch off” on this dia and then back off .005).

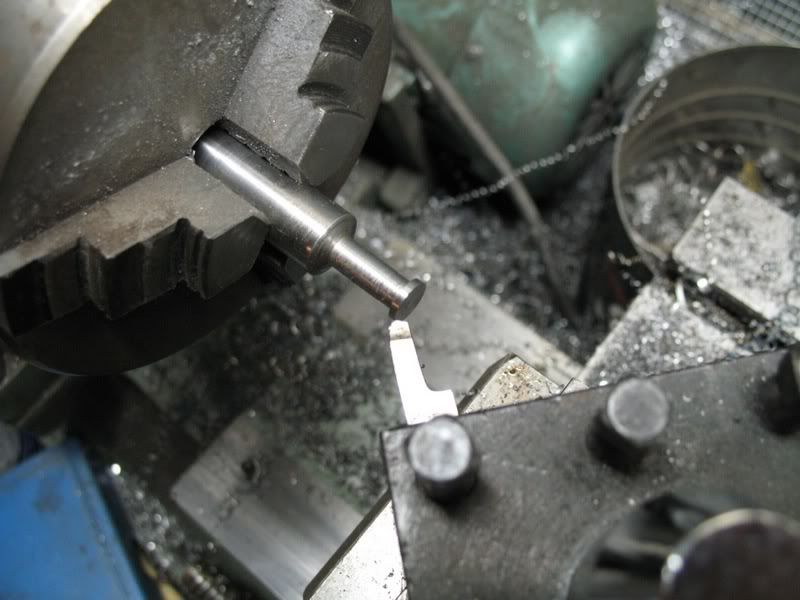
    After it was back cut and the back face was square I faced off the front until I reached the desired .060 length.


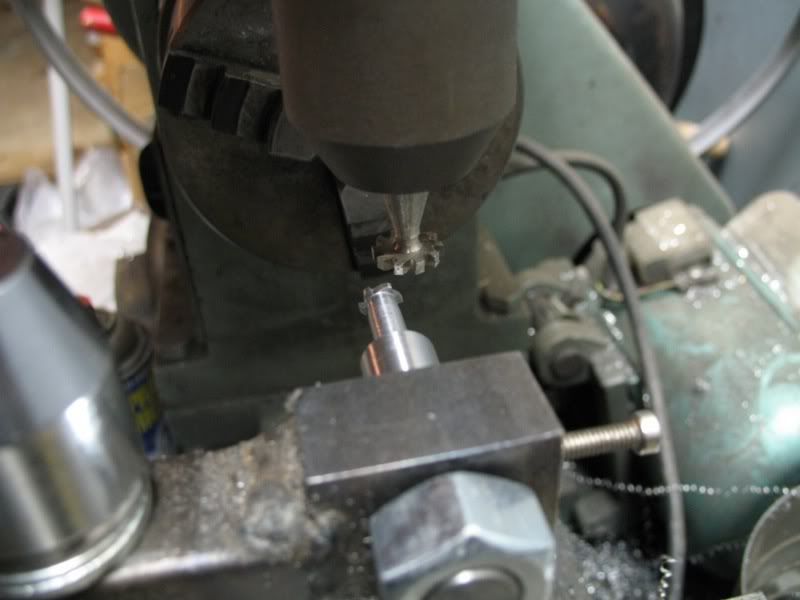
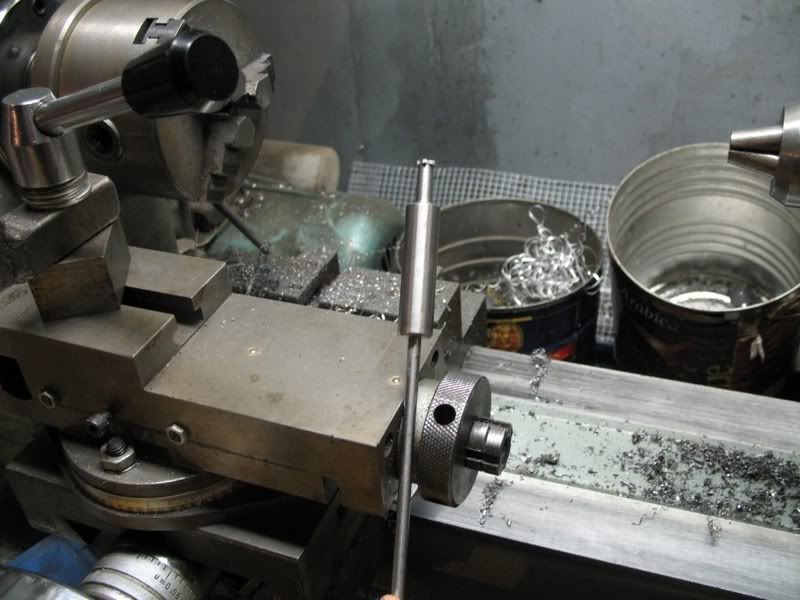
    I put the drill rod in the boring bar holder and leveled the “hexagonal indexing indicator” which is a ½” nut with the threads bored out. I brought the milling head around, touched off on the shank and backed off about .005, then I set the center using my calipers until I had it at .118 (1/2 the shank dia).


    After I made my first cut I indexed with the level for each successive cut.

    Once all the flutes were cut I turned the hexagonal indexing indicator point up, backed off the cutter and then brought it back down to cut some relief on the back of each flute(by eye) . The first cut had left about .050 and the relief cut took that down to about .020.


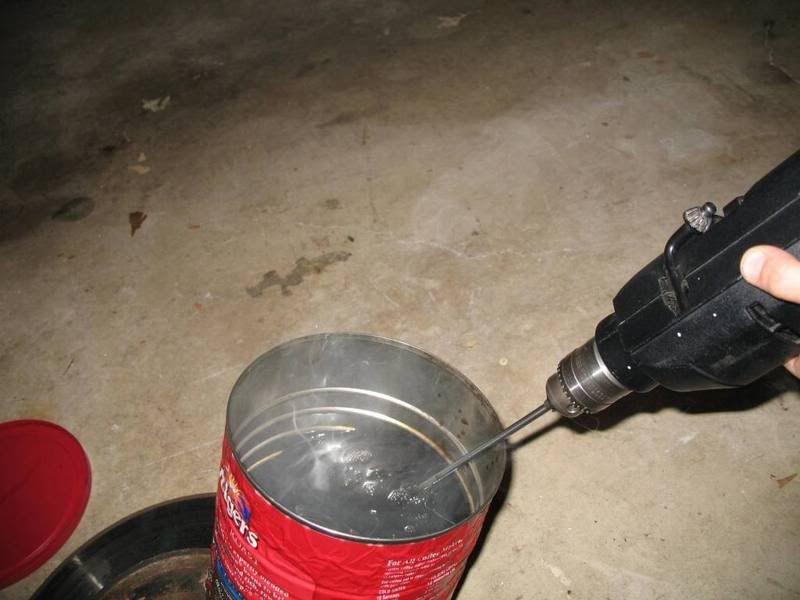
    After the flutes were cut I put the cutter back in the lathe and added a 3/16 hole so I could install a longer rod for holding in my drill. (This way I could heat the whole cutter without putting heat into the jaws of my drill chuck.)


    My assistant and I turned the assy with a drill, heated it until cherry and then quenched it in oil.
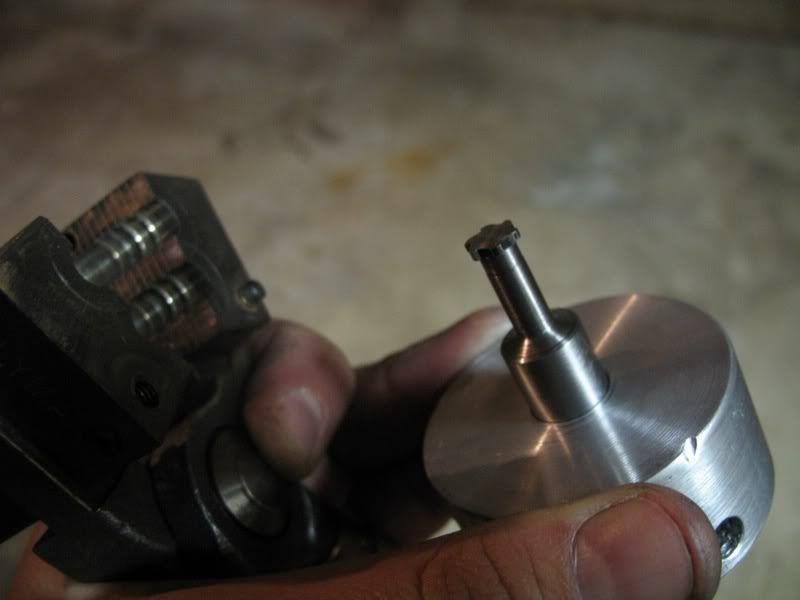
    After cleaning it up I installed the cutter in my round tuit (I’m glad I finally got one).


    I added a bushing to clear the sprue plate stop pin, then set the depth and tightened the set screw. After a few turns with hand pressure on the mold handles I cleared the chips, cut the other cavity and then added a c-clamp for a little more pressure.


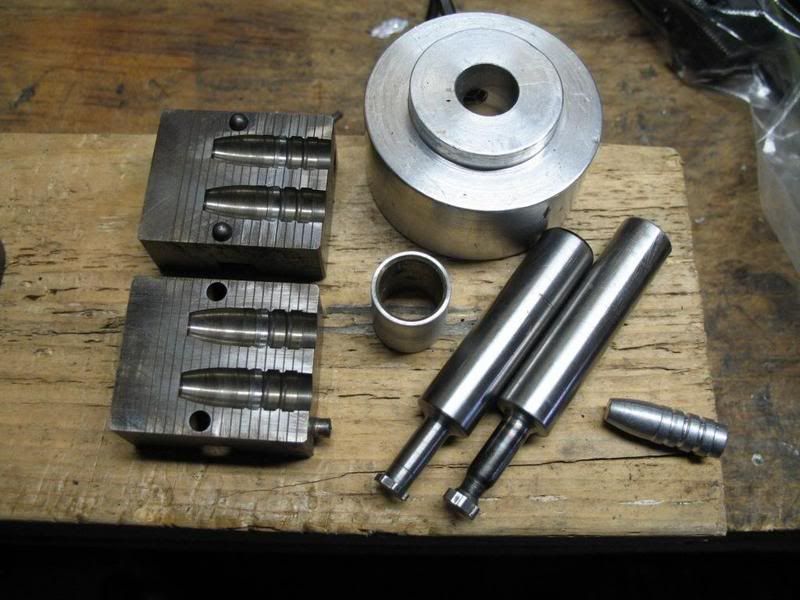
    The end result shows the 2 freshly opened drive bands, the others have been cast from so they have a seasoned look.
    This last picture also shows the .060 cutter on the left of the original .090 that was used on the three main bands.


    As far as diameters go, I had figured on .316 for the cutter, 2 thou of shrinkage to cast at .314 and then size to .312. I’m just a bit above that; the cutters grew about ½ thou when heat treated, the casting dia with wheel weights is .315-.316. They do size nice at either .314 or down in one step to .3115 using my Lyman 450.

    Regards - Slughammer
    Happiness is a couple of 38's and a bucket of ammo.

  2. #2
    Boolit Buddy
    Join Date
    Jun 2005
    Location
    Ventura, CA
    Posts
    415
    Good job! I have a couple molds that I would like to open up a bit. Might have to try your method. I wonder if you could get away without hardening the cutter.

  3. #3
    Boolit Master slughammer's Avatar
    Join Date
    Mar 2005
    Location
    SE PA
    Posts
    787
    For aluminum maybe you can get away without the heat treat, but it's not that hard to do.

    Hardest part of the heat treat was pulling the car out before firing up the torch.


    Heat


    Quench
    Happiness is a couple of 38's and a bucket of ammo.

  4. #4
    Cast Boolits Founder/B.O.B.

    45nut's Avatar
    Join Date
    Mar 2005
    Location
    Orygun
    Posts
    4,663
    wow,, very impressive thread sir. kudo's are in order.
    Boolits= as God laid it into the soil,,grand old Galena,the Silver Stream graciously hand poured into molds for our consumption.

    Bullets= Machine made utilizing Full Length Gas Checks as to provide projectiles for the masses.

    http://www.cafepress.com/castboolits

    castboolits@gmail.com

  5. #5
    Boolit Master
    lathesmith's Avatar
    Join Date
    Nov 2006
    Location
    Springfield, Missouri
    Posts
    1,373
    Very nice work...you have made yourself a custom, one-of-a-kind mold, just right for YOUR stuff. That is the hallmark of a good home machining project! I assume in order to get it hot enough to heat-treat, you needed an oxy-acetaline torch? How long did you heat it before quenching?
    lathesmith

  6. #6
    Boolit Buddy
    Join Date
    Dec 2005
    Location
    Truckee Meadows
    Posts
    393
    Fellow member "drinks" made me a couple of cutters out of a grade 5 bolt that looks very simmiler. They worked fine for opening up a couple of Lee moulds that I have. I think that he cut the teeth with a hack or jewlers saw. same idea though.

  7. #7
    Boolit Master slughammer's Avatar
    Join Date
    Mar 2005
    Location
    SE PA
    Posts
    787
    Quote Originally Posted by lathesmith View Post
    Very nice work...you have made yourself a custom, one-of-a-kind mold, just right for YOUR stuff. That is the hallmark of a good home machining project! I assume in order to get it hot enough to heat-treat, you needed an oxy-acetaline torch? How long did you heat it before quenching?
    lathesmith
    This little projest is nice because it doesn't require all the time required to make a set of blocks.

    I used the oxy-acetaline because it was right there and I knew it would work. I had annealed a 7/8-14 die with a hand held propane torch once and it took forever. I think perhaps (2) hand held propane torches, a weed burner or a turkey fryer would do the job. I heated it until it was red, then I quenched it, didn't take long at all. Just kept the drill turning and the flame moving. You can see from the picture I concentrated the flame on the largest mass first.

    Along with helping me face it off and drilling the back end of the cutter, my 7 year old assistant really liked putting the cutter in oil and watching a flame pop up
    Happiness is a couple of 38's and a bucket of ammo.

  8. #8
    Boolit Buddy Single Shot's Avatar
    Join Date
    Jul 2007
    Location
    Ohio
    Posts
    228
    NICE WORK FOR A CUSTOM MOLD.

    Quote Originally Posted by lathesmith View Post
    Very nice work...you have made yourself a custom, one-of-a-kind mold, just right for YOUR stuff. That is the hallmark of a good home machining project! I assume in order to get it hot enough to heat-treat, you needed an oxy-acetaline torch? How long did you heat it before quenching?
    lathesmith

    I have used a BernzOmatic® Jet Torch with MAP GAS

    http://www.lowes.com/lowes/lkn?actio...TH7&lpage=none
    WORK TO LIVE, LIVE TO HUNT
    SHOOT ONCE, KILL CLEAN, APOLOGIZE TO NO ONE

  9. #9
    Boolit Buddy
    Join Date
    Sep 2007
    Posts
    208
    I for one would like to express my appreciation for your post. Many times folks think this stuff is mundane and no one would be interested. I always learn from these type posts and with pictures it is even better.


    This from someone that is patiently trying to accumulate funds for a mill/lathe set.

    Steven

  10. #10
    Boolit Grand Master

    imashooter2's Avatar
    Join Date
    Mar 2005
    Location
    PA
    Posts
    7,955
    Quote Originally Posted by slughammer View Post
    Along with helping me face it off and drilling the back end of the cutter, my 7 year old assistant really liked putting the cutter in oil and watching a flame pop up

    Is there a 7 year old boy that doesn't like helping his Dad? Even more so when there's fire!

    Great detailed step by step post on a very worthwhile project.

  11. #11
    Boolit Grand Master
    454PB's Avatar
    Join Date
    Mar 2005
    Location
    Helena, Mt.
    Posts
    5,389
    Nice work and great pictures!
    You cannot discover new oceans unless you have the courage to lose sight of the shore

  12. #12
    Boolit Master
    lathesmith's Avatar
    Join Date
    Nov 2006
    Location
    Springfield, Missouri
    Posts
    1,373
    In one of life's great ironies, I have discovered that since I have acquired a few basic machine tools--small lathe, mill, drill press--I spend a great deal of my time in the shop using my tools...to make or improve tools. Your post clearly demonstrates this! Most folks don't realize that a lot of seemingly difficult jobs can be fairly easy...with exactly the right tool at hand. It's making that tool that consumes so much of our time and attention sometimes!
    I have used one of those Mapp Gas torches, they work great. The only real drawback is the expense of the bottles. Ouch, the locals ARE proud of them! But for small occasional jobs, they do the trick. I am kinda lucky, I know a couple of guys who have the big setups, which is good for my occasional torch needs. I'll try the spinning technique the next time I need to harden something, that is a good idea. Thanks for sharing!
    lathesmith

  13. #13
    Boolit Master

    Join Date
    Aug 2005
    Location
    Wyoming
    Posts
    3,047
    You can make a nice propane burner that will heat better and hotter than you have experienced with a small propane torch.


    Here is alink to some atmoshpheric eductor (venturi jets) type burners.
    http://ronreil.abana.org/design1.shtml

    I built a couple and have longed for one of the T-REx series built by Rex Price. Here is a page about the t-rex series.
    http://ronreil.abana.org/Hybrid.shtml

    Great design and should be easy for any of you with a lathe and mill (are combo tool).

    For reference I built my burners using a drill press with vise.

  14. #14
    Boolit Master
    Join Date
    Oct 2005
    Posts
    727

    Wink

    Nice Job --- Well done --- Thanks Mag_01

  15. #15
    Super Moderator


    Buckshot's Avatar
    Join Date
    Mar 2005
    Location
    So. California
    Posts
    11,833
    .............Great post! Nice neat work and easy to understand. Best of all it works !

    ..............Buckshot
    Father Grand Caster watches over you my brother. Go now and pour yourself a hot one. May the Sacred Silver Stream be with you always

    Proud former Shooters.Com Cast Bullet alumnus and plank owner.

    "The Republic can survive a Barack Obama, who is, after all, merely a fool. It is less likely to survive a multitude of fools such as those who made him their president."

    Shrink the State End the Fed Balance the budget Make a profit Leave an inheritance

  16. #16
    Boolit Master
    Join Date
    Jun 2005
    Location
    Alberta Canada
    Posts
    1,214
    How is the cocentricity of tthe bullets after the modification? Or how accurate are the bullets from this mold now.? Very creative, I would not have thought of this in a billion years.

  17. #17
    Banned

    Blammer's Avatar
    Join Date
    Feb 2007
    Location
    Asheville, NC
    Posts
    10,427
    great job!

    makes me want to get a lathe!

  18. #18
    Boolit Master slughammer's Avatar
    Join Date
    Mar 2005
    Location
    SE PA
    Posts
    787
    Quote Originally Posted by quasi View Post
    How is the cocentricity of tthe bullets after the modification? Or how accurate are the bullets from this mold now.? Very creative, I would not have thought of this in a billion years.
    I didn't set any boolits in the vee blocks, but I imagine that someone could. With opening the diameter maybe .005 - .006 and having full contact on the entire surface from the start I do belive it stayed as concentric as it was before I started.

    I have 200 cast and have lube/sized 100 of them at .3115. I plan on shooting them with IMR 4198 within the next week or two hopefully.
    Happiness is a couple of 38's and a bucket of ammo.

  19. #19
    Boolit Buddy
    Join Date
    Feb 2006
    Location
    western PA, USA
    Posts
    120
    Nice job and a great wirte up. Thanks.

  20. #20
    Banned
    Join Date
    Oct 2007
    Location
    North Carolina
    Posts
    92
    I want one in 358

Posting Permissions

  • You may not post new threads
  • You may not post replies
  • You may not post attachments
  • You may not edit your posts
  •  
Abbreviations used in Reloading

BP Bronze Point IMR Improved Military Rifle PTD Pointed
BR Bench Rest M Magnum RN Round Nose
BT Boat Tail PL Power-Lokt SP Soft Point
C Compressed Charge PR Primer SPCL Soft Point "Core-Lokt"
HP Hollow Point PSPCL Pointed Soft Point "Core Lokt" C.O.L. Cartridge Overall Length
PSP Pointed Soft Point Spz Spitzer Point SBT Spitzer Boat Tail
LRN Lead Round Nose LWC Lead Wad Cutter LSWC Lead Semi Wad Cutter
GC Gas Check