MidSouth Shooters SupplyRepackboxLee PrecisionRotoMetals2
Titan ReloadingSnyders JerkyReloading EverythingInline Fabrication
Wideners Load Data
Results 1 to 12 of 12

Thread: Perfected Patch Design!

  1. #1
    Boolit Grand Master 303Guy's Avatar
    Join Date
    Oct 2008
    Location
    New Zealand
    Posts
    9,078

    Perfected Patch Design!

    I have finally figured out the 'formula' for designing a paper patch! I can now take any boolit that is to be patched, measure and design the patch using CAD and print out an A4 sheet full of patches, cut them out, wet them and roll them and they fit perfectly.

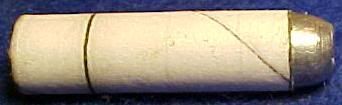
    Not the patch for the PPCBoo below.
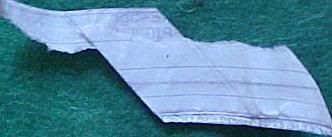
    Note the curved top and bottom edges for a tapered or two-diameter boolit. The boolit weight is printed on the patch were it remains exposed.


    The line is the correct seating depth.

    Perfect 'eye' centralization every time.

    With this design technique, aligning the boolit on the patch is a breeze and the patch just wraps on straight. The start and end aligns perfectly too although that is not a necessity - I just like it that way.

    This works particularly well for tapered boolits. The same technique will work for parrallel boolits only there would be no curved top and bottom edges.
    Last edited by 303Guy; 01-11-2010 at 04:56 PM.
    Rest In Peace My Son (01/06/1986 - 14/01/2014)

    ''Assume everything that moves is a human before identifying as otherwise''

  2. #2
    Boolit Master yondering's Avatar
    Join Date
    May 2008
    Location
    NW Washington State
    Posts
    1,519
    I've been doing this for straight bullets (no curved edges). It does work well. I hadn't thought of printing a line for seating depth.

    Slightly off topic, have you found any benefits to using a tapered boolit?

  3. #3
    Boolit Grand Master 303Guy's Avatar
    Join Date
    Oct 2008
    Location
    New Zealand
    Posts
    9,078
    ... have you found any benefits to using a tapered boolit?
    Well, for starters, they come out the solid body molds. But mainly it's a case of them actually fitting my particular set of rifle's throats. You can se how much boolit protrudes from the case. One of my rifles uses a two-groove boolit for best fit and for that one I have a sizer die. I could go with a parallel boolit if I made it much lighter and shorter so as to have the ogive contact the leade but the other rifle has such a large bore at the chamber end that the boolit shown has to be used to contact the rifling fron nose to where the leade used to begin.

    I'm not sure that hhaving the neck section actuall sizing down as it enters the throat is a good idea or not. Too much base sizing results in tails being formed on the base edge and that can't be good. All the 'funny' step-downs and tapers dissappear on firing I plan to add a small chamfer on the bases to avoid that 'feathering' effect.
    Rest In Peace My Son (01/06/1986 - 14/01/2014)

    ''Assume everything that moves is a human before identifying as otherwise''

  4. #4
    Boolit Grand Master 303Guy's Avatar
    Join Date
    Oct 2008
    Location
    New Zealand
    Posts
    9,078

    Getting the patch dimensions

    This is going to be difficult for me. I'll start with a basic or crude patch design then refine it later on - I have to go out soon.

    To get the top edge and bottom edge lengths for the patch, half wrap the boolit with the patch paper (one layer) and mic the base and the very near the front of where the patch is to sit at the ogive. Measure the distance from that top edge to the base of the boolit. Draw a pair of parallel lines that distance apart. Draw an angular line between the two parallels (somewhere in the middle). Calculate the top and bottom lengths using diameter times pi and mark off on either side of the angular line/top and bottom parallels. Draw the side lines from those markings to form the side edges of the patch.

    To get the Arc radius for the curved top and bottom edges, one needs to use CAD or do some trig calcs or scale drawings. Measurements do need to be very accurate.

    To tighten the wrap on the boolit, I roll the patched core between a flexible platic ruler and a smooth surface. This brings the ends together, closing the gap. That action also 'glues' the two wraps together so that once dry it is quite difficult to unwrap the patch.
    Last edited by 303Guy; 01-11-2010 at 06:05 PM.
    Rest In Peace My Son (01/06/1986 - 14/01/2014)

    ''Assume everything that moves is a human before identifying as otherwise''

  5. #5
    Boolit Master

    Join Date
    Mar 2005
    Location
    NW Ohio, almost as N and W as you can be :-)
    Posts
    2,915
    I'm wondering about doing a solid rendering of the bullet, then just "unwrapping" the outer surface into a flat ?? Then adding some material onto the bottom edge to form a tail, then cloning two side by side to get two wraps ?

    Bill
    Both ends WHAT a player

  6. #6
    Boolit Grand Master 303Guy's Avatar
    Join Date
    Oct 2008
    Location
    New Zealand
    Posts
    9,078
    Can you do a solid rendering of the patch itself? I measure the diameter with one wrap to get a mean of the patch diameter. That leaves a small gap which I then 'iron' closed. I do it that way because of the bond formed between the paper surfaces. You could use the same single wrap diameters for your rendering.

    I add the 'tail' after the patch is drawn just like you are suggesting.

    I'm trying to figure out how to describe my technique properly.
    Rest In Peace My Son (01/06/1986 - 14/01/2014)

    ''Assume everything that moves is a human before identifying as otherwise''

  7. #7
    Boolit Master

    Join Date
    Mar 2005
    Location
    NW Ohio, almost as N and W as you can be :-)
    Posts
    2,915
    I am sure not a CAD wizard, in autocad I would draw a cross section of the bullet from the centerline out, then revolve that polyline 360 degrees to get a solid. There SHOULD be a way then to unroll the outer surface if the resulting solid. There SHOULD also be a way to roll a flat into a cylinder and make a solid from it.
    Both ends WHAT a player

  8. #8
    Boolit Master yondering's Avatar
    Join Date
    May 2008
    Location
    NW Washington State
    Posts
    1,519
    I just cut some paper and roll it on a bullet, then trim until I get the right length, and measure the paper. It's pretty easy.

    You can do all the calculations you want, but don't forget the paper stretches, and some paper stretches more than others.

  9. #9
    Boolit Grand Master 303Guy's Avatar
    Join Date
    Oct 2008
    Location
    New Zealand
    Posts
    9,078
    ... don't forget the paper stretches, and some paper stretches more than others.
    True. But paper can be stretched manually and that's what I do when I 'iron' the patch after wrapping.

    The problem I was having with wrapping then measuring and trimming was that my boolits are tapered and that means the top and bottom edges need to be a semi-circle. Since coming up with this method of measuring then designing/drawing on CAD, I can just print out the whole page and they fit properly first time. A big plus is the ease with which they roll on straight and true. I make a final alignment adjustment as the leading corner aligns with the edge of the next wrap. Real sweet and easy!
    Rest In Peace My Son (01/06/1986 - 14/01/2014)

    ''Assume everything that moves is a human before identifying as otherwise''

  10. #10
    Boolit Master
    Lucky Joe's Avatar
    Join Date
    Apr 2006
    Location
    Michigan
    Posts
    533
    Quote Originally Posted by 303Guy View Post
    Real sweet and easy!

    Too bad about all I can do is run a pencil.
    Lucky Joe
    "There's always a way."

  11. #11
    Boolit Grand Master 303Guy's Avatar
    Join Date
    Oct 2008
    Location
    New Zealand
    Posts
    9,078
    Too bad about all I can do is run a pencil.
    Mmmmm. I started out that way. Quite honestly, it's flippin difficult to measure out and draw with a pencil. Things only started coming together for me when someone pointed out the printed patch idea! Even then it took me a while to master it. But, there is still the metal template idea. Like draw blinds. The shape itself might take a little effort but once right your good to go. Me? I have so many different size and shapes of boolits to experiment with, not even I know what I'm doing anymore!

    Well, I do actually - I'm having fun, that's what!

    Perhaps if'n you were to take those three critical measurements for me I could design your patch and give you the dimensions so you could make a template?
    Rest In Peace My Son (01/06/1986 - 14/01/2014)

    ''Assume everything that moves is a human before identifying as otherwise''

  12. #12
    Boolit Grand Master 303Guy's Avatar
    Join Date
    Oct 2008
    Location
    New Zealand
    Posts
    9,078
    Just an update. To show how well the paper wraps adhere to each other .....


    Here one can see how the patch tore while unwrapping it. The two wraps are still well stuck together. This is from 'ironing' the patch while wet - which brings the ends together. The same could be happening when using a cig roller. Testing it right now.
    Last edited by 303Guy; 01-15-2010 at 07:25 PM.
    Rest In Peace My Son (01/06/1986 - 14/01/2014)

    ''Assume everything that moves is a human before identifying as otherwise''

Posting Permissions

  • You may not post new threads
  • You may not post replies
  • You may not post attachments
  • You may not edit your posts
  •  
Abbreviations used in Reloading

BP Bronze Point IMR Improved Military Rifle PTD Pointed
BR Bench Rest M Magnum RN Round Nose
BT Boat Tail PL Power-Lokt SP Soft Point
C Compressed Charge PR Primer SPCL Soft Point "Core-Lokt"
HP Hollow Point PSPCL Pointed Soft Point "Core Lokt" C.O.L. Cartridge Overall Length
PSP Pointed Soft Point Spz Spitzer Point SBT Spitzer Boat Tail
LRN Lead Round Nose LWC Lead Wad Cutter LSWC Lead Semi Wad Cutter
GC Gas Check