Howdy all,
What angle do you recommend to make the ends for easy ingot removal? Friend said he made his straight up and had a real hard time getting them up.
Thanks,
Sam

|
   
   
|


|


Howdy all,
What angle do you recommend to make the ends for easy ingot removal? Friend said he made his straight up and had a real hard time getting them up.
Thanks,
Sam
Muddy Creek Sam
|__
( o )\_
USN 100% Disabled
Dark Lord of The Soot
SBSS# 2137
LASSOOS#1957s
SASS VET #131
http://www.muddycreeksam.com
My Feedback!
http://castboolits.gunloads.com/showthread.php?t=66946
I made mine with whatever angle you get when you stick a headless nail under the angle as you cut it on the bandsaw.
Works fine.
To lazy to chase arrows.
Clodhopper

About an 1/4in difference from bottom to top. Drop out nice.
2in angle iron by about 9in long. Ingots weight in at 5-6lbs.


I have several angle iron ingot moulds:
It isn't terribly important how much angle but there MUST be some angle (or properly called, "draft") to the ends to easily release the lead ingots. Examination of the picture will show you "how much" as this works perfectly. The picture was not taken at a perfect angle to illustrate the proper "draft" but if you look at how the left side "handle" tilts, that should give you a good idea. It is better to have it angle a bit too much rather than too little.
Dale53

I've seen several homemade jobs. All had slight angles. They were probably along the lines of of what clodhopper did with his nail under the iron.
You are just looking for a small draft angle. The angles on my mold frames for making vulcanized rubber molds for jewelry purposes are no more than a couple of degreees.
Shiloh
Je suis Charlie
"A society of sheep must in time beget a government of wolves."
Bertrand de Jouvenel
�Any government that does not trust its citizens with firearms is either a tyranny, or planning to become one.� � Joseph P. Martino
�If you put the federal government in charge of the Sahara Desert , in five years there would be a shortage of sand.� � Milton Friedman
"Ideas are more powerful than guns. We would not let our enemies have guns; why should we let them have ideas?" - J. Stalin

Cut mine on a chop saw, made a little jig on an old piece of plywood and welded like crazy!
Just the heat from the wire feed caused some movement in the metal. My goal at the time was to just get them to lay flat for even "bottoms" on the ingot.
Guess everything turned out all right one or two good thumps and the ingots fall right out.
Never even thought about "draft" If I make some for the BIL I wlll "engineer" that into the next batch. Think I can get a little angle on the compound slide miter saw I put a cut off wheel on?
I used a friend's metal cutting bandsaw to cut my channel iron. I forgot what the angle was ...5 degrees maybe...10 degrees... I don't know.
But I will pass this tidbit of advice along to you... don't weld on the inside of the mould.
I did. Maybe it was the welder I was using (the big red Lincoln AC box, stick welder). Or maybe it was the rods I was using (I think I learned later that there was such a thing as AC rods). Or maybe it was because my auto darkening hood decided to go on the fritz. Anywhooo.... I tried to clean up the welds as best as I could with a cone shaped stone chucked into a dremel.
I originally made mine like this in cross section:
\__/\__/\__/\__/
and capped the open and angled ends with about a foot long piece of angle iron.
Well, what I should have done was added a 1 inch to 1.5 inch wide steel spacer between the channels so that I could have gotten my stick in there to weld just from the back side...or the underneath side.....
So... maybe for the Mark II version it will look something like this:
\__/--\__/--\__/--\__/
Since I welded on the inside of the Mark I version it left a little bit of a hump in the corners even after all the dremeling, so I have one or two ingots that don't want to drop out right away... and it takes some effort.... maybe if I let them cool and shrink a little while longer.

NOT being a welder, I prevailed upon the fine gents in our Shaft and Hoist shop at the mine to build my ingot moulds.
They're built of 1.5" angle iron 10.5 inches long, so that when the ingots are stored in .50-caliber ammo cans, they can be lifted out with a finger at one end. Otherwise, if too long, ingots can be a real trial to lift from the cans....triangular shapes nest very snugly! A .50 can holds just over 100 pounds of ingots, and is a reasonable size to treat as a "lot" for consistency in bullet alloy.
The ends of the "troughs" have no angle at all, but ingots drop freely from the mould.
The pieces of angle iron are arranged like this: VVVV, with flat stock welded across the ends and NO welds needed along the lengths of the pieces. Welds, as mentioned, should all be on the outside. Some sort of handle should also be added to the ends for ease of handling..
Regards from BruceB in Nevada
"The .30'06 is never a mistake." - Colonel Townsend Whelen
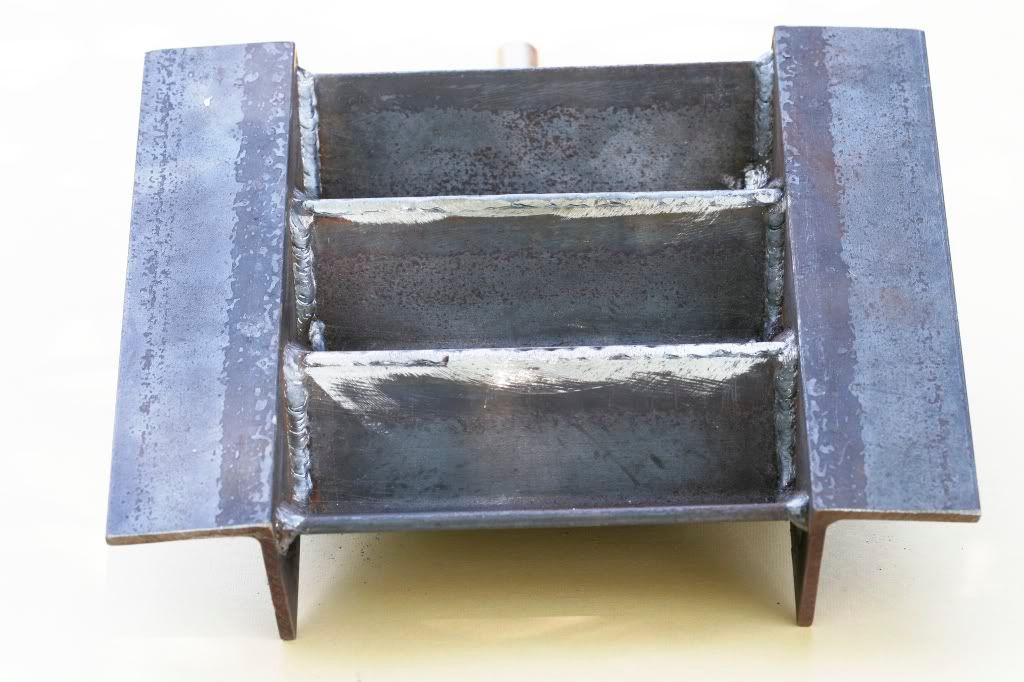
Here is a picture of my latest ingot mould I had my welder friend make up for me:
You will note that it is welded inside, very little "cleaning up" was necessary and the "legs" have a bit of draft that allows easy release of the ingots. I have NO problem using these at all (I now have three of these).
FWIW
Dale53

We had this one built to hold approx 10 pounds per slot and sized to fit into a 20 pound pot. Total of 5 slots makes 50 pounds per mold dump, which is about right to keep up the production speed required. The error in calculation was not taking into consideration the work involved in filling the mold using a 20 pound capacity ladle. The ladle should have been sized more like having only a 10 pound capacity. ... Sundog and Felix
Last edited by felix; 06-12-2011 at 11:01 PM.
felix
This is how I made mine.


mine follows the dale rule except i went with 8 v's and only 8" across and the welding is on the outside not the inside.
figure if i had any leaks thats what j.b. weld is for.
i went with 8 because it fits comfortably on my smelter between the two pots and i don't gotta bend over.
i make a lot less mess now. and each one holds two lbs nicely,same as my ladle.
they also fit in the 10 lb pot at 1-1/2"


Mine are a lot like Dale's but I sure do like Kevin's. My ladle is a two pounder and my ingots drop at 2 lbs. They are about 4.5"X2" angle iron with one end cut at the angle that a penny underneath the one ends provide. My first one was straight on both ends and would sometimes have to be beat with a hammer to drop.
EW

3 degrees of draft angle is plenty. More doesn't hurt anything.
If you want nice clean smooth beads from a stick welder, then clean the scale off your stock before you weld it & try some Hobart 6013 rods. Get the ones that come in the little air tight plastic tube that keeps the moisture out, so that you will get fresh ones. You might be pleasantly surprised at how much your welding seems to improve. Just don't try to run that rod out of position. Like most rods with high deposit rates, this one will give you the best results when welding flat on a horizontal. Don't be shy about letting the flux puddle up. You're suposed to have big fat beads with that rod. If you weld them good & fat, you will be pleasantly surprised at how easily the slag comes off too.
�an armed society is a polite society.�
Robert A. Heinlein
"Idque apud imperitos humanitas vocabatur, cum pars servitutis esset."
Publius Tacitus
Here's what mine look like, I did all the welding on the backside with my wire welder. It doesn't have to be a full bead, skip welding works fine.

You cannot discover new oceans unless you have the courage to lose sight of the shore
 Posting Permissions


| BP | Bronze Point | IMR | Improved Military Rifle | PTD | Pointed |
| BR | Bench Rest | M | Magnum | RN | Round Nose |
| BT | Boat Tail | PL | Power-Lokt | SP | Soft Point |
| C | Compressed Charge | PR | Primer | SPCL | Soft Point "Core-Lokt" |
| HP | Hollow Point | PSPCL | Pointed Soft Point "Core Lokt" | C.O.L. | Cartridge Overall Length |
| PSP | Pointed Soft Point | Spz | Spitzer Point | SBT | Spitzer Boat Tail |
| LRN | Lead Round Nose | LWC | Lead Wad Cutter | LSWC | Lead Semi Wad Cutter |
| GC | Gas Check |

 Reply With Quote