Pillar, I sent you another message.
Hey, all you guys that work in a machine shop, How difficult is it for a total novice that is at least handy to make a set of dies like Pillar did? What is involved, what books do I need to read? Thanks!

|
   
   
|


|


Pillar, I sent you another message.
Hey, all you guys that work in a machine shop, How difficult is it for a total novice that is at least handy to make a set of dies like Pillar did? What is involved, what books do I need to read? Thanks!
NO MORE CHANGE!
Mac, your last message was on the tooling required, did you get my reply?
No, the last PM i got from you was talking about the steel core and going through the concrete wall, on 8/13/09
NO MORE CHANGE!
There must be something quirky with the private messages, check if you got a reply on the tooling now.
How about sharing this information with all of us. I want to try to make a set myself. I have a lathe and an old mill......would have to outshop the heat treatment unless it's a simple heat it with a torch to caseharden (Kasenit) or quench/air cool.Originally Posted by pillardrill

This machining hobby is new to me......so how do you form the internal dimensions of the die....the bullet shape in other words.....and then polish the insides to a micro finish?
Looks to be a fun and interesting project.
I'm shufflin' thru the Texas sand..... but my head's in Mississippi
Hi Jumptrap,
I made a set in .355"
For the basic die:
First drill through with an 8.8mm drill.
Then bore (not drill) one end to 1/2" to take the nose former.
I casehardened the nose former, whilst I hardened the die and plunger (made of mild steel) by heating to cherry red for 1hr per inch of steel then quenching in sodium hydroxide solution.
I wear a raincoat, gloves and a military gas mask cos it's nasty stuff.
Ream with 9mm reamer. Note that the die blank will expand after quenching. So the reamer will only take off a gnat's hair.
Polish with grit paper to obtain a nice finish. Beware not to exceed .355"
Nose former is cut from a 1/2" bar, drilled part way and a boolit nose point made with a d bit.
I caseharden the nose former.
To avoid cracking (and if this step is not followed, crack it will) then shrink fit a piece of tubing around the die.
The plunger is made out of a 9mm rod and hardened as per the die. The plunger must be a push fit into the die hole otherwise the jacket material will flow into any gap. There is a trick to avoid this but it will wear the die out and making the boolits is more laborious.
How about that, if you need any more info just ask.

pillardrill, I love your innovative thinking! I'm into the paper patching thing but am interested doing a final swage of the prime casting, including adding a hollow point. Now with your concept, I think I can do it - including the plastic ball!
Ooooh.... ! I've jast had another idea! I'll go work on it and get back to you folks if it works.
Rest In Peace My Son (01/06/1986 - 14/01/2014)
''Assume everything that moves is a human before identifying as otherwise''
Pillardrill,
Way cool! Innovative stuff like this keeps me coming back for more.
Thanks for your comments folks, I agree this is a good place to get new ideas.
303 - can't wait to hear of your new idea and glad I have been of assistance.
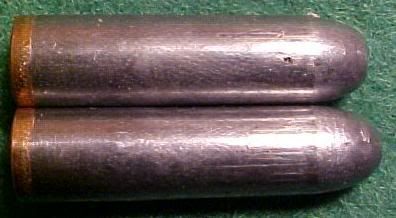
Hee hee! First off you got me thinking outside the box - I went and looked at what I had and made some new parts to come up with a two-diameter sizer then to a two-diameter swage die!303 - can't wait to hear of your new idea
The top one is swaged.
The next idea is still to come! (If it works).
Rest In Peace My Son (01/06/1986 - 14/01/2014)
''Assume everything that moves is a human before identifying as otherwise''
303,
once I tried my hand at paper patching as an experiment. I swaged the boolit then rolled it between a hard surface and a rough file. This produced a sort of knurling. The paper patch seemed to stick better to the bullet. Maybe you have heard of this procedure.
Yes, I have tried that but not range tested. I disassembled one yesterday and found the paper sticks to the casting maybe a little too much. Anyway, I am contemplating trying it again with my new boolit design, being a bore-rider, the rifling does not impress into the casting so the knurling may be needed to grip the boolit better.
Well, you have started me down a whole new avenue of fun! Take a look.
Swaged hollow point with opening partially closed. (Ejector punch needs work - it leaves a ring on the ogive which shows up worse in the pic).
This one is a re-formed fired boolit. Note how even the gas-check is reformed!
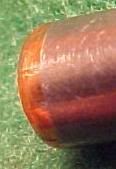
If you look carefully you can make out the transition between base shank and nose shank diameters.
Forming the hollow point - before and after.
I have long been interested in the idea of forming jackets using copper tubing. I just did not know it would actually work nor or how to do it. But right now I am enjoying experimenting with paper patching and the swaging aspect has opened up new prospects. What I like about paper is the polishing effect on the bore! Making bullets per s� opens up the possibility of custom fitting bullets to better suite the rifle. Swaging makes that so much more versatile.
So much fun to be had! Thanks for the inspiration, pillardrill
Last edited by 303Guy; 08-27-2009 at 06:31 PM.
Rest In Peace My Son (01/06/1986 - 14/01/2014)
''Assume everything that moves is a human before identifying as otherwise''
Nice looking boolits. The noses of my swaged boolits also show rings on them, cos I didn't polish the nose former properly. It was an experiment and it worked and I guess I didn't fancy making a new one.
I tried the paper patching to see if there would be rifling marks impressed on the core. Unfortunately I had a friend in forensics who could check if there were marks left on the core which he could compare with a normal boolit, but i am no longer in contact with him.
303,
it's strange that the rifling marks don't show on the gas check of the reformed fired boolit, or you replaced it.
I reform my fired boolits but you can still make out the marks.
Hee hee! You noticed that. Those are the same gas checks. I was pretty surprized myself!... it's strange that the rifling marks don't show on the gas check of the reformed fired boolit, ...
If you look real careful you can make out little lines where the rifling engraving was.
This is an attempt to zoom in a little.
Now the marks are visible. It's actually amazing how well the gas checks reform! I would never have thought it.
Rest In Peace My Son (01/06/1986 - 14/01/2014)
''Assume everything that moves is a human before identifying as otherwise''
303,
it is the same for me. They are only "shadows" and you cannot measure them, making them perfectly reusable.
I guess you would have a hell of a time getting a gas check off a fired bullet. Talk of marriage in a barrel
pillardrill,
My gas checks are cast in situ - I use them as the base plug on my nose pour molds. (I have to flare them a bit as I'm using 30cal checks to make oversize 303 boolits. My new mold just sits on a plate so I'm likely to stay that route if those boolits shoot straight - it's tricky fitting a gas check in a hot mold!)
Say, you know, I find it not exactly easy to make these small internal things like sizer dies and ejector punches. My two-diameter die was a mission to make and in the end the transition between the two diameters is wrong - I wanted it to be a lot more gradual to suite the leade angle. Oh well, I'll use it as is then one day I'll try make a new one - a challenge to look forward to. It's all fun!
Rest In Peace My Son (01/06/1986 - 14/01/2014)
''Assume everything that moves is a human before identifying as otherwise''
Hey Pillar!
Love the ingenuity! NICE DIY!
Anytime you can cut out unneeded steps in a process OR the middle man for that matter, and still have a great result, I'm all for it.
If a RockChucker would take the pressure, (and I know there are those of us out there who would know) would the operation go faster if the dies were made to work on one?
Think about it and let me know.
Caveape
I think the RockChucker can stand the force, but I am unsure if it is able to generate enough force. I have never used such presses always a screw or hydraulic press.
When I use a vise/hydraulic press the steps are as follows:
- refit nose former to die (by hand takes only a few seconds and no effort involved)
- remove plunger from die (just pull it out by hand)
- drop in a fresh slug in die
- replace plunger into die
- open vise and place loaded die in between jaws
- close vise and apply that extra force to ensure that slug has fully expanded into die
- open vise by about 1 inch
- place a piece of tubing on the side of the nose former (refer to previous posts on how to eject formed boolit)
- close vise so that plunger ejects boolit and nose former from die.
- start again
Basically the only innovative things in my setup is that it eliminates the following steps:
- forming the core
- forming/buying the jacket
- seating the core
the other innovative step is it eliminates the need of having something like the RockChucker.
I think you could fit a piece of annealed copper tubing filled with lead and try to form it into one of your dies. I do not guarantee that it would stand to the pressure if ever you can get it to produce the necessary force. I have cracked a couple of my dies when experimenting, they fell in my quest for knowledge
303,
I have an old Lithgow Mark III and wanted to shoot it for a few times just for the heck of it. It was FTRd with matching numbers.
All I had was .308"s which should have been fine, but the ten other voices in my head wanted me to make a few boolits in .311" so I designed a die that would squash a boat tailed 308 and form it into a flat based .311".
Sparing you the calvary of re priming the fired .303 brass and the making of the resizing die
Well it worked and grouped nicely.
The old warhorse is better left on the wall but it felt nice shooting a piece of history.
 Posting Permissions


| BP | Bronze Point | IMR | Improved Military Rifle | PTD | Pointed |
| BR | Bench Rest | M | Magnum | RN | Round Nose |
| BT | Boat Tail | PL | Power-Lokt | SP | Soft Point |
| C | Compressed Charge | PR | Primer | SPCL | Soft Point "Core-Lokt" |
| HP | Hollow Point | PSPCL | Pointed Soft Point "Core Lokt" | C.O.L. | Cartridge Overall Length |
| PSP | Pointed Soft Point | Spz | Spitzer Point | SBT | Spitzer Boat Tail |
| LRN | Lead Round Nose | LWC | Lead Wad Cutter | LSWC | Lead Semi Wad Cutter |
| GC | Gas Check |

 Reply With Quote