Yeah.
CAN'T YOU READ MY MIND?
Whats the matter with you!
Obviously 45*, that is 45 degrees.
It doesn't matter that I did not completely type it, or catch it when I proofread.
oops

|
   
   
|


|


Yeah.
CAN'T YOU READ MY MIND?
Whats the matter with you!
Obviously 45*, that is 45 degrees.
It doesn't matter that I did not completely type it, or catch it when I proofread.
oops

Hee hee! It could have been 40*.
But just seeing the 4* I thought I might be missing something.
Rest In Peace My Son (01/06/1986 - 14/01/2014)
''Assume everything that moves is a human before identifying as otherwise''
With my rifle, patched loads are not specific as to how they are cut. So far, I have cut straight, at angles, overlapped, underlapped, triple wrapped. I have had ripped seats, long tails, short tails, no tails. They ripped off. I have wrapped to nearly the tip, and wrapped so it just covers the crimp groove.
With the 40.4gns of 4895, they go where I point them. I get confetti at the muzzle. Same with my .30s.
What is fascinating about your pictorgraph, is they show real details. Money where the mouth is.
I was amazed at the details one can see on a pic. Hard to get the lighting right - that old camera is big and casts it's own shadow! I only get to see the details when I post the pics.
Now I am doing some tests to try to keep the patches on! Check this one out.

Rest In Peace My Son (01/06/1986 - 14/01/2014)
''Assume everything that moves is a human before identifying as otherwise''
Because I didn't go shooting today and because felt like trying things, I tried a single wrap tracing paper patch! Would you believe it seems to work!
That was the largest piece of patch I found.

Rest In Peace My Son (01/06/1986 - 14/01/2014)
''Assume everything that moves is a human before identifying as otherwise''


303guy:
Here is another link where this guy uses sinlge wrap for muzzleloader and minies:
http://members.shaw.ca/bobschewe/
I haven't tried this myself but it is an interesting article.
I think if the overlap is small enough, it shouldn't affect anything. It likely just gets crushed down flat. If it was half a boolit diameter then you might get an eccentric boolit going down the bore.
You are right about the detail in those photos. Very clear!
Longbow
Thanks for the link, longbow.
(I have a new mold design I would like to run past you - you might like it. It's a push-out, but different than yours. I think yours is brilliant!)
docone31 gave me a patch size to try and that is more or less how it came out. After sizing, it is as smooth as. But I wasn't sure I got it right and was going to ask him. That link now - that has given me an idea. How easy would it be to place a narrow sliver of paper under (or glued over) the patch on the opposite side of the boolit to 'ballance it? I used straight cuts so the patch wouldn't unwrap before chambering.
My single wrap above was created by wetting and gluing the tracing paper onto the boolit, then cutting a slit opposing the flush joint.I also took the patch just past the ogive so the air blast at the muzzle would get under it and force it off. Well, it cut to confetti anyway! It's another avenue to expler (and have fun with!)
Well, I'm finally going off shooting! I shall be testing a few patched loads of course. Nothing formal - going to a farm and it is raining.
Last edited by 303Guy; 06-16-2009 at 04:30 PM.
Rest In Peace My Son (01/06/1986 - 14/01/2014)
''Assume everything that moves is a human before identifying as otherwise''
And did it rain! It stopped raining and cleared up long enough to have a quick, muddy shoot! I could not lie down and all that so I used a gate post for a rest. Not the best. Still, I did have success.Nothing formal - going to a farm and it is raining.
I loaded up two test batches with two 'step up' loads between. The patch was folded over the base. the boolit bases were then dipped into waxy-lube and seated. That held them firmly.
The first test was with 35gr AR2209(H4350) under a 245gr PP boolit.
Those hit point of aim and the accuracy was consistant with my poor rest.
Then I fired the two 'step up' loads which showed me that my next batch was going to be warm but safe.
The second test really impressed me!
37gr AR2209(H4350) under a 245gr PP boolit.
Was I shooting better or were the loads more accurate?
These boolits were two-wrap patched the way docone31 suggested.
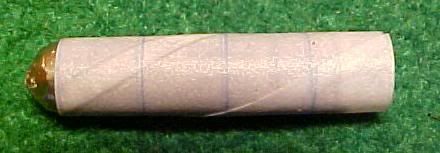
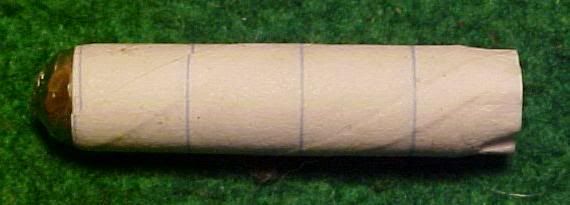
My next test will be with single wrap writing pad paper - but with a twist.
Litterally! Have a look -
Dried
Here one can see what I have done.
Last edited by 303Guy; 06-14-2009 at 05:55 PM.
Rest In Peace My Son (01/06/1986 - 14/01/2014)
''Assume everything that moves is a human before identifying as otherwise''
You need more to make a tail.
They do not come off in the barrel that way. Make your patches a little longer on the casting.
Lookin good though.
Thanks. The tail was still wet in the pic - I added a 'dry' pic. I leave enough tail to twist and fold, just closing the hole on the base. I do it that way because I find the paper too weak to twist wet. I have test tube fired a few with patches wrapped flush with the base. The boolit taper prevents the patch coming off. But not for field shooting where I will not be inspecting the bore after each shot!
Oh, I was getting nice confetti which glissened in the sun, floating down in a 'shower'!
Rest In Peace My Son (01/06/1986 - 14/01/2014)
''Assume everything that moves is a human before identifying as otherwise''
One of my test loads was giving me quite a thump on the shoulder. I had forgotten what the load was and when I looked it up it turned out to be quite healthy! These did not not shoot straight but at around 160yds, the boolits showed no sign of yaw. I also discovered I had mixed several boolit types so now I don't know if it was the patches causing the problem or different boolits! Oh well, I'll just start again!
Last edited by 303Guy; 06-15-2009 at 05:06 PM.
Rest In Peace My Son (01/06/1986 - 14/01/2014)
''Assume everything that moves is a human before identifying as otherwise''
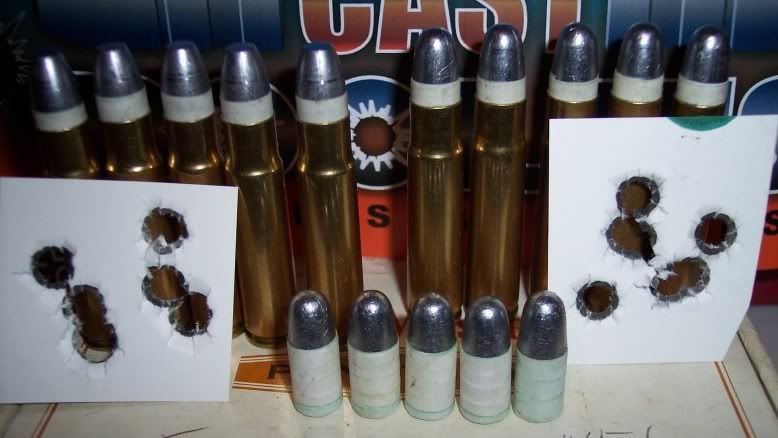
Have you folks had a look at 357maximum's thread "35 remington patched project"? His is a success story!
Here are two of his pics from his thread (with his permission - thanks 357).
See those neat groups!
The last one was clevely done by pencil-ing the throat area then chambering, to show how the patch engages the rifling.
Beauties!
Last edited by 303Guy; 06-16-2009 at 11:06 PM.
Rest In Peace My Son (01/06/1986 - 14/01/2014)
''Assume everything that moves is a human before identifying as otherwise''
Yeppir!!
I like. Indeed.
Mine are a little sloppier, but they sure work well for me.
When I first did it, I couldn't believe it! An old Cranky rifle, I had watched movies and they carried this one I have, paper patched boolitts! Exotic or what?
But, they worked!
I am not an hunter. I punch paper. Not real well, the bench resters near the wife and myself have started talking to us once in a while.
I do though get out of the routine, hit the range, eat some crappy range food, get hassled by the range officers who like my wife and myself. A day away from the routine with a crappy old rifle, shooting paper patched loads that work.
Can it be better than that!
I dreamt of doing this since I was a kid reading Jules Verne for the first time. In the third grade they had this very large book, "The History of Firearms". I was the only one who took it out. I used up the slots on the card pocket. I saw the Sharps and the paper patched loads, the Remington paintings.
Now, I also can wrap paper and make it work. Thanks to a few outreaching folks here, a patient wife, and keeping at it. I have probably done a couple of thousand so far. Now they are boring.
I got bad eyes, two stage triggers, torn rotator cuffs, but at 100yds I am pleased with my groups. Definately better than factory.
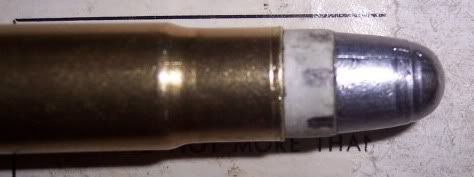
Just an update - I've already posted this a few times on other threads.
Spiral wound single wrap.
That's the bottom one. The top fired one is a double overlap single wrap.
And the fired boolit.
The significance here is that the patched stayed on in the bore and came off at the muzzle. I'm going to load up a few of these for range testing at full tilt. (The idea is to use my existing boolits).
Rest In Peace My Son (01/06/1986 - 14/01/2014)
''Assume everything that moves is a human before identifying as otherwise''
I have had a heap of fun trying out all sorts of different patches and papers and methds. A big fun factor is discovering the same things as other folks are already doing! BUT I STILL HAVEN'T DONE ANY BENCH TESTS!(What with job hunting and being ill and all that). But, I have acquired a lathe small enough to make molds and dies and the like so now I can start experimenting with boolit designs again (once the lathe arrives and is set up).
My latest 'test' was my "Disastrous PP test".
Rest In Peace My Son (01/06/1986 - 14/01/2014)
''Assume everything that moves is a human before identifying as otherwise''
 Posting Permissions


| BP | Bronze Point | IMR | Improved Military Rifle | PTD | Pointed |
| BR | Bench Rest | M | Magnum | RN | Round Nose |
| BT | Boat Tail | PL | Power-Lokt | SP | Soft Point |
| C | Compressed Charge | PR | Primer | SPCL | Soft Point "Core-Lokt" |
| HP | Hollow Point | PSPCL | Pointed Soft Point "Core Lokt" | C.O.L. | Cartridge Overall Length |
| PSP | Pointed Soft Point | Spz | Spitzer Point | SBT | Spitzer Boat Tail |
| LRN | Lead Round Nose | LWC | Lead Wad Cutter | LSWC | Lead Semi Wad Cutter |
| GC | Gas Check |

 Reply With Quote