That link isn't working for me. How well do these homemade controllers work compared to this: http://magmaengineering.com/products...ure-controller ?Originally Posted by kbstenberg


|
   
   
|


|


That link isn't working for me. How well do these homemade controllers work compared to this: http://magmaengineering.com/products...ure-controller ?
"The possession of arms is the distinction between a freeman and a slave."
James Burgh, Political Disquisitions, 1774


Should the link have been to the bradley smoker forums? that is what I get when I add a u to the above posted link. It does not come up with the correct thread but you can get to the forums.
is this the correct link
http://www.susanminor.org/forums/sho...ure+controller

I bought a cal 9900 controller, can anyone help me with what goes where?
Questions about the Heat Sink and thermocouple:
Will this work? http://www.radioshack.com/product/in...ductId=2102857
How do you install it? The guy on the Bradley forum says to press it against the SSR and then talks about JB Weld (but doesn't say what to do with it). Does the JB Weld glue the two together and transfer heat?
The thermocouples that I'm seeing on the Auber site (and others) look like some kind of a "short" fitting. What goes down into the lead? Also - if I have a thermocouple for each lead pot, can I then just use a plug on the end of the thermocouples to "quick disconnect" and move the PID to another pot or to a sizer heater?
"The possession of arms is the distinction between a freeman and a slave."
James Burgh, Political Disquisitions, 1774

Jim4065,
PID's are industrial grade. Building this unit will give you exactly the same results as the unit from Magma if your wiring and assembly is good.How well do these homemade controllers work compared to this: http://magmaengineering.com/products...ure-controller ?
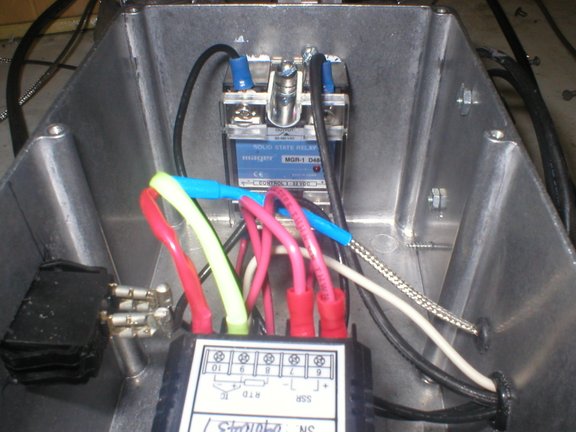
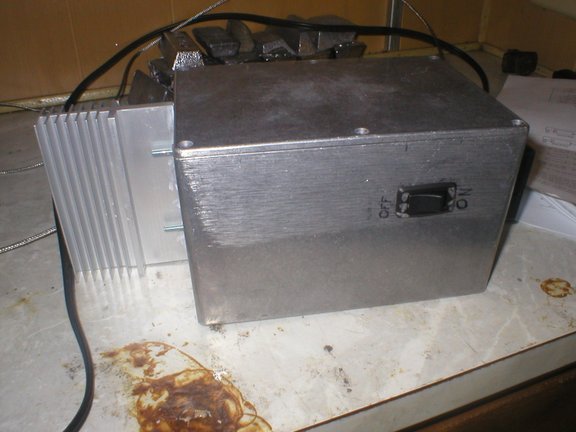
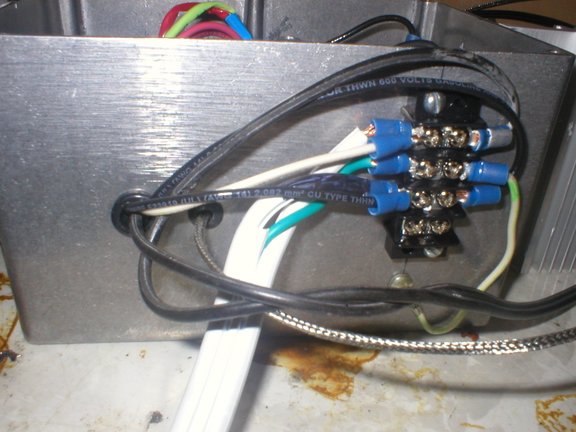
I ordered most of my parts direct from Auber Instruments, including the heat sink for the SSR (Solid State Relay). For those interested, see the list of items and prices below.
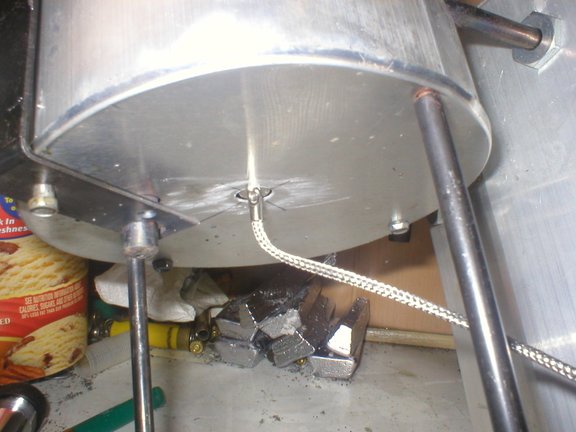
I think the reference to JB Weld is the attachment of the thermocouple to the smoker body. This could work in a smoker but won't work at the temperatures that lead melt at. See the thermocouple (The pointy thing with the lead coming from it) in the 3rd picture of this thread. The thermocouple is held in place by the articulated mount to the left of the pot.
I am going to be building a largish melting pot using stainless steel and 8" band heaters. I would have liked to just buy the Masterpot from Magma Engineering, but the cost is steep. (I also like challenges!)
I will post pics as I go.
Bliksem
Here is the list of parts from Auber:
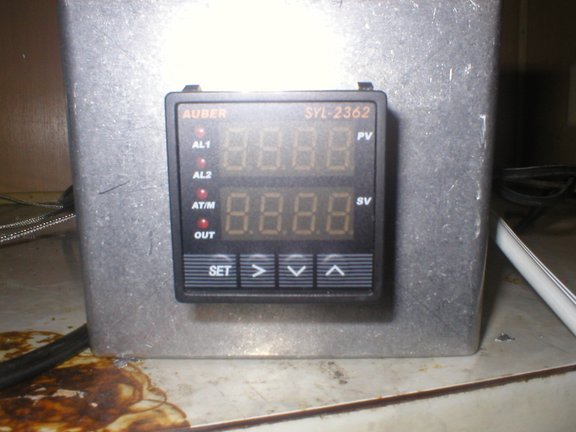
Universal 1/16 DIN PID Temperature Controller
Item# SYL-2362 $41.95
Panel mount connector for K thermocouple
Item# TCCON $4.90
K type high temperature thermocouple for heat treatment
Item# WRNK-191 $19.62
40 A SSR
Item# RS1A40D40 $19.00
Heat Sink for 40A SSR
Item# HS40 $18.50
Box for 1/16 DIN controller
Item# Pbox16 $28.67
Subtotal $132.64
blikseme300,
Thank you! The picture of the box showed the SSR mounted on the heat sink. Looks like all I need to add is some wire and connectors. The box is even pre-cut for the PID. I can cut wood pretty well, but struggle doing a good job with steel.
Jim
"The possession of arms is the distinction between a freeman and a slave."
James Burgh, Political Disquisitions, 1774
I used a heatsink for the output transistors from an old stereo amp. It's about 3" x 5". You need an area ~ 1 1/2" square for the SSR mount. I mounted the heatsink to the outside of the housing and only cut a hole big enough for the SSR to mount to it on the inside through the housing. The best part is you can't see my ragged cuts
No fan needed up to ~ 18 amp.
I also put my Thermocouple through the bottom of the pot.
You can use a brass 'compression fitting' (5/32) to get a liquid lead tight seal on the cheaper ( ~ $7 ) high temp TC from 'Aubor'.
That put the sensor 1/2" up in the melt. I can hold <1deg control and it reads true melt temp not the steel pot. Overkill?? Probably.
I added plugs for quick disconnect of the output and TC but if you use different pots ( or even if the heating element is different) the PID has to "Relearn" each time you change pots.
I use a 4# pot for pure lead, a 10# for 30/1 and a 20# for WWs - the wait isn't to bad but it can take 10- 15 minutes before control is stable to +-5d
See http://www.mpja.com/prodinfo.asp?number=16293+BX for a good project box. On a low power setup ( <7amp ) I bet you could just heat sink to the enclosure and add a few cheapo heat sinks to one end if it ran a little hot.
Last edited by Frozone; 10-18-2009 at 11:17 PM. Reason: bad spelling
Too late - of course - I read about something called "Heat Sink Grease". The guy at my local Radio Shack says he's never heard of it. Do I really have to use this stuff? Was thinking of trying Bull Plate Lube.
"The possession of arms is the distinction between a freeman and a slave."
James Burgh, Political Disquisitions, 1774
"you've got questions we've got answers". Famous last words. Heat sink compound should be known by anyone who biulds or works on computers. A very thin coating between the device and the heat sink aids in the transfer of heat. It shouldn't be that hard to find.
It is a (often white) heat conductive paste that aids in the transfer of heat between two surfaces. It can be found in small plastic tubes that look like toothpaste tubes but are only ~ 3/4" long. gun oil samples are often in a smillar package. They sent one with the heatsink, if you bought from Aubor.
Any computer repair shop would have it around in a larger amounts, it is used on the CPUs of PCs. I doubt they would charge you for a "dab", it doesn't take much, and there is always some left over from a CPU install.
BTW RadioShack does stock it.
Heat Sink Grease (6g)
Model: 276-1372 | Catalog #: 276-1372
This enough grease to last 30 years!!!!
It really does help make the heatsink effective, I would recommend using it, NOT BullPlate!
I'd be happy to mail you a sample tube.
Last edited by Frozone; 10-20-2009 at 01:43 PM.
Thanks Frozone. If Auber is sending a tube that will cover it. Appreciate the offer.
"The possession of arms is the distinction between a freeman and a slave."
James Burgh, Political Disquisitions, 1774
Got it all from Auber - fast shipping (and it oughta be, for $24). Kinda impressive (and intimidating).
Boldly press onward.
The heat sink is huge and brings up questions. Why a heat sink? Doesn't heat rise? (Except in Australia - and other such heathen countries south of the Equator.) Should I mount this "sink" with its SSR on the top of the box - hanging down like an avant-garde bat?
And as long as I'm asking questions - what does a terminal strip do for a living? You make it work by cutting a piece of wire, mounting the two ends to the the terminal strip and Voila! the wire is once again whole. Why cut the bloody thing in the first place? Just go from point "A" to point "B" and eliminate the middle man. Sorry if this is treading on sacred toes - no offense meant.
I'm having a good time with this. Haven't had a beer in 3 weeks (dry county) and the wife just bought me 4 exotic (erotic?) six-packs. Interesting how that stuff improves one's outlook...........
"The possession of arms is the distinction between a freeman and a slave."
James Burgh, Political Disquisitions, 1774
A heat 'Sump' is a good way of saying it too. Look up the more obscure definitions of a sink. Try to mount it with the fins oriented vertically, that way the convection (yes hot air rises) currents pull cool air along the fins best.
you want fins this way:
| | | | |
| | | | |
| | | | |
not this:
_____
_____
_____
I would mount it this way for best cooling.
http://liquidimagephoto.com/Images/mount1.jpg
If you just want a single wire run then you don't need to go thru it.
It can be used as distribution points for more complex circuits. If you need the same wire to go more than one place, it's better to wire it from a central location than try to daisychain or use a multiple connection 'wirenut' set up. You can cut Only that part of the circuit that you want rather than disconnect everything.
It also makes the use of a "wiring harness" Far less complex.
In some cases it is used as "Test Points', the component you need is hidden and to check things you use can use the ( labeled ) strip.
There are more reasons.
Last edited by Frozone; 11-12-2009 at 10:13 PM. Reason: Added Info


I came to this thread though the one Walker77 had on the cast boolits .
I now have mine put together, how did I do?
Thermocouple is into and through the bottom of the lee 20# pot. Similar to the way Frozone did his.
Now if I could just get the damn thing programed, I could see how it works!
The instructions that came with the PID are hard to follow. Maybe if I were an electrical engineer, I could follow their reasoning?
Wow, that looks nice. Mine still hasnt been put in a project box, its still kinda all over the place. On mine, to program it, i hold down one of the buttons then arrow up or down to my temp.
Thanks, walker!The pid isn't quite in all the way, if I ever get it to work, I'll make the hole a little bigger so it goes flush.
I've got the temp put in, it just won't heat or trigger the SSR. Does the polarity of the thermocouple have to be just right? I could try switching those wires to see if that makes any difference.
Red to + for the thermocouple.
To set:
start it up.
The arrow on it's side next to 'Set' is "scroll" it will move the digit being controlled. You can select the Hundreds and set that, then the tens ect. You don't need to go up/down in sequence with the up/down arrows. Look for the flashing 'decimal point' next to the digits in the bottom display window this is the 'active' digit.
Set your temp.
Melt at least 3/4 pot of lead.
while you wait for the lead to melt.
press and hold "SET" for a few sec. In all cases - if you don't do something (press a button) in about 10 sec it reverts to normal mode!!!!!!
you should see ALM1 in the top window and 100 in the bottom.
This is the process High alarm. I set mine at 825 , that warns me if the pot gets too hot.
press set - ALM2 in the top window, 50 in the bottom. This is process Low. I set mine to 650, it warns the pot is cold.
press set - Hy-1 = Deviation High Alarm - I set this to 15. I want to know when the melt is 15 above the set temp.
press set - Hy-2 = Deviation Low Alarm - I set this to 15. I want to know when the melt is 15 below the set temp.
< you can adjust when these 4 alarms trigger 1 line of 2 possible signals. I use a red neon light and an orange neon to provide visual warnings of out of range temps. >
press set - Hy = Hysteresis - I set this to .5 - this means the controller will attempt to keep the pot withing 1 degree of set.
press set - At = <0 - 3> set this to 1 to enable the "learning" mode. It will set itself to 3 after it's completed the learn session. when set to 3 it cannot be put in learn mode.
you can ignore the rest of the settings for now. Just let it be for a few seconds and it will go to normal mode.
When the lead is melted and the pot gets up to operating temp, press ( you may need to hold for a second or to) the "scroll" arrow until the display changes to learn mode.
After about 10 minutes it will complete the learn and start to control better and better. The longer you leave it on the better it does for temp control.
Last edited by Frozone; 11-12-2009 at 10:17 PM. Reason: added info
We have the same PID. This puppy is set up right by Auber - if you've got the same TC. I heat mine using straight power (Lee pot at 10) then plug into the PID and switch it on. The initial setting is 800 - just use the down arrow to lower it to 650 or whatever you want. Press and hold the button 'til the "Auto" light starts blinking - the PID will set it's own parameters. When it stops blinking you're cooking. Try it for awhile before messing with your own parameters - mine keeps pretty close to the set temp in the Waage (which has no thermostat). I will probably have to spend more time with it in the 20# Lee - right now I have too many variables changing to be sure of what's happening. The PID seems to have no memory - you have to re-set the parameters (auto or manually) each time you start it up. Or (high probability) I'm doing it wrong.
"The possession of arms is the distinction between a freeman and a slave."
James Burgh, Political Disquisitions, 1774
I just noticed something! What are you guys doing for Power for these??
You running 120 volt house current or something else to the controller?
Thanks frozone for the help. I'm using plain old 110 3 prong house current. I put the terminal block on the outside, much simpler, easier to get at.
Prevented me cutting a bigger hole in the box to admit the flat cord, and it's easier to make connections.
 Posting Permissions


| BP | Bronze Point | IMR | Improved Military Rifle | PTD | Pointed |
| BR | Bench Rest | M | Magnum | RN | Round Nose |
| BT | Boat Tail | PL | Power-Lokt | SP | Soft Point |
| C | Compressed Charge | PR | Primer | SPCL | Soft Point "Core-Lokt" |
| HP | Hollow Point | PSPCL | Pointed Soft Point "Core Lokt" | C.O.L. | Cartridge Overall Length |
| PSP | Pointed Soft Point | Spz | Spitzer Point | SBT | Spitzer Boat Tail |
| LRN | Lead Round Nose | LWC | Lead Wad Cutter | LSWC | Lead Semi Wad Cutter |
| GC | Gas Check |

 Reply With Quote
")