Load DataMidSouth Shooters SupplyTitan ReloadingWideners
Lee PrecisionInline FabricationSnyders JerkyRotoMetals2
Reloading Everything Repackbox
Results 1 to 14 of 14

Thread: Help with rebuilding a fishing knife.

  1. #1
    Boolit Buddy
    Join Date
    Mar 2017
    Posts
    200

    Help with rebuilding a fishing knife.

    Went to some garage sales this morning.
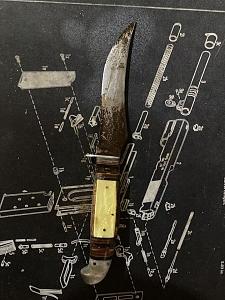
    Picked up this knife and was told I could have it for free.
    To say it needs some TLC is an understatement.
    I put some Kroil on the rust spots, my plan is to take it apart and replace the sales with wood.
    This is something I've never done before. My plan is to drive the pins out.
    Before I start I'm looking for a heads up on how to proceed.

    Click image for larger version. 

Name:	IMG_7097.jpg 
Views:	56 
Size:	47.7 KB 
ID:	326664

  2. #2
    Boolit Grand Master

    Join Date
    Mar 2013
    Location
    Northwest Ohio
    Posts
    14,653
    The hilt and back aree probably pins , but the scales could be headed rivets. Not a big thing replacing scales as the heads can be drilled out.
    What wood are you planning on using?
    I made a 3 piece pen pencil and scribe set with olive wood that was very nice. Zebra wood is a nice grain work but smells bad working it. Cherry can be nice as pear also. Walnut is a stand by too.

  3. #3
    Boolit Master


    TNsailorman's Avatar
    Join Date
    Dec 2006
    Location
    Northeast Tennessee Hills
    Posts
    2,677
    Depends on how you are going to use the knife. If hunting and fishing, I would put laminated scales on it. I nearly always used laminated because the knives I made were going to be hunted and fished with. If you have a drill press, I would used the screw style threaded pins and also glue the scales in place with a really good epoxy made for that use. I used both after dropping a knife on a concrete floor and having the handle pop off on one side. Epoxy is super strong except it has a low sheer factor. Laminated handles are easy to work and they buff out beautifully. Check with a knife making supply house and you can find a bunch of tools and supplies. my way anyway, james

  4. #4
    Boolit Master
    Join Date
    Jul 2009
    Location
    Central Texas
    Posts
    1,999
    Micarta makes a good handle and is almost indestructible. A lot of people also wrap handles in paracord using interesting patterns then seal with hard epoxy. I generally used mesquite or osage wood because I have quite a bit on hand.

    Lots of ways to skin the cat...pun intended.

  5. #5
    Boolit Buddy Rockingkj's Avatar
    Join Date
    Mar 2023
    Location
    Nebraska
    Posts
    426
    Looks like a Western brand knife. I would not remove the pommel (the aluminum butt). The yellow handle is pinned on. Since you not try to salvage them grind the heads of the pins and pry em off. If the spacers at either end are usable leave them in place. Measure the open spot in the handle and cut your handle material to fit the length. You can fit the handle several different ways. Either drill four holes (two to side) in the metal tang handle. Or cut a piece that fits the opening in the middle of the handle. You can drill two holes through that to pin the handle scales on. Get your scales close to the shape you want then and pin then on with brass of nickel silver pins the same size as the hole s you drilled. Put on one side and drill the holes and put the other side on and drill thru the side you just drilled. I would put pins through temporary and finish shaping the handle. When shaped take out the temp pins and put some in that are 1/16” proud on either side. To affix the scales tap the pins on either side to mushroom em a bit this will keep the scales from coming off. That was long winded and sounds like more than it is.

  6. #6
    Boolit Master

    Join Date
    Feb 2016
    Location
    Fl.
    Posts
    1,631
    Never seen a fishing knife like that. More like a hunting / skinning knife to me. Is the top back end of the blade nearest the handle grooved for a thumb rest?
    Whatever it is, it has a pleasing shape.

  7. #7
    Boolit Buddy
    Join Date
    May 2010
    Location
    SE Pa
    Posts
    196
    Who made the blade and what are the markings? Vintage knives are highly collectible so unless the grips are cracked or missing I would just clean up the blade and enjoy it. Besides, I like the look.

    If you want to start knifemaking or rehabbing old blades find some junkers with loose, cracked, or missing handles and fix them. Grips with 2 wood side scales are the easiest but knives like the one you have with the round sections of stacked leather are extremely difficult to get right.

  8. #8
    Boolit Buddy
    Join Date
    May 2010
    Location
    SE Pa
    Posts
    196
    Who made the blade and what are the markings? Vintage knives are highly collectible so unless the grips are cracked or missing I would just clean up the blade and enjoy it. Besides, I like the look.

    If you want to start knifemaking or rehabbing old blades find some junkers with loose, cracked, or missing handles and fix them. Grips with 2 wood side scales are easy but knives like the one you have with the round sections of stacked leather are extremely difficult to get right.

  9. #9
    Boolit Buddy Rockingkj's Avatar
    Join Date
    Mar 2023
    Location
    Nebraska
    Posts
    426
    The knife was made as a hunting knife. With the upswept blade it a skinner style blade. Appears to be rough enough and missing spacers in the handle certainly not going to hurt anything by replacing the handle.

  10. #10
    Boolit Buddy
    Join Date
    May 2010
    Location
    SE Pa
    Posts
    196
    Quote Originally Posted by Rockingkj View Post
    The knife was made as a hunting knife. With the upswept blade it a skinner style blade. Appears to be rough enough and missing spacers in the handle certainly not going to hurt anything by replacing the handle.
    Good eye. I thought the handle looked intact so disregard my comment. Except for the part about round stacked leather being a pain to get right.

  11. #11
    Boolit Buddy Rockingkj's Avatar
    Join Date
    Mar 2023
    Location
    Nebraska
    Posts
    426
    Quote Originally Posted by Delkal View Post
    Good eye. I thought the handle looked intact so disregard my comment. Except for the part about round stacked leather being a pain to get right.
    Your right on the “H” type spacers can be a pain but they can be made and when the handle scales are replace a bit a wedge fit to make em tight will work. With the pinned pommel I would leave that alone properly removing that and reinstalling the pommel correctly is beyond most.

  12. #12
    Boolit Master


    TNsailorman's Avatar
    Join Date
    Dec 2006
    Location
    Northeast Tennessee Hills
    Posts
    2,677
    Thanks for the memory jog Wooldridge, I could not think of the material I used so called it laminate. It was laminate but it was cloth and resin of some sort laminated togather to form the material called Micarta. It is almost indestructible. I am getting old now and the old memory doesn't operate as well as it did years ago. If memory serves me right they made laminate material out of both cloth and wood. I always used the cloth laminate. james

  13. #13
    Boolit Master
    Join Date
    Jul 2009
    Location
    Central Texas
    Posts
    1,999
    Quote Originally Posted by TNsailorman View Post
    Thanks for the memory jog Wooldridge, I could not think of the material I used so called it laminate. It was laminate but it was cloth and resin of some sort laminated togather to form the material called Micarta. It is almost indestructible. I am getting old now and the old memory doesn't operate as well as it did years ago. If memory serves me right they made laminate material out of both cloth and wood. I always used the cloth laminate. james
    Hi James…we all get by with a little help from our friends (was that a song?).

    Very nice cloth laminate can be made from old Levis. Glue, clamp, cure and cut to size…

  14. #14
    Boolit Grand Master
    Join Date
    May 2007
    Posts
    5,310
    When I apply scales, I first make the scales to fit, and then "fit" (clap) one side to the frame and drill the rivet holes through just the one scale with a slightly undersized bit. (Allows me to use the existing holes in the frame to match the new drill holes into the scale. Then I apply the second scale, clamp and then drill through the first scale into the second scale with the correct bit size to fit the rivets. Using an oversized bit, I just barely touch the outside of the scales to create a flare for the rivets to fit into. Glue, rivet & finish. Anyway - that's the way Ido it. YMMV. Good luck.

Posting Permissions

  • You may not post new threads
  • You may not post replies
  • You may not post attachments
  • You may not edit your posts
  •  
Abbreviations used in Reloading

BP Bronze Point IMR Improved Military Rifle PTD Pointed
BR Bench Rest M Magnum RN Round Nose
BT Boat Tail PL Power-Lokt SP Soft Point
C Compressed Charge PR Primer SPCL Soft Point "Core-Lokt"
HP Hollow Point PSPCL Pointed Soft Point "Core Lokt" C.O.L. Cartridge Overall Length
PSP Pointed Soft Point Spz Spitzer Point SBT Spitzer Boat Tail
LRN Lead Round Nose LWC Lead Wad Cutter LSWC Lead Semi Wad Cutter
GC Gas Check