You should be going by the feed chart, not the threading chart to set your feed. (I hope you are not engaging the half-nuts for longitudinal feed!) I use .007" for roughing cuts and what ever works for finer finish.

|
   
   
|


|


You should be going by the feed chart, not the threading chart to set your feed. (I hope you are not engaging the half-nuts for longitudinal feed!) I use .007" for roughing cuts and what ever works for finer finish.

Well…I will admit that I may well be using the tool incorrectly. The best clue for me is that I do not know what you are asking.Originally Posted by jdsingleshot

I only have one “chart” and that is above the two shift levers that control the feed screw speed. That chart does have two sets of numbers for each set point and maybe the smaller (in actual size) number is what you are referring to? The smaller number did not seem to be correct for actual travel, so I disregarded it. Maybe at my peril.
I do not have any sort of instructions for this tool and basically, I just started moving levers until I made the carriage move in the direction I wanted it to move.
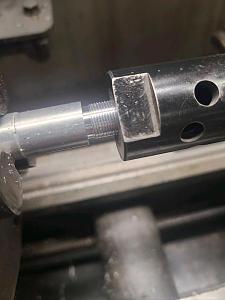
There is a sort of crown looking knob that is segmented with four? major numbered lines with half ticks between that does not move when I am traveling currrently. I think that is the part that rotates when you are threading and want to return to a home for the next pass. This makes me think that I am not using the threads on the feed screw but the key way. The lever that I use to start and stop travel is the red one at the lower right in the picture. Behind the knob is the segmented indicator dial/knob that is not moving. There is another lever that start/stops crossfeed travel. There is another three position lever that I do not remember just what it does, but it is set to the center position now. Am I getting warm?
Ahhhh…Ignorance, it is vast…luckily I have a great team of mentors here.
Last edited by corbinace; 02-04-2024 at 12:50 AM. Reason: Picture and more description
Hello corbinace,
As long as your not getting any chatter your doing good.
Light cuts are the hardest to do, deflection is an issue.
Rememner a piece of 320 paper will easily remove a couple thousands if needed.
AntiqueSledMan.


Check vintagemachinery.org for info on your lathe. They may have a manual for it on their site.
NRA Life 1992
My avatar is almost a dead ringer for my little buddy Chico. Six pounds of mean that thought he was a Pit Bull. Miss that little guy.

To convert the threads to feed thousandths per revolution divide the threads per inch into 1. your 112 threads per inch are equal to .0089 per revolution feed.A lot of these little early gear box lathes only had the threads per inch on the chart.The little wheel with 4 marks tells you when to engage the half nut when threading so it catches the thread every time. some lathes what threads determine the number to engage on. But if you engage on the same number every time its good.
Yes, I was using the half nut Assyrian for feeding. I found another lever to engage the feed without using the brass half nuts. Thank you JDsingleshot.
Slugster, I did as you said and found a somewhat abbreviated manual. Thank you.
Country gent, I looked again and the smaller numbers are printed and now I understand how the correspond, thank you.
AntiqueSledMan, I was doing without chatter until I started utilizing the other feed method and then the last few passes with the thinner barrel, the chatter started. I was to the very end of the cutting so I just tried to minimize it with a piece of wood against the work and used a file to clean it up at the end.
Last edited by corbinace; 02-04-2024 at 05:51 PM.
As the barrel gets closer to finished size ( smaller) it wont be as stiff over the length and chatter will become more of an issue.
I finished cutting the barrel insert to fit the shotgun barrel this morning.
It was pointed out that I had made a 90degree shoulder on the forward face of the rim. I will need to give it a bit of a trim when I get it back in the lathe.
That is the nice thing about turning between centers, you can take it out and try it as many times as you like.
I am going to get a small piece of stock and try to learn how to thread 1/2”x28 pitch threads next.
When I get it down, I will go back to the barrel and thread it. I have a bit of extra barrel to make a mistake if that happens.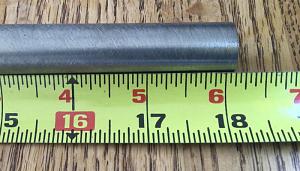
Last edited by corbinace; 02-04-2024 at 07:41 PM.
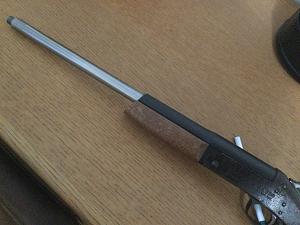
The hand guard that came with this barrel is already cut off to five inches long.
I think I may cut the barrel and hand guard at an angle like this ala Weatherby.
The barrel is stainless and the portion that sticks out will remain silver. Any opinions?
Im assuming you mean 1/2". threading isnt that hard set your gear box and run slow to start the carriage is going to be moving .036 every revolution. leave plenty of room at chuck and tail stock for tool.
Set compound to 29 1/2*
set gear box to 28 tpi
set tool with fish tail to true and on center.
Coat part with lay out ink or marker
set cross feed to zero touch of lightly with compound and zero it.
take a .002 scratch pass. check with thread gauge.
Use cross feed only to back cutter out. keep track of turns you back out, carriage back to start set cross feed back to zero
feed in on compound this will feed the tool so the back dosnt cut only the front..
On your fishtail/center gauge should be the double depth of various thread pitches. divide this by 2 and when the compound gets close to it start checking.
Chamfer the front of the piece with the edge of the threading tool and if you can cut a thread relief at the back of the thread for the tool to run into a cut off blade 3/32 or 1/8" works good here.
I had to take a bit of a break due to work and waiting for tooling.
I got to work on it yesterday but could not get it set for 28tpi due to a gear being in the wrong place and I could only get 14tpi. After getting a bit of help, I was able to move the gear and cut 28tpi.
This morning I cut two practice muzzle threads on aluminum scrap. I think I am ready to go to the barrel now.
Last edited by corbinace; 02-11-2024 at 09:38 PM.
I have to take a pic of the thread chart on my lathe then set it. From the chair I cant get low enough to read it.
Dust the tops of your threads with a file or turn them .005-.008 undersized to leave a small flat on the crest. Either will break that sharp edge. The actual dia being dead on isnt that important as it locates and sets off the vee faces. a little gap at the tops of the thread isnt a big deal.
I use a 8" fine swiss file to just clean up the crests to a nice fine flat.

A 24 TPI thread and 28TPI thread are not compatible. Is this a typo?
Thank you for pointing that out country gent. I had started out with a true 0.500". The bit I was using had a bit of a rounded point so I had to cut a bit too deep to get it to allow the device to thread on as well. This would have left the major diameter a bit small and caused the crests to be pointy.
I did two of the threads. The first one going from right to left and then the second one with the machine running in reverse and the tool turned over and going from left to right and running off of the muzzle end instead of having to be so precise in stopping before crashing.
In retrospect, I guess I need to do another practice or two as I have a different thread cutting tool that utilizes a carbide insert. I have not used it yet and it will require a bit different tool post setup. This insert should make better threads than the tool that I was using today.
I do have enough barrel length to make two or three attempts, but one time would be better.
Last edited by corbinace; 02-11-2024 at 10:08 PM.
Thank you for the heads up on the typo Hannibal. I had been dealing with a missing 24T stud gear and had a brain/finger deficiency while typing on my phone for that post. I have it fixed now, both the typo and the missing 24T gear.
The small radius makes the tool much stronger, and isnt an issue since most threads are tapped to 75% - 80% threads. The other thatt can give fits threading is a tool with out enough relief. A threading tool moves faster so the relief needs to accommodate this, at 28 tpi the tool is moving .035 per revolution the cutting relief on the side need to reflect this or it rubs at some point.
It has been a while since I checked in, but I have made a bit of progress.
I was able to get the muzzle threaded on the second try. Luckily, I had a bit of extra barrel to work with.
That is scotch tape just behind the threads to protect the shiny SS on its many trips into the stub and out.
Today I was able to get the breach end cut off and trimmed down to flush with the stub so it would close nicely.
Then I got the barrel chambered for 32 S&W and actually launched a projectile down the tube. I chambered it for the shortest of the family, as sort of a trial run on the chambering. It may never make it past the next step of 32 S&W long, not really much need for what I want it to do.
Here it is in a semi assembled form. It still needs the wood cleaned up and barrel glued together. The barrel is SS, so it will stay light.
The thread looks very good nice flat on the crest,vees look good no chatter showing. The thread relief looks good. How is the fit
When the thread is cut to size and everything is set up run the compound in another .020-.030 and just touch the front of the threads to give a chamfer to them. then the same in the thread relief makes the starting easier and the first thread stronger. It also keeps the sharp edge from wearing the threads faster.
The threads look very good.
When last we talked, I had just gotten the barrel fitted to the chamber and test fired it just to have the satisfaction of hearing it go bang.
I did not talk about how I chambered the barrel and I think I should write a few words about that.
I used a normal straight reamer of 0.341" for the chamber and a #6 spiral flute taper pin reamer for the throat. The method of getting the reamer the correct depth involved measuring the reamer diameter and adding the case length and marking the reamer for a stop at the breach. All very scientific, I assure you. I made the largest diameter of the throat 0.314".
I am held up waiting for a 6-48 tap at the moment to install the EGW scope base. I tried to use two tiny dabs of epoxy to hold it on temporarily and use it for a drilling guide. I wanted to only use a little bit so I could get it off in the future. Yep, you guessed it...temporary was the operative word...Too temporary.
That does bring up a question though. before I broke it off, I was having a hard time getting the scope to open up with any sort of cheek weld on the shotgun stock. It is the lowest mount possible with this optic.
However, If I rolled the mount over about ten degrees to the right, moving the Centerline of the scope to the right maybe 1/4" I was able to get a better view. Can anyone see any reason to have the scope mounted perfectly on the centerline of the bore? Yes, I do know scope adjustments will be more challenging. Weren't some of the early sniper rifles mounted off to the side?
Anyway, I went ahead and stretched the chamber all the way out to the 32S&W LONG. Yes, I know that the recoil will be fearsome in this seven-pound rifle, but being the manly man that I am...I am unafraid of that massive recoil.
I have loaded up a few of three types of fodder for group tests when I get my tap and then scope mounted. They are;
85 grn GC without GC .314"
135 grn flat point .311"
155 grn spire point .309"
Just a few of the random projectiles on the shelves.
I will try to fill in the pictures from my phone...STBY.
Last edited by corbinace; 02-29-2024 at 12:49 AM.

I just was gifted an old 12 ga. Essex single shot from a cousin. It needs some stock work but may make a rifle out of it. It’s got a very large firing pin so it would be something low pressure with a rimmed case.
I do have an old 8 mm Mauser barrel with a good bore and might make a necked down 38 spl. to .323 plinker. It would be easy to make a D bit reamer to ream the chamber and I have a dies I could modify to load it. It would probably make more sense to just leave it a shotgun but I have so many already that I would not shoot it ?
Jedman
 Posting Permissions


| BP | Bronze Point | IMR | Improved Military Rifle | PTD | Pointed |
| BR | Bench Rest | M | Magnum | RN | Round Nose |
| BT | Boat Tail | PL | Power-Lokt | SP | Soft Point |
| C | Compressed Charge | PR | Primer | SPCL | Soft Point "Core-Lokt" |
| HP | Hollow Point | PSPCL | Pointed Soft Point "Core Lokt" | C.O.L. | Cartridge Overall Length |
| PSP | Pointed Soft Point | Spz | Spitzer Point | SBT | Spitzer Boat Tail |
| LRN | Lead Round Nose | LWC | Lead Wad Cutter | LSWC | Lead Semi Wad Cutter |
| GC | Gas Check |

 Reply With Quote