RepackboxMidSouth Shooters SupplyInline FabricationLee Precision
Snyders JerkyReloading EverythingWidenersTitan Reloading
RotoMetals2 Load Data
Page 1 of 2 12 LastLast
Results 1 to 20 of 24

Thread: Another Project: US M1842

  1. #1
    Boolit Buddy
    Join Date
    Nov 2022
    Location
    Minnesota, US
    Posts
    150

    Another Project: US M1842

    Was determining which board to post this on, but determined that the Milsurp group would have the most positive outlook on how I’m going to proceed on this one. Picked up an M1842 this week on G-Broker (gee now I’m broker than I was). Advertised as a “very poor, 41” .695 Cal BP muzzleloader wall-hanger,” what I got was a very dirty but surprisingly good shape Harpers Ferry M1842 manufactured in 1850. And for less than what RTI is selling Carcanos right now.
    My plans: restore to an original configuration/condition. It’s all getting cleaned, the rust is coming off, and the stock is going to be re-extended to full-length. I think I’m going to try and fill-in the initials someone carved in the stock as well. It seems more consistent with the later sporterization than something done by a soldier, but does anyone have strong opinions why I should leave these? Already cleaned the stock and applied some boiled linseed oil to start the remoisturizing process. Will Post as things progress.
    Click image for larger version. 

Name:	A5265983-6681-4220-8007-4FCDCB73739C.jpg 
Views:	28 
Size:	39.7 KB 
ID:	320807
    Click image for larger version. 

Name:	6C934BDB-9DF3-40DB-BC43-37A4A49B83AA.jpg 
Views:	32 
Size:	58.1 KB 
ID:	320808
    Click image for larger version. 

Name:	2DE6D897-E464-45D7-A891-0A98D1C7CF02.jpg 
Views:	33 
Size:	67.0 KB 
ID:	320809
    Click image for larger version. 

Name:	3BBBD029-D7BA-4F14-9760-40DAB4590292.jpg 
Views:	30 
Size:	61.7 KB 
ID:	320810
    The lock is in fantastic shape internally

    Click image for larger version. 

Name:	11D68C5E-113B-4E3E-876A-0C6884860F4F.jpg 
Views:	35 
Size:	59.5 KB 
ID:	320811
    Inspectors mark on the stock. There is a “JAS” mark under the buttplate as well. This is the wood after cleaning with hot water and Murphy’s wood soap.
    Click image for larger version. 

Name:	9BD54E59-DFA4-4EC4-9363-3782974A5B4E.jpg 
Views:	34 
Size:	53.4 KB 
ID:	320812
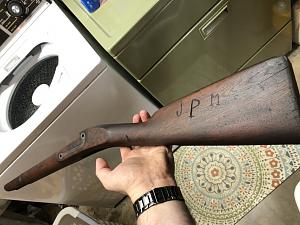
    And the initials carved in after oiling
    Click image for larger version. 

Name:	C2CAB8A2-EBB8-42B3-BC3E-D8976D043297.jpg 
Views:	35 
Size:	61.1 KB 
ID:	320813

  2. #2
    Boolit Master
    JSnover's Avatar
    Join Date
    Dec 2007
    Location
    Sicklerville NJ
    Posts
    4,382
    If "JPN" could be identified and you could glean some of the actual history of this piece, then maybe I'd want to keep them. If not, it wouldn't be wrong to fill them in. Without knowing the unit this rifle served in, it might be near impossible to figure out who he was.
    Warning: I know Judo. If you force me to prove it I'll shoot you.

  3. #3
    Boolit Grand Master WILCO's Avatar
    Join Date
    Jan 2008
    Location
    20 minutes from a Tiki Bar!
    Posts
    6,334
    I'd clean it up and run as is.

    Great job on the rescue!
    "Everyone has a plan, until they get punched in the face!" - Mike Tyson

    "Don't let my fears become yours." - Me, talking to my children

    That look on your face, when you shift into 6th gear, but it's not there.

  4. #4
    Boolit Master

    Dutchman's Avatar
    Join Date
    Nov 2005
    Location
    Siskiyou County, Calif
    Posts
    2,242
    The initials are post-war. The good fellow who was issued this musket had a first sergeant who would have beaten his backside with a leather strap for defacing gov' property. The initials belonged to the fellow who cut off the stock to make it lighter when out hunting Bambi, IMO. These m/1842 were issued during the Civil War.

    I would do minimal to the stock.Boiled linseed oil for about a month. I heat it up just so you can dip your fingers into the linseed oil to rub it into the wood. The smell will grow on you (and your clothes). Its a good test for your wife to be tolerant of your passions. Just keep repeating to her how wonderful and natural the smell of boiled linseed oil is and smile when you say it. Its organic!

    I've fired a m/1842 musket.

    Leave the initials.

    Dutch

  5. #5
    Boolit Buddy
    Join Date
    Oct 2015
    Location
    Stephens City, VA
    Posts
    235
    I've restored a few of these for N-SSA shooters. I would leave the letters as it is a part of the history and does not detract from it. Filling them would be a bigger detraction. It looks like you are fortunate that the rear band is intact. Splice the new forend under the rear band. Don't make a butt joint they are very weak. Make a tenon joint at least an inch long. I make replacement forends that you can buy thru S&S Firearms. Original bands are expensive and hard to find with a good front one going for $200 or so. Band springs are also hard to find. Good luck with your project.

  6. #6
    Boolit Buddy Rockingkj's Avatar
    Join Date
    Mar 2023
    Location
    Nebraska
    Posts
    382
    I agree leave the initials. Part of the history of the gun and filling/removing probably causes area that would not look right.

  7. #7
    Boolit Master
    JoeJames's Avatar
    Join Date
    May 2018
    Location
    Arkansas Delta
    Posts
    1,468
    I traded for a fairly minty Model 1861 - 1863 Norwich contract. It also had initials on it. Not a biggee, and I reckon I will leave well enough alone. I suspect they are of the period.

    Click image for larger version. 

Name:	Initials.jpg 
Views:	15 
Size:	41.0 KB 
ID:	320855
    Britons shall never be slaves.

  8. #8
    Boolit Buddy
    Join Date
    Nov 2022
    Location
    Minnesota, US
    Posts
    150
    Bly, I was going to buy on of those forends. Nice to see who they are made by, and thanks for the recommendation on joining it.
    Ok, time for some controversy: I’m giving all of the metal a bath in Evapo-Rust. Here’s the before and after test on the barrel band. My reasoning: the old parts are going to have to match the new parts I buy. I simply can’t afford original parts. I like the results though. Smooth finish, no etching, no pits, and no more rust.
    Before
    Click image for larger version. 

Name:	B08E18C2-A420-4869-90AB-231177F655D2.jpg 
Views:	14 
Size:	65.4 KB 
ID:	320885
    After
    Click image for larger version. 

Name:	E3D7BF19-6FEC-4394-BEEC-0E33B2855475.jpg 
Views:	13 
Size:	61.4 KB 
ID:	320886

  9. #9
    Boolit Buddy
    Join Date
    Oct 2015
    Location
    Stephens City, VA
    Posts
    235
    Here is what I mean by a tenon joint. This is one I repaired that had been done with a butt joint that had failed.
    Click image for larger version. 

Name:	Stock repair.jpg 
Views:	24 
Size:	38.8 KB 
ID:	320889

  10. #10
    Boolit Buddy
    Join Date
    Nov 2022
    Location
    Minnesota, US
    Posts
    150
    Taking it a step further, would it also be of benefit to have the pin of the band spring go through the tenon? The spring would be doing double duty in that case.

  11. #11
    Boolit Buddy
    Join Date
    Nov 2022
    Location
    Minnesota, US
    Posts
    150
    Mocking-up the parts minus the barrel, I think things are cleaning up nicely.Click image for larger version. 

Name:	74F5DAFF-017B-4FCA-9948-4CC4DCF518C0.jpg 
Views:	18 
Size:	59.3 KB 
ID:	320922

  12. #12
    Boolit Buddy
    Join Date
    Nov 2022
    Location
    Minnesota, US
    Posts
    150
    Barrel cleaned up fairly well, as did the ramrod. I have 2 inquiries though.
    1) I noticed the marks on the breach plug are off from the barrel by about 10 degrees. I believe the barrel was un-breached at one point and the plug not installed properly. Should I break it loose and align it properly? The barrel and percussion nipple will be at a slight tilt if I don’t.
    2) The ramrod is bent from years of floating freely the last 2.5 ft. How do I best go about straightening it?
    Click image for larger version. 

Name:	397FFBBC-34BB-476C-A438-082E9575A187.jpg 
Views:	9 
Size:	38.3 KB 
ID:	321113

  13. #13
    Boolit Buddy
    Join Date
    Oct 2015
    Location
    Stephens City, VA
    Posts
    235
    Yes, the breech plug should be installed properly. Be careful removing it. They can be stubborn but at least it has been out previously. A little penetrating oil and some heat may help. The ramrod is heat treated but can be bent without breaking it. If you have a lathe it will help identify the bend location. If not place it in a vise and bend it back straight. Don't expect to get it all at once. Take your time to get it straight enough to work. Rolling it on a flat surface will help identify where you need to bend it.

  14. #14
    Boolit Buddy
    Join Date
    Nov 2022
    Location
    Minnesota, US
    Posts
    150
    Went to Harbor Freight yesterday and bought a basic carving set and a combination mortise gauge. For reference, Bly, in your photo there is a separate tenon between the two forend pieces because this was a repair to a butt joint right? If starting from scratch the correct way would be to form a tenon out of one end and cut a mortise into the other? Should the tenon extend from the original stock then or the other way around?

  15. #15
    Boolit Grand Master WILCO's Avatar
    Join Date
    Jan 2008
    Location
    20 minutes from a Tiki Bar!
    Posts
    6,334
    Good thread. Enjoying the progress.
    "Everyone has a plan, until they get punched in the face!" - Mike Tyson

    "Don't let my fears become yours." - Me, talking to my children

    That look on your face, when you shift into 6th gear, but it's not there.

  16. #16
    Boolit Buddy
    Join Date
    Nov 2022
    Location
    Minnesota, US
    Posts
    150
    Took a drive to Track of the Wolf today and brought along the M1842. The plug is 3-degrees off, and the mutual conclusion is that likely it’s been in that way so long that it’s not going to leak any gases, and there shouldn’t be much impact to how it operates. The threads for the percussion nipple were too far gone to replace with the proper one, but they had an M9-1 threaded one that I can bore out the original hole a bit larger and cut completely new threads, and the threads should be safe. I also picked up some powder and .648 lead balls while I was there, so I may do a live fire test before the forend-extension takes place. 30 min drive and I saved myself shipping and hazmat charges, yay!

  17. #17
    Boolit Buddy
    Join Date
    Oct 2015
    Location
    Stephens City, VA
    Posts
    235
    Yes, I prefer to have an integral tenon. It makes no difference which piece it is on, it works the same. Sounds lie you are on the way to having a working gun.

  18. #18
    Boolit Buddy
    Join Date
    Nov 2022
    Location
    Minnesota, US
    Posts
    150
    Progress updates: patched the wood cracks and have 4 coats of BLO on it now. Ramrod is now straight enough. Here is a photo of it reassembled. Problem though: the nipple threads are sheared off and there isn’t a larger size available, though I did get a 9x1.5 from Track, it’s only wedged in there and not currently usable. I think my only option is to have someone machine the hole larger then weld in a threaded collar. Thoughts?

    One other concern: the wood seems fragile. I took an auto punch to it per my usual practice to make a divot to keep the drill steady when patching the cracks, and each time the wood broke through before the punch activated. That shouldn’t happen, though it was on thinner parts of the wood. Is that going to improve with more linseed oil absorption and curing?

    Click image for larger version. 

Name:	9CDC774E-E215-4E4F-9B8A-12AE930FCBA8.jpg 
Views:	17 
Size:	61.4 KB 
ID:	322408

  19. #19
    Boolit Grand Master


    GregLaROCHE's Avatar
    Join Date
    Feb 2018
    Location
    Southern France by way of Interior Bush Alaska
    Posts
    5,293
    Looks like you have a great project. However, I agree with the others who say not to fill in the letters. They may add to the valve and it would be almost impossible to fill them in, without it being noticeable.

  20. #20
    Boolit Grand Master

    Wayne Smith's Avatar
    Join Date
    Mar 2005
    Location
    Hampton Roads, Virginia
    Posts
    13,655
    Quote Originally Posted by TheAbe View Post
    Progress updates: patched the wood cracks and have 4 coats of BLO on it now. Ramrod is now straight enough. Here is a photo of it reassembled. Problem though: the nipple threads are sheared off and there isn’t a larger size available, though I did get a 9x1.5 from Track, it’s only wedged in there and not currently usable. I think my only option is to have someone machine the hole larger then weld in a threaded collar. Thoughts?

    One other concern: the wood seems fragile. I took an auto punch to it per my usual practice to make a divot to keep the drill steady when patching the cracks, and each time the wood broke through before the punch activated. That shouldn’t happen, though it was on thinner parts of the wood. Is that going to improve with more linseed oil absorption and curing?

    Click image for larger version. 

Name:	9CDC774E-E215-4E4F-9B8A-12AE930FCBA8.jpg 
Views:	17 
Size:	61.4 KB 
ID:	322408
    No. BLO does not completely polymerize. Minwax makes a wood hardner that is designed for rotten wood. Something like that is what you need.
    Wayne the Shrink

    There is no 'right' that requires me to work for you or you to work for me!

Page 1 of 2 12 LastLast

Posting Permissions

  • You may not post new threads
  • You may not post replies
  • You may not post attachments
  • You may not edit your posts
  •  
Abbreviations used in Reloading

BP Bronze Point IMR Improved Military Rifle PTD Pointed
BR Bench Rest M Magnum RN Round Nose
BT Boat Tail PL Power-Lokt SP Soft Point
C Compressed Charge PR Primer SPCL Soft Point "Core-Lokt"
HP Hollow Point PSPCL Pointed Soft Point "Core Lokt" C.O.L. Cartridge Overall Length
PSP Pointed Soft Point Spz Spitzer Point SBT Spitzer Boat Tail
LRN Lead Round Nose LWC Lead Wad Cutter LSWC Lead Semi Wad Cutter
GC Gas Check