Titan ReloadingLoad DataMidSouth Shooters SupplyRepackbox
Lee PrecisionWidenersInline FabricationReloading Everything
Snyders Jerky RotoMetals2
Results 1 to 15 of 15

Thread: Ideal #1 Lubesizer

  1. #1
    Boolit Master
    metricmonkeywrench's Avatar
    Join Date
    Apr 2016
    Location
    Virginia
    Posts
    1,108

    Ideal #1 Lubesizer

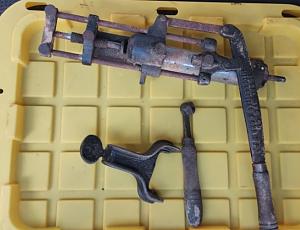
    Though I really don't need another sizer I picked up this little gem yesterday, it’s already out soaking in Pb Blaster, I think all of the thumbscrews are not seized so thats half the battle. Definitely need some TLC but seems to be salvageable and best of all it was complete. I’m not sure what top punch and die is in it, so that will have tho be the second thing to figure out when I start cleaning it up. My brief checks on the web shows this to be a second Gen #1 with the wrench and the chrome hopper. The first Gen had an old school water bib type 4 spoke handle as a wrench and the 3rd gen had a blackened hopper.

    Looking for a PDF of the instructions and any tips and things to look for.

    Click image for larger version. 

Name:	Ideal No1.jpg 
Views:	38 
Size:	53.8 KB 
ID:	319288

  2. #2
    Boolit Buddy
    Join Date
    Oct 2016
    Location
    So Cal
    Posts
    368
    I've rebuilt several old lube sizers. That looks like a fun project , good luck with it. Post pictures when you'r done.

  3. #3
    Boolit Grand Master
    Join Date
    Nov 2008
    Location
    Central VA
    Posts
    5,550
    That’s a favorite of mine as well. It’s not strong enough to swage bullets down 3-5 thousandths like some people try to do, but if you’re just truing up the bullet diameter a bit and applying lube, this old press really shines.
    Finding one complete with the clamp, the wrench, and the spider cap on the reservoir is becoming harder and more expensive all the time. You did well.
    Froggie
    "It aint easy being green!"

  4. #4
    Moderator Emeritus


    JonB_in_Glencoe's Avatar
    Join Date
    Mar 2010
    Location
    Land of 10,000 Lakes
    Posts
    15,877
    I have had a few of the Ideal #1 sizers. I sold a couple of them and kept the ugliest one with the most Bubba style repairs you've ever seen, but works perfectly. I use it exclusively for 22 cal boolits as it just has more finger space to deal with those tiny boolits and it doesn't take much pressure to size down a .228 down to .226
    .
    BUT, I'm not real crazy about having the handle at 90º but I made a 90º Bench adaptor to mount it to the bench, so the handle becomes oriented like the #45.

    Attachment 319348
    ~~~~~~~~~~~~~~
    “If someone has a gun and is trying to kill you, it would be reasonable to shoot back with your own gun.”
    ― The Dalai Lama, Seattle Times, May 2001

  5. #5
    Boolit Master
    metricmonkeywrench's Avatar
    Join Date
    Apr 2016
    Location
    Virginia
    Posts
    1,108
    A bit of an update, I slipped out of the house for a bit and got the #1 disassembled and some initial cleaning. What was interesting is that except for the rusted bare metal portions is that the Pb Blaster really did no good just sitting on top and did not seem to soften or melt the old lube at all. Thankfully the three handle/link screws were already loose and came right out. All of the thumbscrews except for the die retainer loosened up by finger pressure only and though some were a little tight but some oil and working them in and out a bit freed them up enough to be completely removed. The bridge and guide rods tapped out nicely despite the heavy corrosion on the rods and some steel wool cleaned them up pretty good bit there is some remaining rust staining and a pit here and there. The die retainer thumbscrew came loose with a some gentle aid from a tiny set of channel locks (out of my ignition wrench set, for those who know what points are), it was not seized per say but the old wax lube had hardened a bit keeping it from moving with just finger pressure. The Die turned out to be a 357 and the top punch is unmarked but appears to be for a flat top SWC and with a bit of persuasion with a plastic hammer broke free of the lube stiction and popped right out. The nickel plating on the reservoir and overall paint (japaning?) is in incredible shape for its age and with a bit more cleanup appears that I will opt to leave it original and not even attempt to refinish it.

    The last piece removed was the lube piston. It unfortunately appears to have fallen victim to the rookie mistake if being installed upside down and one locating pin hole on the brass “seal” was a bit oblonged and the other side torn out. A bit of file work cleaned up the top edge’s enough to sit properly on the piston and seems like it will still function properly I may try to locate a replacement. The two wooden handles are probably the worst for age related damage, the remaining varnish is in rough shape, but they are uncracked and should respond well to some cleanup sanding and a fresh coat of varnish. My next step is to warm up the die and reservoir with a heat gun to drain out the remaining old wax and hopefully recover what looks to be some good condition Alox based lube.

    Its exciting to now have all four versions of the Ideal/Lyman sizer and to see and have operational the progression to the lube/sizers from over the years. More to come…

    Click image for larger version. 

Name:	Ideal No1 in Pieces.jpeg 
Views:	21 
Size:	91.9 KB 
ID:	319354

  6. #6
    Boolit Grand Master
    Mk42gunner's Avatar
    Join Date
    Aug 2005
    Location
    Butler, MO
    Posts
    9,053
    Kind of astounding how well bullet lube preserves metal parts, isn't it? Another fairly common example is an old .22 rifle that looks like it was dragged behind a truck over twenty miles of gravel road then left to rust, but the bore is in perfect shape.

    I like seeing old tools put back in service.

    Robert

  7. #7
    Moderator


    Winger Ed.'s Avatar
    Join Date
    May 2007
    Location
    Just outside Gun Barrel City, Texas
    Posts
    9,708
    Ahhh,,, Looks like a fun project. Basically a diamond in the rough.

    Restoring it should keep you out of those crooked BINGO parlors for awhile.

    The only thing that might put some stress on ya is that it has a .357 die.
    Now you need to figure out if you 'need' either a S&W 686 or Marlin CB to with it.
    Last edited by Winger Ed.; 10-28-2023 at 04:58 PM.
    In school: We learn lessons, and are given tests.
    In life: We are given tests, and learn lessons.


    OK People. Enough of this idle chit-chat.
    This ain't your Grandma's sewing circle.
    EVERYONE!
    Back to your oars. The Captain wants to waterski.

  8. #8
    Moderator Emeritus


    JonB_in_Glencoe's Avatar
    Join Date
    Mar 2010
    Location
    Land of 10,000 Lakes
    Posts
    15,877
    Quote Originally Posted by Winger Ed. View Post
    SNIP>>>

    The only thing that might put some stress on ya is that it has a .357 die.
    Now you need to figure out if you 'need' either a S&W 686 or Marlin CB to with it.
    I like a bigger die for 357 mag
    I like the .357 die for 9mm.
    SO, maybe he needs a Marlin camp carbine
    ~~~~~~~~~~~~~~
    “If someone has a gun and is trying to kill you, it would be reasonable to shoot back with your own gun.”
    ― The Dalai Lama, Seattle Times, May 2001

  9. #9
    Boolit Master

    Eddie Southgate's Avatar
    Join Date
    Dec 2016
    Location
    Southern Middle Tennessee/ Hillsboro Alabama
    Posts
    1,180
    Last I checked Lyman still had parts for the #45 that fit the #1 .
    Grumpy Old Man With A Gun....... Do Not Touch !!

  10. #10
    Boolit Master
    metricmonkeywrench's Avatar
    Join Date
    Apr 2016
    Location
    Virginia
    Posts
    1,108
    Short update for all you nefarious enablers, once the decision was made to go the cleanup rather than restoration things moved pretty quickly. The process for the most part follows JonB's excellent sticky on the cleanup of 45's with the obvious differences. After a total disassembly except for removing the reservoir tube, I did try a quick twist by hand while it was hot from melting out the lube- no movement whatsoever so it was left in place. A lot of what looked like rust in the original picture (except the truly rusted guide rods) turned out to be clumps of Virginia clay all over. As this is actually in excellent condition the longest part of the cleanup was melting out the lube and sanding the handles. The .357 die was replaced with a .358 as I intend to use this with nice soft Alox on .38 Spl, I have yet to decide if it will be dedicated to the 158g LRN or the Keith 170g SWC for the rest of its life with me. The wooden handles got sanded down and are out drying with their second coat of spar varnish. The wood was really stained and didn't sand out as well as I hoped but they are intact and not cracked. I'm not sure what bullet the SWC top punch that came with it goes to, I tried a 170g Keith but the meplat was too wide to properly fit up inside. When I get some more time I'll poke around with the bullets I do have to see what fits.

    The downside from today was the lower crossbar thumbscrews, the threads appear to be unfinished in both thumbscrews closer to the knob part and I cannot get them to fully and cleanly thread into the crossbar enough to engage well with the guide rods. I went back out to the shop and tried out what I had. 10-32 seemed close but just didn't seem right, already forewarned I pulled out the thread gauge and sure enough they appear to be a 36tpi. The big blue smiley truck should drop off a tap and die tomorrow. Depending on how that goes all that's left is to get some new tubes of lube and possibly a replacement lube piston seal.

    All in all so far it has been an enjoyable diversion as I would peck away at it here and there between the Fall household chores.

    Click image for larger version. 

Name:	P Ideal No1 Part 2.jpg 
Views:	16 
Size:	90.7 KB 
ID:	319410

  11. #11
    Boolit Buddy
    Join Date
    Oct 2016
    Location
    So Cal
    Posts
    368
    Looks really good in that last picture.

  12. #12
    Boolit Master
    metricmonkeywrench's Avatar
    Join Date
    Apr 2016
    Location
    Virginia
    Posts
    1,108
    Ok folks more or less the end of this project, the blue smiley truck driver dropped off the tap and die set. 10-36 was spot on and the the gunky crunchy threads on the crossbar cleaned up real well and the thumbscrews were able to fully thread in and everything was assembled for the last time.

    Try as I might I could not get either thumbscrew to start in the die, so rather than letting perfection get in the way of good enough I decided to leave them alone. I did try the die on one of the known good thumbscrews from one of my 45's and it was real tight even though the thread pitch was correct and in fine shape- it was shaving off the bluing and somewhat truing up the old threads I stopped after a turn or two. I believe the die is cut to minimum so not much help for thread chasing.

    The last detail to correct if I choose to do so is the piston seal, as is it will work fine for the initial runs and I intend to have a replacement on hand for when I have to add new lube and if the seal decides to depart the piston when I back it off, nothing really exciting there. I may be able to use some #45 parts but the square head piston screw and fixed handle is what makes this model unique. As soon as I can get my hands on the a couple of tubes of new Alox it will be back in service.

    Based on a bit more research this is the "improved" version was produced around the mid 1940's, but I have yet to be able to find a reference for a production date range for the three versions.

    Click image for larger version. 

Name:	P Ideal No1 Part 3.jpg 
Views:	11 
Size:	47.0 KB 
ID:	319451

  13. #13
    Boolit Master
    metricmonkeywrench's Avatar
    Join Date
    Apr 2016
    Location
    Virginia
    Posts
    1,108
    Final update to close out the project. A replacement brass piston seal was procured and the baby food of off the shelf lubes was acquired and the reservoir filled. The final bullet choice is the 358495 wad cutter.

    After to sizing the first 50 I now see what Jon_B was getting at, after using the 45/450/4500's for so long the sideways handle feels funny to use and I can see why they made the orientation change for a forward handle design. The square drive pressure nut wrench also had a learning curve, with the newer units my ratchet generally is at the 3 o'clock position and nudged forward towards the bench to keep up the pressure. On this one it was awkward to use the same way and it performs much better over at the 9 o'clock side though I do miss the ratchet action.

    Otherwise it was a dream to operate and will be a welcome addition to the bench.

    Click image for larger version. 

Name:	P No 1 Final.jpg 
Views:	12 
Size:	45.3 KB 
ID:	321724

  14. #14
    Moderator Emeritus


    JonB_in_Glencoe's Avatar
    Join Date
    Mar 2010
    Location
    Land of 10,000 Lakes
    Posts
    15,877
    Very nice.
    I prefer a ratchet action also. about 10 years ago, I made adapter out of a modified 1/4 drive socket, so I could use a standard 1/4" Ratchet ...actually I made a few adaptors since some welding was required, I swapped my extras with fellow castboolit members. You can see the bottom half of the adaptor in my photo above.
    ~~~~~~~~~~~~~~
    “If someone has a gun and is trying to kill you, it would be reasonable to shoot back with your own gun.”
    ― The Dalai Lama, Seattle Times, May 2001

  15. #15
    Boolit Master
    John Wayne's Avatar
    Join Date
    Jun 2012
    Location
    Atlanta Georgia
    Posts
    504
    Thanks! I refer to this thread before I restore mine ;^)
    HOLLYWOOD Collector Left hawg 405#, right one 315#, had my elderly neighbors granddaughter treed and why I got the call. Both charged, one from 20' and one from 40'. Thanks to the good Lord and Samuel Colt I won. May God bless our Lawmen & Soldiers!

Posting Permissions

  • You may not post new threads
  • You may not post replies
  • You may not post attachments
  • You may not edit your posts
  •  
Abbreviations used in Reloading

BP Bronze Point IMR Improved Military Rifle PTD Pointed
BR Bench Rest M Magnum RN Round Nose
BT Boat Tail PL Power-Lokt SP Soft Point
C Compressed Charge PR Primer SPCL Soft Point "Core-Lokt"
HP Hollow Point PSPCL Pointed Soft Point "Core Lokt" C.O.L. Cartridge Overall Length
PSP Pointed Soft Point Spz Spitzer Point SBT Spitzer Boat Tail
LRN Lead Round Nose LWC Lead Wad Cutter LSWC Lead Semi Wad Cutter
GC Gas Check