Lee PrecisionLoad DataReloading EverythingWideners
RepackboxRotoMetals2Snyders JerkyTitan Reloading
Inline Fabrication MidSouth Shooters Supply
Results 1 to 7 of 7

Thread: NOE Primer Die Set to Remove Primer Dimples

  1. #1
    Boolit Master


    MUSTANG's Avatar
    Join Date
    Jan 2012
    Location
    Kalispell, Montana
    Posts
    2,768

    NOE Primer Die Set to Remove Primer Dimples

    NOE Makes a Die Set for preparing Large and Small Primer Cups for removing the impact dimple on the base of a spent primer; and to resize the spent primer cup before “Remanufacturing” the Primer. I have gotten away for using the term Reloading Primers because a search on the Internet results in what seems to be 20,000 ads on Primers; most of which are out of stock or often SCAM sites. For this and other Primer Posts I will attempt to use the term Primer Remanufacturing. When I purchased my NOE Primer Dies they came with no instructions; and I could not locate instructions on the Internet – So I experimented and came up with the process/es I describe in this thread.

    https://noebulletmolds.com/site/?s=Primer+Size+die


    The first step is to obviously collect spent primers from brass one has previously shot or from range brass pick ups. I highly recommend at the start that reloaders seeking to currently or in the future Remanufacture Primers – keep all spent primers collected in at a minimum four different containers. I use empty plastic Vitamin Supplement containers for this purpose. This will keep those thinner Pistol Cups separated from the Thicker Rifle Cups, and of course keeping Large Pistol primers separated from Large Rifle Primers is essential as the Large Rifle Cup is slightly “Taller” than the Large Pistol cup.

    Click image for larger version. 

Name:	Spent Primer Storage.jpg 
Views:	12 
Size:	39.4 KB 
ID:	313810

    I also take an additional step and sort out the “Brass Colored” primer cups from the “Shiny Silver Colored” primer cups for each of the Primer types. As an example; Remington Primers are all Brass colored, and CCI are shiny silver colored. Not sure this will be critical in the long run; but trying to reduce variables up front.

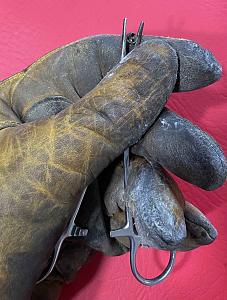
    The next step is the most challenging to ones patience; separating the anvil from the Primer Cup. I have tried using a vise, vise grips, plyers of a variety of types to hold the primer cup while removing the anvil, but have settled on using a set of Forceps to hold the cup. I wear a leather glove on the hand holding the forceps because I have pinched my finger or hand a couple of times. I also use the leather of the glove to help trap the Anvil when prying it from the primer cup. The anvils are prone to flying out rapidly and being lost if one is not careful. The Dental pick is used to get the point between one of the Three Anvil Legs, then to pry it loose. Some will fall out with a slight touch – others will be like breaking loose a 40 year old rusted tight bolt.

    Click image for larger version. 

Name:	Anvil and forceps.jpg 
Views:	9 
Size:	48.6 KB 
ID:	313811 Click image for larger version. 

Name:	Anvil and Dental Pick.jpg 
Views:	9 
Size:	32.8 KB 
ID:	313812

    Once the Cups and anvils are separated; I use an Harbor Freight Ultrasonic cleaner with water and a couple drops of dawn dish detergent and Lemishine for cleaning. I always clean the cups (Single type of cup LR/LP/SR/ or SP in each cleaning) in one session and the anvils in another session. This way I can ensure both are cleaned and remain separated prior to remanufacturing. I drain the cleaning solution off and dry on a n old towel or paper towels. Any cups still having any residue in them are scraped clean with a dental pick.
    Primer Cup processing is the next step. Over a few hundred primers I developed the following process. The “Repeated Steps” came to being because of slightly flattened primer cups, some thicker cups, a single press not fully removing dimples, or after dimple remover some primers having had side walls expanded outward. Any way, this is what works best for me:

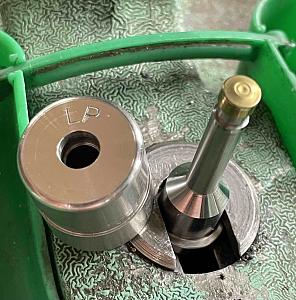
    1. Place Primer cup on top of the appropriate ram punch (The NOE set comes with a Ram punch and sizer for LR/LP and a Ram Punch and sizer for SR/SP cups).

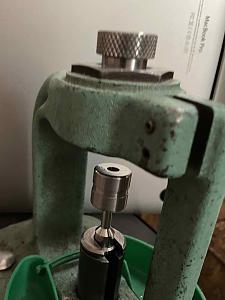
    2. Place the appropriate NOE Primer Wall sizer on top of the Primer cup sitting on the Ram Punch. I screw the NOE 7/8 threaded Bolt (Press Anvil) in only about 2 full turns; this allows the ram to almost fully cycle giving a greater pressure to Iron out the Dimple.

    3. Cycle the Press arm, pushing the Primer Cup through the die and then causing the Ram Punch to force the Cup against the 7/8 threaded NOE Bolt which as a small milled indent in it’s face. I lower slightly and rotate the cup 90 degrees and do a second activation of the Ram to ensure the dimple is ironed out.

    4. I lower the ram, remove the primer cup, and remove the NOE sizer die from the Ram Punch.

    5. I then seat the “De-Dimpled” cup on the ram punch once again, place the NOE sizer on top of the cup/ram punch once again and press the Cup through. I do NOT press the cup into the 7/8 bolt again as this could expand the wall of the cup – the cup sizing process is completed. Store processed cups in separate container (Pill bottles are good) for inserting Primer Compound into cups at a later time/date.

    6. Take another cup and repeat steps 1 to 5 again until all Cups are sized. Much quicker than it seems after one does a few and becomes accustomed to the process steps.

    Click image for larger version. 

Name:	NOE Cup Sizing.jpg 
Views:	12 
Size:	66.3 KB 
ID:	313814 Click image for larger version. 

Name:	NOE Cup Top Sizing.jpg 
Views:	12 
Size:	26.1 KB 
ID:	313816
    Attached Thumbnails Attached Thumbnails NOE Die - Upside Down RCBS Press.jpg  
    Mustang

    "In the beginning... the patriot is a scarce man, and brave and hated and scorned. When his cause succeeds, the timid join him, for then it costs nothing to be a patriot." - Mark Twain.

  2. #2
    Boolit Master


    MUSTANG's Avatar
    Join Date
    Jan 2012
    Location
    Kalispell, Montana
    Posts
    2,768
    Anyone else have their experiences to share or comments on the NOE Primer Resizing die set? I continue to use the Large Primer for Large Rifle primers; have not ventured into the Small Primer Cup for SP/SR primers.
    Mustang

    "In the beginning... the patriot is a scarce man, and brave and hated and scorned. When his cause succeeds, the timid join him, for then it costs nothing to be a patriot." - Mark Twain.

  3. #3
    Boolit Master
    Join Date
    Mar 2020
    Location
    Texas
    Posts
    591
    GOOD PHOTOS--What are the cost savings? I may be too lazy. How long to make 100 primers ready to load? Is the compound the exact amount for the primer? I have a couple of RCBS presses under the counter. What is the total cost of equipment/ I still have primers. Thanks for the post.

  4. #4
    Boolit Master deces's Avatar
    Join Date
    Nov 2012
    Location
    noyb
    Posts
    760
    Quote Originally Posted by 45DUDE View Post
    GOOD PHOTOS--What are the cost savings? I may be too lazy. How long to make 100 primers ready to load? Is the compound the exact amount for the primer? I have a couple of RCBS presses under the counter. What is the total cost of equipment/ I still have primers. Thanks for the post.
    The tooling to make it easy is about $250 in total, Lab gear and chems is probably about as much. Buy once, cry once kind of deal.
    These men and their hypnotized followers call this a new order. It is not new. It is not order.

  5. #5
    Boolit Buddy atfsux's Avatar
    Join Date
    Jun 2009
    Location
    Arizona
    Posts
    179
    Maybe this was covered in another thread, but how are you fabricating the lead styphnate or sodium azide for the primary explosive? Isn't ATF a little wound up about folks making their own batches of stuff like that?
    When democracy becomes tyranny, those of us with rifles still get to vote.

  6. #6
    Boolit Buddy
    Join Date
    Jan 2013
    Location
    Beattie, TX
    Posts
    254
    I've been using the NOE die set for about a year and a half. At first I thought "this is great" compared to the reamed-out .173" bushing I was using. But it wasn't perfectly round and my OCD forced me to buy the NOE set. I had some trouble initially because of the domed surface on the primer cup created a gap as much as .008" and larger between the anvil and inside of the cup. After experiencing numerous failure to ignite I stuck the die in my lathe and faced off the recessed cup. Then I chucked the ram and faced off the tip as well. Since then I have not had any problems. Another issue created by the domed primer is they would hang up in the primer magazine in my Dillon 550. As the primer arm withdrew from the primer magazine it would frequently drag out the primer above it. Very aggravating. I have recently gotten a set of primer sizing/reloading plates from a fellow over on the MeWe primer reloading site. Haven't used them yet but sizing 100 at a time appeals to me. And they do not produce domed primer cups. That is just my experience with the NOE dies. I'm sure there are many out there using them 'as is' with great satisfaction. NOE made those dies available at the behest of one of the major contributors on the MeWe primer reloading site. For the most part, it really "upped" our game.
    Last edited by mvintx; 08-10-2023 at 06:54 PM.

  7. #7
    Boolit Buddy
    Join Date
    Jan 2013
    Location
    Beattie, TX
    Posts
    254
    Quote Originally Posted by 45DUDE View Post
    GOOD PHOTOS--What are the cost savings? I may be too lazy. How long to make 100 primers ready to load? Is the compound the exact amount for the primer? I have a couple of RCBS presses under the counter. What is the total cost of equipment/ I still have primers. Thanks for the post.
    Once the chemicals are weighed and combined it takes me about 30 minutes for load 100 small primers. Cost? I bought my chemicals over two years ago when I got involved with primer reloading and I figure small pistol primers cost me about .0027˘ apiece. I round it up to $3 per thousand. Time consuming? You bet, but once you learn the trade you will no longer be at the mercy of greedy merchants or the government that wants to control you. You need to go over here; https://mewe.com/chat/thread/62e11c0571e66c0f6b6802c8

    ...instructional videos and "how to's"; https://aardvarkreloading.com/
    Last edited by mvintx; 08-10-2023 at 07:45 PM.

Posting Permissions

  • You may not post new threads
  • You may not post replies
  • You may not post attachments
  • You may not edit your posts
  •  
Abbreviations used in Reloading

BP Bronze Point IMR Improved Military Rifle PTD Pointed
BR Bench Rest M Magnum RN Round Nose
BT Boat Tail PL Power-Lokt SP Soft Point
C Compressed Charge PR Primer SPCL Soft Point "Core-Lokt"
HP Hollow Point PSPCL Pointed Soft Point "Core Lokt" C.O.L. Cartridge Overall Length
PSP Pointed Soft Point Spz Spitzer Point SBT Spitzer Boat Tail
LRN Lead Round Nose LWC Lead Wad Cutter LSWC Lead Semi Wad Cutter
GC Gas Check