RepackboxMidSouth Shooters SupplyInline FabricationReloading Everything
Lee PrecisionSnyders JerkyRotoMetals2Load Data
Wideners Titan Reloading
Results 1 to 12 of 12

Thread: How I make gas checks

  1. #1
    Boolit Master 44Blam's Avatar
    Join Date
    Sep 2017
    Location
    Nashville, Indiana
    Posts
    1,603

    How I make gas checks

    I have a revolver that shoots 10MM boolits and I found that if I shoot plain base boolits faster than about 1200 fps, I get leading in the barrel. Another funny thing about revolvers is that if I shoot non-crimp grove boolits in them with cases that are not full of powder, I get setback in the boolits and so it gives pressures that are not what was anticipated.

    So with 10mm in the revolver, I pick powders that will fill the case and most of these are slower magnum style powders. One exception is Trail Boss - that is really fun to shoot in the revolver.
    Anyway, I generally use AA#9 and a full case of that powder pushes my 180 grain boolit in the 1350 fps range. So, PB boolits with this charge do lead my barrel. There's one way to fix this: GAS CHECKS!

    I have a 40 caliber mold that makes a GC boolit and is a 180 grain it is the Accurate 40-180 BG. https://accuratemolds.com/bullet_det...ullet=40-180BG I had them make it without the lube grove since I PC / Hi-Tek my boolits.

    There is a major flaw with this though. It is not particularly easy to find 40 caliber gas checks.
    The solution here is to make my own.

    I start with 28 ga dead soft copper sheets, and then I cut strips for punching out disks. I have also used aluminum flashing, but it must be non-tempered! A while back I got a pretty good deal on a bunch of 6"x12" copper sheets, so I am still using those.

    Click image for larger version. 

Name:	01_GasChecks_Start.jpg 
Views:	47 
Size:	51.9 KB 
ID:	285484

    My Die is a Pat Marlin die and the width needed to make 40 caliber GCs is 1.5 cm. So, I mark my copper sheets and start cutting strips.

    Click image for larger version. 

Name:	02_Gas_Checks_Mark_Copper.jpg 
Views:	47 
Size:	64.3 KB 
ID:	285485

    I do check that I have the right sized strips before cutting a whole bunch of strips. I cut one and them make sure it fits properly in the die.

    Click image for larger version. 

Name:	03_Check_Width_Against_Die.jpg 
Views:	44 
Size:	47.1 KB 
ID:	285486

    After I've cut all my strips, I setup my cutting die. Today I am making about 650 checks, so I used 3 sheets and each sheet has 20 strips. I get 11 disks per strip so ends up being 660 except that occasionally I only get 10 in a strip and I also occasionally drop and lose one... I'll find these some time later and not remember which size disk it was - but that is another story.
    To setup this die, I screw the top into my press and then put the cutting die into the shell holder. Now this part is important. To align the cutting die I very carefully raise it up into the top part of the die watching very carefully to see if it is aligned. If the cutting edge touches any part of the top part of the die it must be rotated until it passes perfectly through the top without touching. Not doing this will damage the cutting edge! I also check the cutting die after each strip I punch disks out of because it will rotate and move while punching out disks...

    Click image for larger version. 

Name:	04_Setup_GC_Cutting_Die.jpg 
Views:	44 
Size:	45.0 KB 
ID:	285487

    One thing to note is that punching out disks from copper strips requires some force and will shake / rattle your work bench. This said, make sure loose items are moved / tied down / etc otherwise they will walk around your bench.
    Once my die is setup, I start punching out disks.

    Click image for larger version. 

Name:	05_Punch_Out_Gas_Checks.jpg 
Views:	42 
Size:	58.5 KB 
ID:	285488

    When punching out disks, occasionally the strip will bend/twist/etc. I raise up my ram and gently touch the metal to bend it back if necessary.

    Click image for larger version. 

Name:	06_Kiss_Metal_To_Straighten.jpg 
Views:	48 
Size:	48.3 KB 
ID:	285489

    After a while, I end up with a big pile of disks and it is time to start forming the disks into my actual gas checks. I raise the ram up into the top of the die and fix the cutting edge into the top with the included grub screw and then remove the grub screw for the forming part of the die. I also have a piece of aluminum that will push on the ejector rod to eject the formed gas check.

    Click image for larger version. 

Name:	07_Change_Die_To_Make_Checks_1.jpg 
Views:	38 
Size:	30.7 KB 
ID:	285490

    Click image for larger version. 

Name:	07_Change_Die_To_Make_Checks_2.jpg 
Views:	40 
Size:	35.1 KB 
ID:	285491

    Then I start forming gas checks.

    Click image for larger version. 

Name:	08_Checks_With_Disks.jpg 
Views:	48 
Size:	52.0 KB 
ID:	285492

    After a while, I've got a bunch of gas checks!

    Click image for larger version. 

Name:	09_A_Whole_Bunch_Of_Checis.jpg 
Views:	48 
Size:	49.4 KB 
ID:	285493

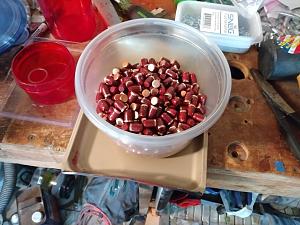
    And I have my boolits and their future gas checks.

    Click image for larger version. 

Name:	10_Checks_With_Boolits.jpg 
Views:	42 
Size:	70.8 KB 
ID:	285494

    The next step is to install the gas checks. I do this by installing them and then resizing my boolits to hold them on. The barrel on my revolver slugs right under 0.400" so I resize to 0.401".

    Click image for larger version. 

Name:	11_Lets_GC_Some_Boolits.jpg 
Views:	45 
Size:	84.9 KB 
ID:	285495

    At the end of the day, I've got about 650 or so 180 grain 40 caliber gas checked boolits! These guys will be loaded to full power at about 1350 fps. These are accurate and do not lead my barrel.

    Click image for larger version. 

Name:	12_GC_Boolits.jpg 
Views:	58 
Size:	70.2 KB 
ID:	285496
    WWG1WGA

  2. #2
    Banned

    tomme boy's Avatar
    Join Date
    May 2011
    Location
    Clinton, Iowa
    Posts
    5,200
    Very nice!

  3. #3
    Boolit Master AntiqueSledMan's Avatar
    Join Date
    Feb 2011
    Posts
    517
    Hello 44Blam,

    Good work, looks like a tedious job doing each step separately.
    I once started to build a single pass check maker,
    but lost interest in it and never finished it.
    I was going to use aluminum Printing Plates, about .007" thick.
    Always great to see how people get things done.

    AntiqueSledMan.

  4. #4
    Moderator Emeritus


    MrWolf's Avatar
    Join Date
    Apr 2013
    Location
    NE West Virginia
    Posts
    4,902
    Nice write up. Keep saying one of these days I can get back to reloading but just to much needs to be done around here first.

  5. #5
    Boolit Master Thumbcocker's Avatar
    Join Date
    Oct 2007
    Location
    East Central Illinois
    Posts
    4,513
    Thank you for the tutorial.
    Paper targets aren't your friends. They won't lie for you and they don't care if your feelings get hurt.

  6. #6
    Boolit Grand Master
    Join Date
    Oct 2009
    Location
    Northern Michigan
    Posts
    9,014
    I decided to buy the Plain Base check maker as wanted to use plain base molds for my .357 Mag's.

    They are formed from thinner stock and I bought a bunch of coils but have not tried them yet. Other projects were more important but nice to see how you manage your process.

    I find it curious that you are getting leading with PC bullets at such a low velocity. I do not PC but that is touted as one of the advantages of the process. I was torn between buying the PB check maker and trying PC but decided the check maker made more sense in my situation as I had over 15k cast bullets already lubed, and I wanted a process that could be done in the basement. I was concerned about off-gassing of the PC during the bake.
    Don Verna


  7. #7
    Boolit Master OldBearHair's Avatar
    Join Date
    Jul 2014
    Location
    Conroe TEXAS
    Posts
    671
    Does the .401 boolit push through the cylinder? (Cylinder throats need reaming?) Pulled boolit still .401? "but lost interest in it and never finished it." sounds like me. I have a one stroke die started with the bottom part finished, then my Chev Sonic has oil in the spark plug deep holes causing misfire . Then both back doors on my f150 2004 truck quit working three days apart. Got one door fixed yesterday and do the other today. Then, might get back to the gas check die for .357 primarily for 350 Legend. Made a swaging tool that fits in a "C" type press. Use boolits from 168 gr. to 220 grain and install gas check on the non concentric boolits and run them through the swaging process. Got to shoot a test group to see how they do. I plan to post pictures later.

  8. #8
    Boolit Grand Master

    gwpercle's Avatar
    Join Date
    Sep 2011
    Location
    Baton Rouge, Louisiana
    Posts
    9,298
    I wish I had seen this 40 years ago ... I would have been all over DIY Gas Check Making ...
    Don't shoot enough now , I was able to get in on a couple group buys , the prices for GC's were so stupid low ... and I had money ... I placed 4 big orders !!!
    Now my kids will have to figure out what to do with all the gas checks their crazy old man hoarded while he was alive .
    A check shortage is one thing I'm not worrying about ... I like to use them on 30 cal. rifles and 357 mag. , 38 spcl+P and 9mm Luger / Super cast boolits !
    Gary
    Certified Cajun
    Proud Member of The Basket of Deplorables
    " Let's Go Brandon !"

  9. #9
    Boolit Master
    Join Date
    Oct 2012
    Location
    Las Cruces, NM
    Posts
    4,560
    So far my PC bullets (.358, 140gn SWC plain base) do not lead my barrel. 4" .357 at just under 1400fps. Lyman #2 Alloy. I don't plan on going any faster with that gun so I am good.

    In the old days....(1980's) we played around with substitutes for gas checks. The most promising was poly wads. Back then they were not commonly available so we would cut our own. Usually 1/16" thick or close to that. I don't remember the diameter we used but it was about the same as the bullets. At least I remember I could just push a poly wad into the case, followed by the bullet. We also used straight wheel weight lead alloy, no heat treating or water dropping.

    FWIW, we got the idea of the poly wad from some of the cast bullet bench rest folks.

    PS a gas check making set in on my wish list. I still like them best for my rifle bullets.
    Last edited by charlie b; 07-02-2021 at 11:14 PM.

  10. #10
    Boolit Master
    Join Date
    Jul 2015
    Location
    Wilmington NC
    Posts
    1,455
    I recently got into the gas check game. I have a mini lathe, so I went with the one stroke check maker. I just bought a 7mm gas check mold, so I will be figuring out the dimensions needed for it.

    https://castboolits.gunloads.com/sho...gas-checkmaker

  11. #11
    Boolit Master 44Blam's Avatar
    Join Date
    Sep 2017
    Location
    Nashville, Indiana
    Posts
    1,603
    So, I have a range report. Please keep in mind, these are 10mm rounds I loaded a month or two back so they are blue vs the red ones I just made (and haven't loaded yet). But this was cool. I shot 100 rounds of these 10mm loads (Accurate 40-180 BG boolit, 14.3 grain AA#9 [full case]) - these guys going 1350 in a 4" barrel... So, my hands are tired and shooting all these double action in a GP100, my mind was tired...

    Anyway, when I went to repaint my target at one point, I found a couple gas checks...

    Here are a couple checks and a few of the boolits I was shooting.
    Click image for larger version. 

Name:	10MM_with_GCs.jpg 
Views:	26 
Size:	71.7 KB 
ID:	285676
    WWG1WGA

  12. #12
    Boolit Buddy Walstr's Avatar
    Join Date
    May 2013
    Location
    SE WISConsin
    Posts
    278
    Mr. 44BLAM:
    Great write-up. Thanks for your valuable time sharing your 'learning curve'.
    Last edited by Walstr; 07-09-2021 at 04:46 PM. Reason: clarification
    Been loading 6.5 CM for ELD, learning to load Mosin Nagant & .308/7.62x51
    Caster & CWW / Lead miner.
    Mountain Mold 45-70-405, 80% Meplat, sized .461" dia. for Marlin 1895GS
    Lyman mold #429421 "Elmer Keith" style 255gr, Dbl Cavity; [for .44 Mag, S&W 629, Alox lubed]
    Lyman #356402, 9mm, Sngl Cavity [for a friend]
    LEE #90282, 12ga Drive Key, 7/8oz Slug [for: Son's 3-Gun]
    LEE #90349, 452-255RF, 6 Cavity [for 45 Colt & 45 ACP; Alox lubed]
    LEE #90697, 453-200RF, ditto

Posting Permissions

  • You may not post new threads
  • You may not post replies
  • You may not post attachments
  • You may not edit your posts
  •  
Abbreviations used in Reloading

BP Bronze Point IMR Improved Military Rifle PTD Pointed
BR Bench Rest M Magnum RN Round Nose
BT Boat Tail PL Power-Lokt SP Soft Point
C Compressed Charge PR Primer SPCL Soft Point "Core-Lokt"
HP Hollow Point PSPCL Pointed Soft Point "Core Lokt" C.O.L. Cartridge Overall Length
PSP Pointed Soft Point Spz Spitzer Point SBT Spitzer Boat Tail
LRN Lead Round Nose LWC Lead Wad Cutter LSWC Lead Semi Wad Cutter
GC Gas Check