Great idea with the rotor!
Originally Posted by redhawk0


|
   
   
|


|


Great idea with the rotor!
Excellent tip, thank you. There is a propane place nearby, I'll stop in and see if I can get a freebie.

If you cut the propane tank just above the center weild there is a ring weilded to the bottom side. only cut through 1 layer and you can use the top o the propane tank as the top of your smelting pot.
make sure the tank is clean and free of gas before you start cutting.
I�m going to suggest you start out with a smaller pot. Get a old cast iron dutch oven from the thrift store and do a few test runs. Test your tools and technique. After you get a feel for it, go bigger. I don�t think my first smelting attempt would be 100+ pounds.
Maybe I�m just turning into a wussy as I get older...
Good luck.
Mould forth, and load in peace.


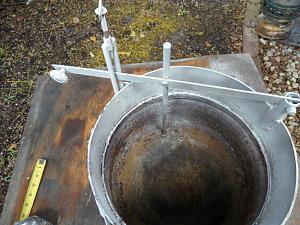
Here is my setup, which has served me well since 2012. Notice the bottom pour design copied from my RCBS Pro-Melt. This will deliver in excess of 200 "Clean"one pound ingots as fast as I can fill the molds.
Last edited by Dragonheart; 10-18-2020 at 05:14 PM. Reason: typo


That is an awesome setup. If your in the market to sell those I�m sure a few of us would be interested
Lots of great advice here.
I found wind screens for the burner, an insulating jacket for the pot and a lid did a lot to greatly reduce propane usage. From what I've read here, most folks can process a thousand pounds of scrap into ingots on a single 20# tank, if they can keep the burner's heat where it's needed.


This^^^
Propane has a lot of Hydrogen which turns to Water when it burns making the hot air rising from burner very humid. Pass a cold tool or lead through that Wet Air and condensation instantly covers it. If that condensation gets trapped under molten lead you will have a steam explosion.
I don't add lead to a hot pot. I let the ladle and other tools float on the surface of the molten lead for a minute to get rid of moisture.
Mal
Mal Paso means Bad Pass, just so you know.

Welding the extra ring on the bottom of your cut off tank is a good idea but not needed. The tank will set on the burner ok with just the ring already on the bottom.
Any burner stand that can support the weight of most adult men and feel steady and solid will hold up the weight of the pot and lead.
Using the top half of the tank as a lid works fine. It has handlers on it already.
The tanks are not hard to cut. I use a 4 1/2 " angle grinder with cut off wheels.
When you go to the refill place to get a tank ask for one with the fill valve taken out. Most will remove them for you.
Once home use your garden hose to fill the tank. The water pushes the propane up out of the tank. Pour the water out. let it drain upside down for awhile. Turn upright and smell the opening. If it smells like propane repeat the fill and drain until it don't smell.
You could use a hack saw but the angle grinder is much quicker.
Never thought about using the old brake rotor for a lid, got a couple around to try that.
A lot of the cheaper burners use a 50K to 60 k BTU head. This works but is slow. I upgraded my burner with a 120K BTU head. Much better. Turned up high it melts in about half the time the old burner did. Once the melt gets going ok turning it down so it doesn't get to hot is easy.
I built a couple ladles kinda the same way I built the pot. By cutting of old 1 LB. bottles. I had some of the tall skinny ones and some short fat ones. The short fat one cut of at the seam holds around 11 or 12 LBS when full. The tall skinny one I cut off a bit below the seam and it holds about 7 or 8 LBS.
The smaller one is the one I use. It fill half the cavities of my 2.5 LB. molds in one dip, then fills the rest in a second dip. It fills all four of the cavities of my 1 LB. molds to a dip.
Made handles out of some scraps of tubing from an old tarp tent / garage I had.
The larger ladle will fill more cavities per dip but is heavier. Being and old fart with weak shoulders the lighter one is easier to use without tiring to quickly.
Leo
 Posting Permissions


| BP | Bronze Point | IMR | Improved Military Rifle | PTD | Pointed |
| BR | Bench Rest | M | Magnum | RN | Round Nose |
| BT | Boat Tail | PL | Power-Lokt | SP | Soft Point |
| C | Compressed Charge | PR | Primer | SPCL | Soft Point "Core-Lokt" |
| HP | Hollow Point | PSPCL | Pointed Soft Point "Core Lokt" | C.O.L. | Cartridge Overall Length |
| PSP | Pointed Soft Point | Spz | Spitzer Point | SBT | Spitzer Boat Tail |
| LRN | Lead Round Nose | LWC | Lead Wad Cutter | LSWC | Lead Semi Wad Cutter |
| GC | Gas Check |

 Reply With Quote