RotoMetals2WidenersTitan ReloadingLee Precision
MidSouth Shooters SupplySnyders JerkyInline FabricationLoad Data
Repackbox Reloading Everything
Results 1 to 3 of 3

Thread: CVA Buckhorn De-Bubbaing

  1. #1
    Banner Sponsor

    lar45's Avatar
    Join Date
    Mar 2005
    Location
    Arkansas
    Posts
    2,829

    CVA Buckhorn De-Bubbaing

    So my neighbor Charlie comes over with what looks like an inline muzzleloader and says, Mr. Glenn can you help me get this back together...
    Charlie is a great guy, but he probably should not work on guns.
    It seems that he tried to take it apart a few years back without a breech plug wrench and really screwed up the slot and nipple threads trying to twist it out with a screwdriver. He also lost all of the internal parts.
    I found http://www.deercreekproducts.net/ and ordered a breech plug wrench and a conversion kit to change it to a 209 ignition system. They didn't have the correct bolt for the Buckhorn. The guy on the phone said that it would fit the action, it just wouldn't allow you to put the bolt handle into the safety slot. I got a new bolt spring and a threaded end cap.
    The parts showed up in just a few days. I put the barreled action in a padded vise and soaked the breech plug with Kroil for a couple of days, then took the new wrench and pounded it down into the buggered up slot. I pried, beat and pounded and could not get the breech plug to budge. I only succeded in twisting the corners off of the new wrench.
    It appears that Charlie left it loaded, or I would have tried to apply some heat to the action around the breech plug.
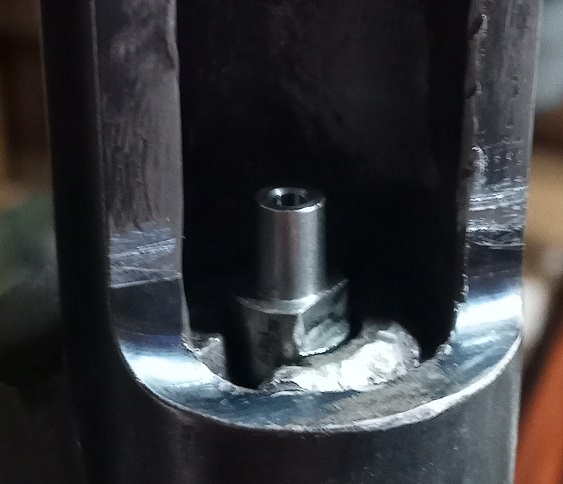
    So I decided to see if I could salvage the old breech plug. There was a big burr in the threads for the nipple. I couldn't get a tap down inside the action with an extension long and small enough to fit, so I took a M6x1 hardened cap screw and ground a flat on one side to act as a D reamer of sorts, to clean up the threads. I applied a little oil and ran it in and out a few times and in short order had the threads cleaned up. I ordered a new stainless nipple and it went right in.

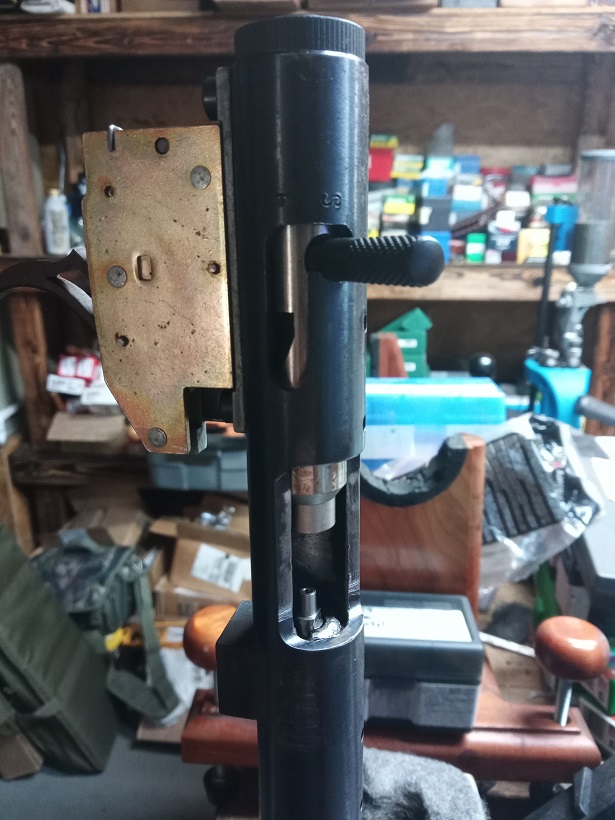
    The next item up was the bolt. It would slide in and engage the trigger sear just fine, but wouldn't slide all the way forward. Charlie had buggered the inside of the action with his screwdriver. So I used an assortment of files and a round sanding drum to clean things up.
    Now that the bolt slid easily in the action, it needed to look at the safety slot. The bolt had a flat cut on the bottom to engage the sear, but would not allow the bolt handle to be rotated up into the safety slot. So with the help of Mr. Mill Bastard file and the sanding drum I cut a radius on one side of the bottom of the bolt to allow for clearance of the sear when the bolt was rotated slightly.


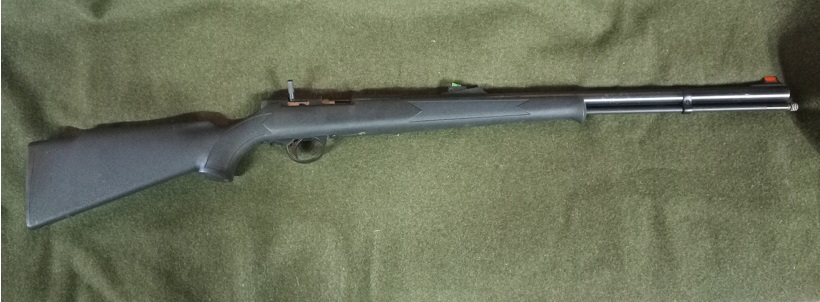
    I put it all together and function tested a few times and everything was great.


    Now all that's left is to dribble a little fresh BP in the nipple hole, replace the nipple and test fire it to clear the old charge and ball.


    Any thoughts on anything I might have missed?

  2. #2
    Banner Sponsor

    lar45's Avatar
    Join Date
    Mar 2005
    Location
    Arkansas
    Posts
    2,829
    Well, I got the barrel cleared without any problems.
    Now that I could get a bore light in one end and take a look, it looks like it was put away dirty and looks like a sewer pipe.
    I took a 50 cal bore brush and wrapped some chore boy around it and scrubbed with Ed's Red for quite awhile and got a pile of rust and powder fouling out. Then switched to a 20 ga brass brush on a cleaning rod powered by a drill and ran that for several minutes with intermittent swabbing of Ed's Red and BP Bore Cleaner, then a hose and more Ed's Red...
    I can see rifling and I'm starting to see the bottom of the grooves. I doused the barrel with Kroil and gave it another run with the 20ga brush and drill. I'm going to let the Kroil sit for awhile, then go back to it.
    Hopefully the bore won't be too rough to get a Maxi Ball loaded.

  3. #3
    Boolit Master
    metricmonkeywrench's Avatar
    Join Date
    Apr 2016
    Location
    Virginia
    Posts
    1,108
    I got a Blackhorn as a second hand deal, it was complete but with no tools, luckily it already had the 209 breach plug. Like your neighbor the PO had tried to get the breach plug out with a screwdriver, wrecked the slot and it was froze up pretty good. I ended up taking an oldy time bumper jack tire iron (got a couple lying around for some reason) as working material and carefully ground and filed the pointed hubcap end to make an overgrown screwdriver to fit the slot exactly and cut off the bent end. With the action carefully locked up in a vice I was able to get the improvised screwdriver in place and while rapping on the end and twisting with a pipe wrench (redneck impact wrench) I was able to break the plug free.

    my home made tool worked so well when the replacement breech plug arrived I refined the end to fit the new plug properly and drilled a hole for a crossbar just like the OEM. Never did get around to buying the "right" tool

Posting Permissions

  • You may not post new threads
  • You may not post replies
  • You may not post attachments
  • You may not edit your posts
  •  
Abbreviations used in Reloading

BP Bronze Point IMR Improved Military Rifle PTD Pointed
BR Bench Rest M Magnum RN Round Nose
BT Boat Tail PL Power-Lokt SP Soft Point
C Compressed Charge PR Primer SPCL Soft Point "Core-Lokt"
HP Hollow Point PSPCL Pointed Soft Point "Core Lokt" C.O.L. Cartridge Overall Length
PSP Pointed Soft Point Spz Spitzer Point SBT Spitzer Boat Tail
LRN Lead Round Nose LWC Lead Wad Cutter LSWC Lead Semi Wad Cutter
GC Gas Check