Load DataSnyders JerkyMidSouth Shooters SupplyRotoMetals2
Reloading EverythingWidenersInline FabricationLee Precision
Titan Reloading Repackbox
Page 1 of 2 12 LastLast
Results 1 to 20 of 21

Thread: First attempt at making a pot

  1. #1
    Boolit Master
    CastingFool's Avatar
    Join Date
    Mar 2009
    Location
    Climax, Michigan
    Posts
    2,645

    First attempt at making a pot

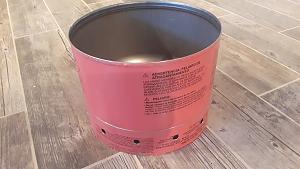
    What say you guys? I put 12 holes around the bottom ring. Would that be enough? I used an empty helium tank, cut just above the weld joint. The ring was cut from the upper half of the tank. It will be welded eventually, after cleaning off the pinkish paint. After welding, I will use heat proof paint on it.

    Click image for larger version. 

Name:	20200608_174422_resized.jpg 
Views:	69 
Size:	45.7 KB 
ID:	263420

  2. #2
    Banned

    Join Date
    May 2012
    Location
    South Texas
    Posts
    1,419
    Looks like a pot to me!

  3. #3
    Moderator


    Winger Ed.'s Avatar
    Join Date
    May 2007
    Location
    Just outside Gun Barrel City, Texas
    Posts
    9,690
    That might just be the prettiest pot I ever saw.
    In school: We learn lessons, and are given tests.
    In life: We are given tests, and learn lessons.


    OK People. Enough of this idle chit-chat.
    This ain't your Grandma's sewing circle.
    EVERYONE!
    Back to your oars. The Captain wants to waterski.

  4. #4
    Boolit Mold
    Join Date
    Feb 2019
    Posts
    19
    Looks really good. Much better than mine!


    Sent from my iPhone using Tapatalk

  5. #5
    Boolit Master
    Join Date
    Apr 2009
    Location
    northern Minn. in the boonies
    Posts
    2,178
    Now you have to make a permamant wood burning oven for it.

  6. #6
    Boolit Grand Master

    Wayne Smith's Avatar
    Join Date
    Mar 2005
    Location
    Hampton Roads, Virginia
    Posts
    13,654
    So, how are you gonna tip it to empty it?
    Wayne the Shrink

    There is no 'right' that requires me to work for you or you to work for me!

  7. #7
    Boolit Grand Master

    Join Date
    Mar 2013
    Location
    Northwest Ohio
    Posts
    14,560
    I cut my ring like you did but cut 1 1/2" holes (8) with a hole saw before cutting off. cut 1/4" above center of holes. Thinking was the flames would still work up sides of pot.

  8. #8
    Boolit Master
    CastingFool's Avatar
    Join Date
    Mar 2009
    Location
    Climax, Michigan
    Posts
    2,645
    Hi Country Gent! that's the kind of information I was hoping to get. Do the 1-1/2" holes work as intended? I drilled my 7/16" holes on a small table top drill press, using a brad point drill bit. I have to admit I never thought of using a hole saw.

    Wayne the Shrink, my plan is to use this pot for rendering lead into ingots. When my ladle can't scoop anymore lead, I think I'll be able to use visegrips to tip the pot, but I'm thinking I should figure out how to attach a bail, or something similar

  9. #9
    Boolit Master
    Join Date
    Sep 2016
    Posts
    2,675
    I started with a 12" diameter cast iron Dutch oven with a bail. I still needed a pair of pliers on a leg to tilt it. When I got a half propane tank processing pot with a welded in spout, I switched to two pairs of vice grips, which I felt worked just as well and were maybe more secure than the bail and pliers. I do make a point of wearing a leather apron and arm protectors as the pot is closer to my body using the grips.

  10. #10
    Boolit Master
    barrabruce's Avatar
    Join Date
    Feb 2009
    Location
    Far Nth Qld Australia
    Posts
    1,989
    Should work a treat.
    Being a helium tank it should be light as a feather
    Last edited by barrabruce; 06-09-2020 at 04:06 PM.

  11. #11
    Boolit Master

    Join Date
    Nov 2011
    Location
    East Arkansas where I55 & I40 come together and then split
    Posts
    694
    The first pot I made was using a Freon tank. It is ok but doesn't hold a bunch of lead. I had a guy at work cut it just above the seam with a band saw.

  12. #12
    Boolit Master
    Join Date
    Dec 2017
    Location
    Farmerville,Louisiana
    Posts
    1,358
    I use a 50# cut off Freon tank, made a spout on one side to pour out last of melt. Have never used it though. When alloy gets that low I’ll leave for the next melt to get started.

  13. #13
    Boolit Master

    Join Date
    Nov 2014
    Location
    'Bout a hundred miles from the Gulf of Mexico
    Posts
    1,158
    I have one just like it. And a spare pink tank just in case! Holds enough lead for me to work on at any one time! I like the holes in the ring on the bottom, might need to do that on the one I have already, but it works good, lightweight also. Good job! Just my .02
    I firmly believe that you should only get treated by how you act, not by who or what you are!!

  14. #14
    Boolit Grand Master

    Join Date
    Mar 2013
    Location
    Northwest Ohio
    Posts
    14,560
    Casting Fool, My pot is for casting from and only hold 130 lbs but with my weed burner I can have it molten and ready to cast in 15 mins. Yes from what I see and sense the flames heat seem to follow the pot up the sides.
    The thing that slows my pot is the 8 1 1/2" holes may not be quite enough at the mid point of my 50,000 weed burners temp it starves for air some. dropping burner down a inch or 2 or a couple more holes would help a lot. I also cut the original stand ring off the bottom so flame could flow better.

    In the future I may bend a ring up 4" larger in dia than my pot and 1/2-3/4" shorter than pots height and weld it on to pot with it centered as a heat shield to make sure I get the most of the heat. But ts hard to change whats working so well.

    The reason my pot is this big is for several reasons. 1) more mass makes heat control easier. 2) I/we cast big rifle bullets lightest I cast is 360 grns heaviest is 550 grns. These drain a pot quick. 3) I am mobility/balance impaired as are a couple friends. We cast together for the added safety if something would happen there is someone to get help and aid. The company is really nice also.3 if us around the pot is comfortable 4 is doable but a little crowded. Mitch and I have cast together around my pot also. Its great for teaching / helping a new caster get started.

    With your pot watch what stand you use as it will be on the heavy side for most turkey frier stands. You will want a heavy built sand.

  15. #15
    Boolit Master
    CastingFool's Avatar
    Join Date
    Mar 2009
    Location
    Climax, Michigan
    Posts
    2,645
    Thanks for the word of caution, Country Gent. I use the side burner on my grill to render lead, so I will be testing the set up before I start melting lead. I'm not planning on having marathon casting sessions.

  16. #16
    Boolit Buddy
    Join Date
    Mar 2011
    Location
    ST, Charles,MO.
    Posts
    185
    Think about using a couple of large C clamps on the rim to aid in poring lead. Six inch clamps work well and does not get too hot. I use them all the time.
    "Any man who thinks he can be happy and prosperous by letting the government take care of him; better take a closer look at the American Indian" Henry Ford

  17. #17
    Vendor Sponsor
    Bantou's Avatar
    Join Date
    Jan 2020
    Location
    Texas
    Posts
    299
    Quote Originally Posted by CastingFool View Post
    Hi Country Gent! that's the kind of information I was hoping to get. Do the 1-1/2" holes work as intended? I drilled my 7/16" holes on a small table top drill press, using a brad point drill bit. I have to admit I never thought of using a hole saw.

    Wayne the Shrink, my plan is to use this pot for rendering lead into ingots. When my ladle can't scoop anymore lead, I think I'll be able to use visegrips to tip the pot, but I'm thinking I should figure out how to attach a bail, or something similar
    I just let the remainder cool and dump out the remainder once it is cool. It goes back in the wheel weight bucket and gets melted with the next batch


    Sent from my iPhone using Tapatalk
    Happiness is a warm .45

  18. #18
    Banned
    Join Date
    Dec 2018
    Posts
    3,409
    That's purdy until you grind/sand/burn & wire brush the paint off so you can weld the ring on after a few smelting sessions it will just look like a nice used smelting pot.

    We bent out sections of the ring on the bottom for the flames to lap up the side of the pot instead of drilled holes.


    Last edited by Conditor22; 06-11-2020 at 03:15 PM.

  19. #19
    Boolit Grand Master

    gwpercle's Avatar
    Join Date
    Sep 2011
    Location
    Baton Rouge, Louisiana
    Posts
    9,298
    The pink is kinda pretty ... think about leaving it !
    You might start a new trend ... black is getting old .
    Certified Cajun
    Proud Member of The Basket of Deplorables
    " Let's Go Brandon !"

  20. #20
    Boolit Master
    Join Date
    Sep 2016
    Posts
    2,675
    That's really nice, Conditor. I'm contemplating doing the same.

    Are the old and new rings flush with each other, or does the new ring stand higher?

Page 1 of 2 12 LastLast

Posting Permissions

  • You may not post new threads
  • You may not post replies
  • You may not post attachments
  • You may not edit your posts
  •  
Abbreviations used in Reloading

BP Bronze Point IMR Improved Military Rifle PTD Pointed
BR Bench Rest M Magnum RN Round Nose
BT Boat Tail PL Power-Lokt SP Soft Point
C Compressed Charge PR Primer SPCL Soft Point "Core-Lokt"
HP Hollow Point PSPCL Pointed Soft Point "Core Lokt" C.O.L. Cartridge Overall Length
PSP Pointed Soft Point Spz Spitzer Point SBT Spitzer Boat Tail
LRN Lead Round Nose LWC Lead Wad Cutter LSWC Lead Semi Wad Cutter
GC Gas Check