Snyders JerkyInline FabricationLoad DataReloading Everything
MidSouth Shooters SupplyTitan ReloadingWidenersLee Precision
Repackbox RotoMetals2
Results 1 to 13 of 13

Thread: Casting Lyman mold hollow points

  1. #1
    Boolit Master
    cabezaverde's Avatar
    Join Date
    Mar 2005
    Location
    Out West in NY
    Posts
    1,552

    Casting Lyman mold hollow points

    Guys,

    I consider myself to be a fairly experienced caster, but need some help.

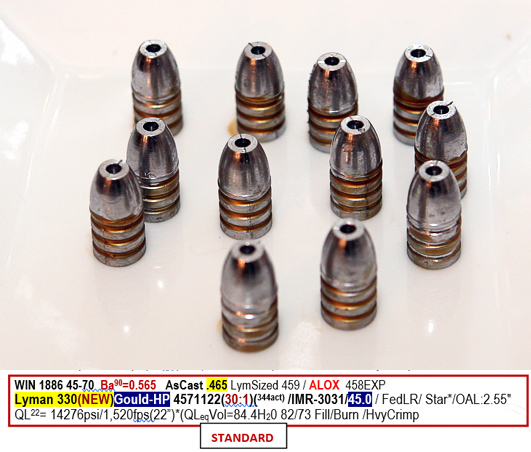
    For the first time, I have started working with a single cavity Lyman mold with the removeable hollow point pin. Alloy is coww with some added tin.

    Overall, I am happy with the way the body is coming out, but I am getting a smeared hollow point. It does not match the profile of the pin.

    A few things I have tried:

    Giving the pin a twist or two before removing it from the mold.

    I have lubed the pin with some synthetic 2 stroke oil.

    I still seem to get the mis-shaped hollow point cavity. Am I being too picky?

    Should I not remove the pin before opening the mold?

    Any suggestions?
    Founder of the Single Shot section.

    A government big enough to give you everything you want is big enough to take everything you have.


    8 in the 10 ring, then I get a PING. Love my Garand.

  2. #2
    Boolit Buddy
    Join Date
    Mar 2012
    Location
    Bartlesville, OK
    Posts
    327
    My two pesos. Clean off any an all remnants of oil. Hot lead doesn't seem to like oil on the surface. I have stored some of my molds long term with a light spray of lube, and always have to use acetone to get it off before I get a good boolit.

    And I've had your same issues with the 356637 HP. The perimeter of the HP tip would invariably have a flaw in it. Higher temps helped to alleviate the issue.

    HTH,

  3. #3
    Boolit Buddy

    Join Date
    Jan 2012
    Location
    Oregon
    Posts
    393
    Preheat the hollow point pin on a hotplate. I have used a copper pipe fittings before on the hotplate to hold it vertical. That's pin needs to real hot. Clean off the oil, make sure it's super clean and smooth. Graphite or pencil lead helps with sticking.

    Sent from my Pixel 4 XL using Tapatalk

  4. #4
    Boolit Grand Master


    Larry Gibson's Avatar
    Join Date
    Jul 2005
    Location
    Lake Havasu City, Arizona
    Posts
    21,324
    As mentioned keep the mould clean and oil free including the HP stem.

    Alloy temp should be 710 - 725 degrees.

    Cast at a tempo that keeps the mould and stem hot.

    Don't dribble alloy into cavity. Open spout to get alloy into cavity as soon as possible and let a good sprue build up and even flow off sprue plate.

    Let the sprue harden, twist HP stem and remove, cut sprue, drop bullet out of mould, close blocks and immediately put the HP stem back in the mould and refill the cavity.

    While the next sprue is hardening you can put the cut sprue back in the pot. I do not inspect the bullets until casting is done and they have cooled. That way an even casting tempo can be maintained.

    Inspecting the bullet with the mould empty an/or putting the sprue back in the pot will let both the mould blocks and, in particular, the HP stem cool too much. Imperfect HPs and wrinkled bullets can easily be the result.

    With single cavity Lyman HP moulds quantity is not the goal, quality is. With quality casting quantity will follow as less will be rejected. An old Army saying; "slow is smooth, smooth is fast...…"

    If casting in cooler temperatures another means of keeping the HP stem may be needed. When I lived up north an cast in cooler temps, particularly in the winter I used a small propane bottle torch with a low flame to keep the stem hot while cutting the sprue, dropping the bullet out and closing the mould blocks.

    Attachment 261910
    Last edited by Larry Gibson; 05-10-2020 at 09:46 AM.
    Larry Gibson

    “Deficient observation is merely a form of ignorance and responsible for the many morbid notions and foolish ideas prevailing.”
    ― Nikola Tesla

  5. #5
    Boolit Master
    cabezaverde's Avatar
    Join Date
    Mar 2005
    Location
    Out West in NY
    Posts
    1,552
    Sounds like my biggest problem is oiling the pin.
    Founder of the Single Shot section.

    A government big enough to give you everything you want is big enough to take everything you have.


    8 in the 10 ring, then I get a PING. Love my Garand.

  6. #6
    Boolit Master

    Join Date
    Dec 2014
    Location
    UPSTATE new york
    Posts
    1,733
    No oil, more heat, if more heat don't work, try more heat, if no work-add tin, but those should work with low tin content

  7. #7
    Boolit Grand Master

    gwpercle's Avatar
    Join Date
    Sep 2011
    Location
    Baton Rouge, Louisiana
    Posts
    9,298
    You can preheat the pin by sticking the tip into the hot melt , letting it get hot , wiping the pin off and inserting it into mould .
    No oil on pin .
    Gary
    Certified Cajun
    Proud Member of The Basket of Deplorables
    " Let's Go Brandon !"

  8. #8
    Boolit Buddy catkiller45's Avatar
    Join Date
    Sep 2006
    Location
    Towanda, Pa
    Posts
    412
    sounds like good advice. I just got a lyman hollow point mold for my 44
    Henry rifle.. So I know it will be a learning expercience as well. Glad I real
    this post..My mold is the 429640 250 gr gas check..Wish me luck..
    keep on rolling along.no matter what happens just keep rolling

  9. #9
    Moderator
    RogerDat's Avatar
    Join Date
    Nov 2013
    Location
    Michigan Lansing Area
    Posts
    5,750
    Might try some powdered graphite. Even just "coloring" the pin with a soft pencil. I found that helped a lot with getting smooth release from pin. I know some have used a graphite spray that has a carrier that completely evaporates but I do not know the brand or product name.

    I have powdered graphite to roll cast buckshot in so I just dab some on the pin with a Q-tip. That and lots of heat. I ladle cast and will pour some extra lead off the sides or end of the mold to help keep it hotter.

    Good luck. It took a little fiddly farting around by I eventually got good results from a Lyman Minnie mold with the hollow base pin. That was plain lead, without tin to help it flow. I will say on inspection some were rejected but once it all came together not that many.
    Scrap.... because all the really pithy and emphatic four letter words were taken and we had to describe this source of casting material somehow so we added an "S" to what non casters and wives call what we collect.

    Kind of hard to claim to love America while one is hating half the Americans that disagree with you. One nation indivisible requires work.

    Feedback page http://castboolits.gunloads.com/show...light=RogerDat

  10. #10
    Boolit Bub
    Join Date
    Apr 2014
    Location
    Va
    Posts
    51
    This has always worked for me.

  11. #11
    Boolit Master
    Join Date
    May 2012
    Location
    Close to da Creaux,Hang'n out in Swamp's and Bayou's
    Posts
    800
    Quote Originally Posted by catkiller45 View Post
    sounds like good advice. I just got a lyman hollow point mold for my 44
    Henry rifle.. So I know it will be a learning expercience as well. Glad I real
    this post..My mold is the 429640 250 gr gas check..Wish me luck..
    What gas checks did you buy please?

  12. #12
    Boolit Master


    Join Date
    Mar 2005
    Location
    Perryville, Ky,USA
    Posts
    4,518
    You say "smeared hollow point cavity". I'm assuming this means slightly out of round. Looks unsightly. Won't hurt anything but if you want it perfectly round, there's a fix. Buy a piece of 5/16" aluminum round stock. Cut off about an inch. Chuck it in your electric drill. Take a file and cut a shank on it about .260" to fit your sizer. On the other end turn it down until you have a "tit" about 1/8" long and just very slightly larger than the diameter of the HP cavity in your mould. Use this when sizing as a top punch. It accomplishes two things. The first is that it centers the nose of the bullet. The second is that it sizes or swages out the nose cavity until it's perfectly round. Been doing this for years. I call it a "nose picker TP". If you slightly radius the side of the tit to the flat, it gives a nice looking champfer to the HP cavity. Takes maybe 45 minutes with an electric drill and file. If you have a lathe, it goes faster. Drill press will work too./beagle
    diplomacy is being able to say, "nice doggie" until you find a big rock.....

  13. #13
    Boolit Master mehavey's Avatar
    Join Date
    Aug 2012
    Posts
    1,540
    I've never had HP release problems... maybe because I insert the hollow-pointer through a small hole drilled in the bottom ("top") of the pre-heater pot shown here:

    The HP pin preheats the same as the mould blocks.


Posting Permissions

  • You may not post new threads
  • You may not post replies
  • You may not post attachments
  • You may not edit your posts
  •  
Abbreviations used in Reloading

BP Bronze Point IMR Improved Military Rifle PTD Pointed
BR Bench Rest M Magnum RN Round Nose
BT Boat Tail PL Power-Lokt SP Soft Point
C Compressed Charge PR Primer SPCL Soft Point "Core-Lokt"
HP Hollow Point PSPCL Pointed Soft Point "Core Lokt" C.O.L. Cartridge Overall Length
PSP Pointed Soft Point Spz Spitzer Point SBT Spitzer Boat Tail
LRN Lead Round Nose LWC Lead Wad Cutter LSWC Lead Semi Wad Cutter
GC Gas Check