Nice work on the carrier. Very professional looking. I use cci primers and my one piece firing pins and lighter springs have never failed to detonate a hard cci primer.

|
   
   
|


|


Nice work on the carrier. Very professional looking. I use cci primers and my one piece firing pins and lighter springs have never failed to detonate a hard cci primer.
I use a lot of CCI primers too. What hammer spring are you using?Originally Posted by Baltimoreed

Romans 10:9"...If you confess with your mouth Jesus as Lord, and believe in your heart that God raised Jesus from the dead, you shall be saved.."
My trading feedback thread: http://castboolits.gunloads.com/show...t=#post3092680
My one piece pins are from Long Hunter so whatever spring that comes in their kit is what’s in my two 1894s. They’ve been in my guns for decades.
Nice looking work! You can tune the stock springs by thinning them down on the sander/grinder, just don't get them hot. I love those Marlins, and really enjoy working on them, take your time with the hammer, and grind it down slow. You want a nice radius, then polish it good it'll be slicker the snot on a porcelain door knob as dad used to say!
Tagging post for when I get my Marlin lever. Hopefully soon.


Your carrier fix looks good and as long as it stays together should be fine. You could go a little deeper on the Snail Cam Point. It needs to be about .06 radius.
good job so far.
If you have a buffer or bench grinder get a Hard Scotch-Bright Deburring Wheel for it. it is the single most used tool in my shop and I use it on literally everything. That is what I used do radius the hammer face.
On the Hammer Face you radius the top edge more than the bottom edge. What it affects is when closing the lever, the cam on the bottom of the bolt must push the hammer down as it is going forward which is the opposite of what it would want to do. The radius reduces the force required to push the hammer down as the bolt slips by.
As the bolt is opened it pushes on the hammer face until it is near the top of it's travel and then the hammer goes below the bolt and the cam takes over and pushes the hammer down past the sear. You will notice that the cam on the bolt is radiused on the back and tapered on the front. The Radius pushes the hammer back on opening and the Taper pushes the hammer down on closing. The taper only interacts with the radiused top edge of the hammer, and only for a split second.
I can do this in 30 seconds on the Scotch Bright Wheel.
Randy
Last edited by W.R.Buchanan; 06-01-2020 at 05:42 PM.
"It's not how well you do what you know how to do,,,It's how well you do what you DON'T know how to do!"
www.buchananprecisionmachine.com
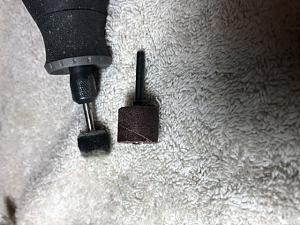
Thanks again for the advice. I don't have a bench grinder but maybe they make one for my Dremel tool.
Question: I was looking at your sticky on chamfering the chamber mouth. You used a 1/2 countersink to do you 44 mag. I cant tell what degree it is. I'm thinking of purchasing a 3/8" 6 flute 90 degree to do my .357. Would that be satisfactory or would something else work better?
Romans 10:9"...If you confess with your mouth Jesus as Lord, and believe in your heart that God raised Jesus from the dead, you shall be saved.."
My trading feedback thread: http://castboolits.gunloads.com/show...t=#post3092680
Or maybe something like this? https://www.homedepot.com/p/RYOBI-Sp...CS72/205472330
Romans 10:9"...If you confess with your mouth Jesus as Lord, and believe in your heart that God raised Jesus from the dead, you shall be saved.."
My trading feedback thread: http://castboolits.gunloads.com/show...t=#post3092680
You'll need a 1/2" CSK. a .357 case is almost 3/8". The 6 flute Severance Brand CSK's leave a smoother finish others tend to chatter a little. Just turn it by hand.
Randy
"It's not how well you do what you know how to do,,,It's how well you do what you DON'T know how to do!"
www.buchananprecisionmachine.com
Thanks! I used a 1/2� and it worked well. It now cycles the SJFN and SWC with out a hitch. Very pleased!
Romans 10:9"...If you confess with your mouth Jesus as Lord, and believe in your heart that God raised Jesus from the dead, you shall be saved.."
My trading feedback thread: http://castboolits.gunloads.com/show...t=#post3092680
Glad to see it worked out. It wasn't that hard ,,, was it? Maybe others will follow?
Randy
"It's not how well you do what you know how to do,,,It's how well you do what you DON'T know how to do!"
www.buchananprecisionmachine.com
Nope! Wasn’t that hard at all!
So I went ahead and radiused my hammer. Not having the recommended tools, I used my Dremil tool. I left the hammer on the rifle while shaping it, covering the opening behind the bolt with a rag to prevent shavings from falling in. Using a sanding drum bit I took a little bit off at a time. Each time I would cycle the action slowly and carefully observe how the little knob on the bottom of the bolt was interacting with the hammer. Once I got it “just right” I polished it with Flitz metal polio’s and a felt wheel. I came out better than I had hoped!
Randy thanks for all your help!
[ATTACH=CONFIG]263920
Romans 10:9"...If you confess with your mouth Jesus as Lord, and believe in your heart that God raised Jesus from the dead, you shall be saved.."
My trading feedback thread: http://castboolits.gunloads.com/show...t=#post3092680
Glad to see it worked out. It wasn't that hard ,,, was it? Maybe others will follow?
Randy
"It's not how well you do what you know how to do,,,It's how well you do what you DON'T know how to do!"
www.buchananprecisionmachine.com
 Posting Permissions


| BP | Bronze Point | IMR | Improved Military Rifle | PTD | Pointed |
| BR | Bench Rest | M | Magnum | RN | Round Nose |
| BT | Boat Tail | PL | Power-Lokt | SP | Soft Point |
| C | Compressed Charge | PR | Primer | SPCL | Soft Point "Core-Lokt" |
| HP | Hollow Point | PSPCL | Pointed Soft Point "Core Lokt" | C.O.L. | Cartridge Overall Length |
| PSP | Pointed Soft Point | Spz | Spitzer Point | SBT | Spitzer Boat Tail |
| LRN | Lead Round Nose | LWC | Lead Wad Cutter | LSWC | Lead Semi Wad Cutter |
| GC | Gas Check |

 Reply With Quote