Leo,
Excellent job! Thanks for taking the time to document in pictures. All that you were saying earlier is now much more clear. I really wish they had a "Like" button!
Ed

|
   
   
|


|


Leo,
Excellent job! Thanks for taking the time to document in pictures. All that you were saying earlier is now much more clear. I really wish they had a "Like" button!
Ed
______________________________________________
Growing old is mandatory, growing up is totally optional!
I like the tube space idea. Ought to be pretty nifty.After looking at it, made me kinda think that if you used the long bolt from Lee, I think4" if you could forego the nut to tension things. Drill a hole in the bolt for a hitch pin, use spring pressure with other spacers to put down tension on the tube mounts and pin in place.
Spring might not be strong enough to hold things up correctly tho.
Might have to do your mod and investigate.
Thanks
"What makes you think I care" ........High Plains Drifter
Rick C.


Give it a shot. It may work fine as long as the spring tension is enough to hold the support in place.
Then it may be more tension than you want to assemble.
Leo
Come to think of it, the tube doesn't actually hold any weight, soa to speak. It's gotta hold a bit, but the bullets and/or brass rests on the pusher, however, you gotta lock the tube in place so the spring won't work.
I went to Lowes today to get some of the 3/8" tubing. Looked around and found, in the hardware-special washers, 1/4" X 3/8ths spacers. They had 1/2" and 3/4" lengths.
Got home and tried em out and they fit perfect. I put a 1/2" on just above the capturing nut(locking bolt to base unit).
For .375 250 grain bullets I use one of each; 1/2 and 3/4.
If need be I can cut one of the 3/4 in half and have a couple of 3/8ths...well almost.
BTW, that 3/8ths inch space just barely rubs to top cap rim, alleviating the need to notch.
https://www.lowes.com/pl/Spacers-Fas...are/3982475578
I got 3 of each for adjustability and take up space for short threading. Average 1.20 each.
Got to thinking while doing this; it would be easy to Powder coat the different lengths different colors.
Short ---Red Medium---White Long---Blue. The color code the change over.
Last edited by hpdrifter; 05-02-2020 at 08:21 PM.
"What makes you think I care" ........High Plains Drifter
Rick C.
I was doing some wood working projects and ran out of screws. I figured it was a nice day and it felt good to get out I thought instead of just driving 10 miles top the hardware store I'd drive the 35 miles to Lowe's.
While I was there I went over into the plumbing section and they have 1/4 " ID copper tubing in 2 Ft lengths. I got one, $5.98.
When I got it home I slid it down on the bolt on the APP to check clearance. The inserter slips by it just fine, no cutting a notch, just cut to length.
One of the wood working projects I was working on was a shooting bench.
I had some rough cut 1x4 boards left from building the rack on my flat bed utility trailer.
I cut some 28 inch lengths and screwed them together to form the legs. I then adjusted my chop saw to 7* and cut this ngle on one end of each leg.
With this angle when the legs are up under the top they spread out at a 7 * angle. I also cut boards at 7* on one edge and on the ends. I cut these for the front, back and sides.
I had a knock together bench I didn't like, to wobbly. I used part of the top for other projects but still had the part that stick out the rest the butt of the rifle on.
I cut this left over bit off about the same width as the stick out part. I used scraps of the rest to make a double layer of this part and used bolts to hold it on my plastic fold up table to shoot off of. This was wobbly to.
Once I got the legs together as a stand, the edge boards cut at an angle had the top edge flat so when I screwed the top on, it laid on the boards and the legs.
I trimmed the boards I had bolted to my fold up table so they were straight and even on the sides. I centered this on the legs with the edge away from me as I sit at the bench to overhang about 1 1/2 ". This lets me clamp the printout box of my chrono on the bench.
This left an open area on both sides. To fill in the sides I had the rig I built to true my motor cycle wheel that had a base that looked close to the right size. I put it on one side of my bench and drew a line on the underside along the legs frame.
Took it to the table saw and eyeballed it to cut on that line. If what was left didn't fit the other side then so be it.
I screwed the one piece on the bench then checked the left over piece, and it fit like I planned it.
I had to make some spacers to lift the two side pieces up to match the center piece.
All my bits and pieces for the top were 3/4" treated plywood.
Once all screwed together using up the screws I had my little bench is very stable. With the legs angled out they triangulate and make it solid even though it don't weigh much.
I plan on adding some more cross bracing on the legs so I can put a shelf on there to add weight to make it more stable.
I guess I need to take a few pics to show it off. It's not pretty but it's stable and will do the job.
Leo
Hi all,
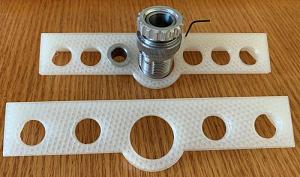
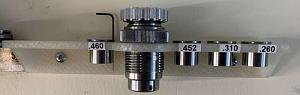
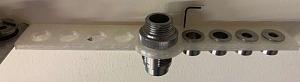
Still loving my Lee APP. Even though I have all my old Lee push through sizers, I decided to get the NOE APP Adapter and some of their bushings. I like to keep things neat and organized, so I 3D printed a tray to hold the adapter, little allen wrench, and the bushings. I made a four and six hole version, and I can always expand if I get more bushings. I posted the files on Thingiverse here.
Ed
______________________________________________
Growing old is mandatory, growing up is totally optional!

I would like to see a picture sounds like a handy project.Originally Posted by 44magLeo

Hi all,
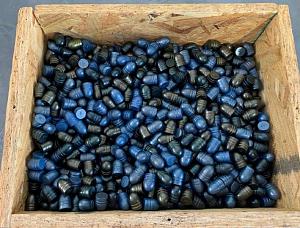
I came up with another mod for the Lee APP to improve the bullet slider. The OEM version kept throwing my bullets, so I made my own bullet slider. Basically, I replaced the two piece slider with pinchers and made a single unit. Actually, I can't take all the credit as I came across a version while preparing to design my own bullet slider. I took his design and made some modifications to fit my needs. In any event, I made it customizable and posted the files here on Thingiverse. When used with my bullet feeder, I was easily getting 60+ per minute, so I could zip through 56 lbs (about 1800) of PC & Hi-Tek coated bullets in pretty short order.
Ed
______________________________________________
Growing old is mandatory, growing up is totally optional!
For those interested in my scrap lumber shooting bench, I'll post pics of my the bench and some pics of how it's made in the homemade thread.
Leo
Hi all,
Thought I'd provide an update. I ordered some more bushings from NOE, and rather than use two trays, I made an 8-hole version. I updated the files on Thingiverse if you want to print one for yourself. The link above should still work.
Ed
______________________________________________
Growing old is mandatory, growing up is totally optional!
 Posting Permissions


| BP | Bronze Point | IMR | Improved Military Rifle | PTD | Pointed |
| BR | Bench Rest | M | Magnum | RN | Round Nose |
| BT | Boat Tail | PL | Power-Lokt | SP | Soft Point |
| C | Compressed Charge | PR | Primer | SPCL | Soft Point "Core-Lokt" |
| HP | Hollow Point | PSPCL | Pointed Soft Point "Core Lokt" | C.O.L. | Cartridge Overall Length |
| PSP | Pointed Soft Point | Spz | Spitzer Point | SBT | Spitzer Boat Tail |
| LRN | Lead Round Nose | LWC | Lead Wad Cutter | LSWC | Lead Semi Wad Cutter |
| GC | Gas Check |

 Reply With Quote