Titan ReloadingLoad DataLee PrecisionWideners
RotoMetals2RepackboxMidSouth Shooters SupplyReloading Everything
Inline Fabrication Snyders Jerky
Results 1 to 10 of 10

Thread: .40 SW brass to 265 gr. .44 mag bullets (different way with small lathe)

  1. #1
    Boolit Buddy

    Join Date
    Jul 2010
    Location
    N. Canton, Ohio
    Posts
    431

    .40 SW brass to 265 gr. .44 mag bullets (different way with small lathe)

    This method makes a nice factory looking bullet if you have a lathe, a small one would be easier. I turn the case head off right to the bottom of the primer hole. I didn't use any kind of stops or collet with a stop because i have an old 1935 8"southbend jr. so i just eyeballed it. I figure it doesn't take as much time as other types of jacket making. then i torched them to a medium glow to anneal, no trimming on that pain in the butt little harbor fright saw! i then tumble in ss pins. I set the cases on a smooth metal surface and pour pure lead into each case up to the top, no flux, you will get the hang of it soon. its okay if it over fills a bit, it shrinks up some. Then comes the swaging. I bought a lee .257 Roberts sizing die from midway for around $18. a better one would be better because of the little breather hole in their dies, but it doesn't matter that much. Anyway. I cut the top part of the die right at the top section of the shoulder, that will give you the bevel on the bullet. the steel was as hard as a donkey's # so I used a cutting wheel and carbide. i suppose you don't have to cut it but I never plan on loading .257's. Screw it into the press. use the punch that comes with the lee .429 or .430 bullet sizing kit and form it. I push it to just above where i cut the die, then using a heavy sharp knife I shave the lead smooth. after that, i run it through that .429-.430 lee size die. the bullet hardly needs much sizing because the inside of that .257 die is almost a perfect fit.
    I tried other ways to make the .44 bullet like manny ca's method, which is okay, that's what got me trying different ways. I think you will like the results.

    Mike (big jake)
    Last edited by bigjake; 03-21-2020 at 08:58 PM.

  2. #2
    Boolit Master

    Join Date
    Feb 2008
    Location
    Bozoland Mt.
    Posts
    1,698
    Nice, lots of ways to make bullets without big spending.
    To lazy to chase arrows.
    Clodhopper

  3. #3
    Moderator


    Join Date
    Dec 2005
    Location
    Oregon Coast
    Posts
    10,248
    Are you facing the base off the brass, or cutting it off with a cutoff bit? I've been playing with it this afternoon, after reading your post, and I'm facing the base off the .40 S&W brass in several passes. I've only got the Grizzly Mini-Lathe, but it's doing the job nicely, but slowly. If there's a quicker way, I'd appreciate knowing it.

    Fred
    After a shooting spree, they always want to take the guns away from the people who didn't do it. - William S. Burroughs.

  4. #4
    Boolit Master
    Join Date
    Feb 2008
    Location
    Eureka MT
    Posts
    2,526
    I use a similar process to make a 270gr .410 bullet for my 41mag. The main difference is I don't bother facing off the base and I size (.410) and form the nose prior to filling with lead. I also use a piece of flat steel on top of the press ram and a piece of 7/8"all thread faced flat installed in the press and I squish the over filled jacket between them while the lead is still liquid. Preset the distance between the flat plate and the all thread with a formed empty jacket. It doesn't take a strong press or lot of pressure for any part of this. No real swaging is done.

  5. #5
    Boolit Buddy

    Join Date
    Jul 2010
    Location
    N. Canton, Ohio
    Posts
    431
    Quote Originally Posted by ReloaderFred View Post
    Are you facing the base off the brass, or cutting it off with a cutoff bit? I've been playing with it this afternoon, after reading your post, and I'm facing the base off the .40 S&W brass in several passes. I've only got the Grizzly Mini-Lathe, but it's doing the job nicely, but slowly. If there's a quicker way, I'd appreciate knowing it.

    Fred
    Fred, I face the rim like you are doing. it takes 3 cuts; one big one, one that exposes the primer pocket bottom, it gets close. then i just touch the dark soot from the primer burning with the tip of the cutting tool to locate the last cut. use a sharp tool, preferably carbide, it lasts a long time. the thing thats cool about this is; you dont have trim the case with a crooked cutting saw then, you have to use your case trimmer to clean it up. When pouring the lead, make sure its pretty hot. dont try to ladle it perfectly. let the molten lead spill over some. it will fill it more accurately, then just pic what spilled off after it cools. if you try to pour perfectly to the top without spilling, it will pour a big hump that you dont want. I'm getting bullets weighing in at 264-265 gr. consistently. These bullets look like factory except for the cantelure(sp?)
    Last edited by bigjake; 03-22-2020 at 02:52 PM.

  6. #6
    Moderator


    Join Date
    Dec 2005
    Location
    Oregon Coast
    Posts
    10,248
    Thanks, bigjake. I did about 50 cases last night, but it's a slow process. I was just wondering if you'd found a faster method.

    I have regular swaging dies and a Corbin CSP-1 Swaging Press, so my swaging process is different than yours. I'm just looking for a quick and easy way to get rid of the rim for making jackets, and yours works about the best I've tried, so far.

    When I swage bullets from regular cases (no trimming), I put the core in the case and anneal and melt the core at the same time, but I do it in a ceramics kiln. I leave the primers in to contain the molten lead, and then swage the whole thing. I'm not pouring molten lead into the cases for my method, but I appreciate your suggestions.

    Here's what they look like before annealing:


    And here's what they look like after spending all night in the kiln:


    And the kiln:


    Of course, I won't be able to anneal the cores and the cases at the same time with the bases cut off, but I'm looking for a different profile and weight with these bases cut off.

    And as a side note, the bullets I've annealed in the kiln with the cores in them have resulted in fully bonded bullets, without the use of any flux. I'm getting them hot enough that I believe they're bonding at the molecular level, rather than soldering together. The only way to separate my "bonded" bullets is to melt the lead from the jacket, but for what I'm doing with them, that isn't necessary. Paper targets, rocks and cans don't seem to care if the bullet is bonded, or not.......

    Hope this helps.

    Fred
    After a shooting spree, they always want to take the guns away from the people who didn't do it. - William S. Burroughs.

  7. #7
    Boolit Buddy Huvius's Avatar
    Join Date
    Apr 2013
    Location
    Colorado Front Range
    Posts
    418
    I like the idea of cutting the die so the neck acts as an extrusion port of sorts.
    Makes the size of the dome of lead irrelevant.

    What I’ve been playing with lately is using a 3/4” end mill in my lathe and holding the brass in a Jacobs chuck in the tail stock.
    This is working way faster for me than than a cutoff tool.

  8. #8
    Moderator


    Join Date
    Dec 2005
    Location
    Oregon Coast
    Posts
    10,248
    Quote Originally Posted by Huvius View Post

    What I’ve been playing with lately is using a 3/4” end mill in my lathe and holding the brass in a Jacobs chuck in the tail stock.
    This is working way faster for me than than a cutoff tool.
    I'll have to give that a try, though the largest end mill I have is a 1/2". Thanks for the suggestion.

    Fred
    After a shooting spree, they always want to take the guns away from the people who didn't do it. - William S. Burroughs.

  9. #9
    Boolit Buddy

    Join Date
    Jul 2010
    Location
    N. Canton, Ohio
    Posts
    431
    Huvius, I'll have to give your method a try. I have a carbide 3/4" end mill. I'm going to start making some .451-452 bullets for my 450 bushmaster. I will be using a .243 sizing die to make these. I will be doing something a bit different this time.
    This round is wicked on deer. you dont have to worry too much about tracking the deer very far with this round.

  10. #10
    Boolit Buddy Huvius's Avatar
    Join Date
    Apr 2013
    Location
    Colorado Front Range
    Posts
    418
    It works pretty well although deprimed brass cuts much better than primed brass.
    Not surprising as an end mill doesn’t cut well in the center when used in this manner.
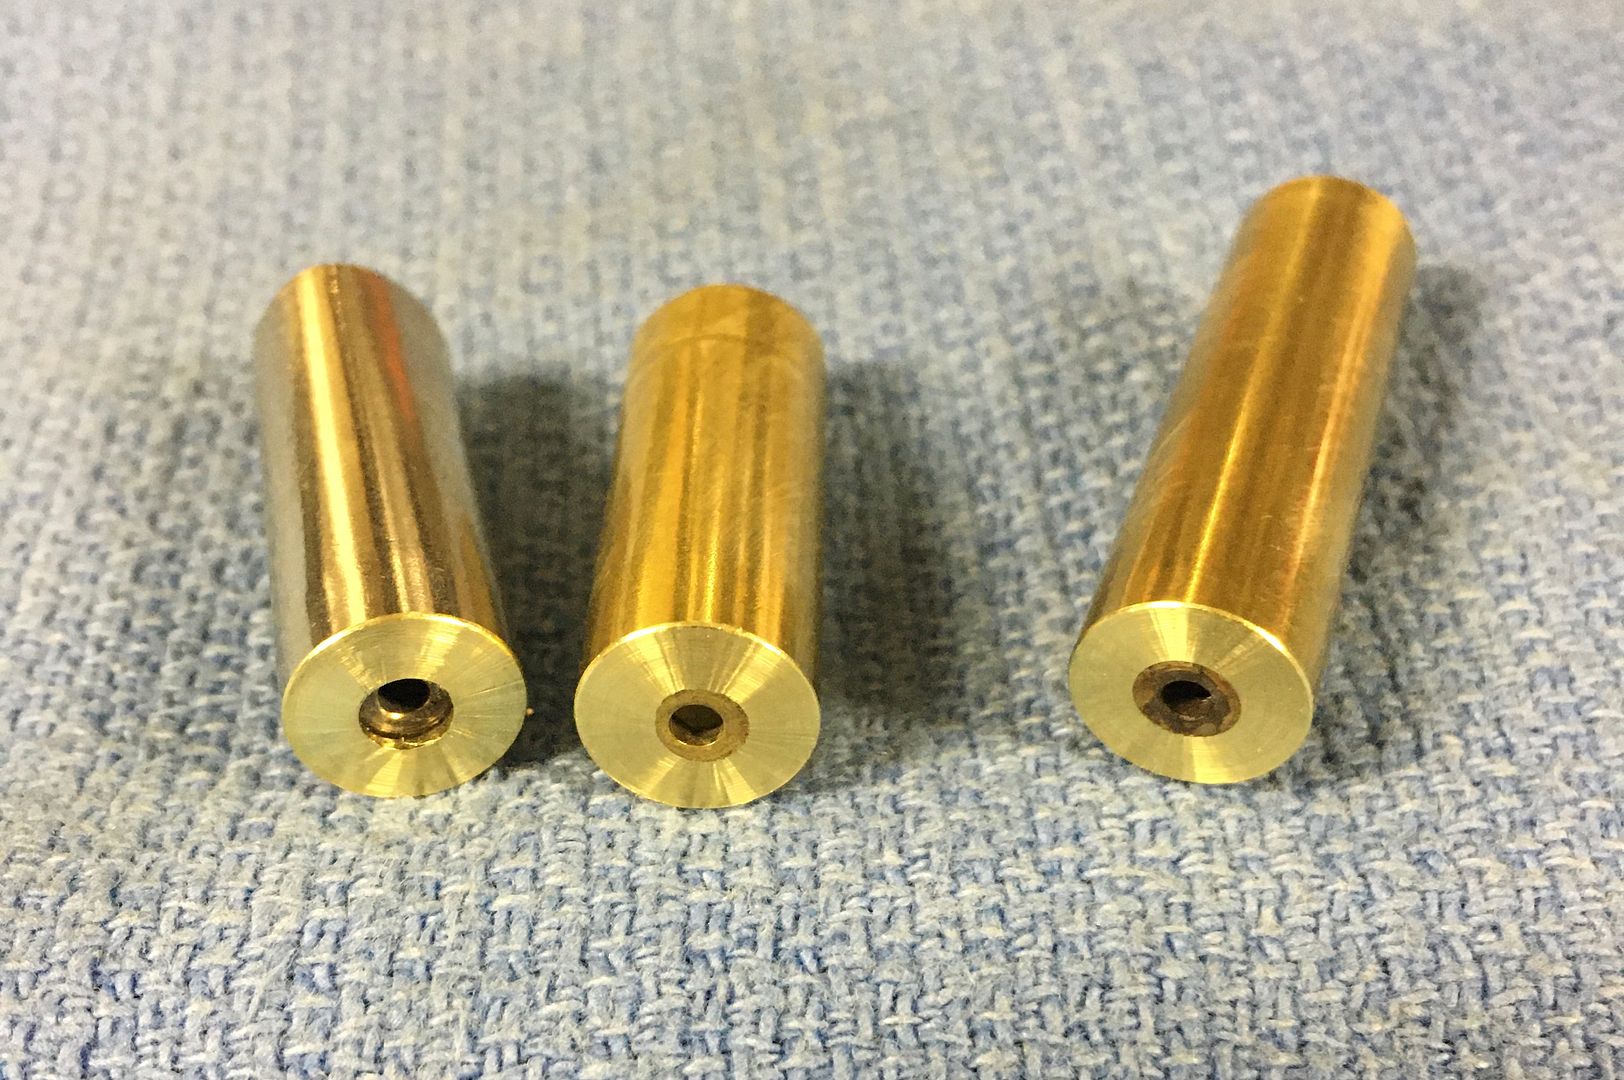
    Here’s two 38spl cases and a .223 case cut this way.
    Makes sense with rimmed brass when forming in one fell swoop, but when starting with rimless, I like to keep the rim intact since it facilitates sizing in standard dies using a regular press and shell holders. This is how I make my .458” from 45ACP and my .423” projectiles made from 40S&W brass.
    When pushing all the way through a sizing die, taking the rim off whether a rimmed or rimless case, this makes sense.
    I would say that when using this method, turning only the rim off is probably your best bet as it is the easiest thing to observe with the naked eye and I bet most primer pockets are consistent within a few thou.

    Last edited by Huvius; 03-23-2020 at 09:35 PM.

Posting Permissions

  • You may not post new threads
  • You may not post replies
  • You may not post attachments
  • You may not edit your posts
  •  
Abbreviations used in Reloading

BP Bronze Point IMR Improved Military Rifle PTD Pointed
BR Bench Rest M Magnum RN Round Nose
BT Boat Tail PL Power-Lokt SP Soft Point
C Compressed Charge PR Primer SPCL Soft Point "Core-Lokt"
HP Hollow Point PSPCL Pointed Soft Point "Core Lokt" C.O.L. Cartridge Overall Length
PSP Pointed Soft Point Spz Spitzer Point SBT Spitzer Boat Tail
LRN Lead Round Nose LWC Lead Wad Cutter LSWC Lead Semi Wad Cutter
GC Gas Check