WidenersRotoMetals2MidSouth Shooters SupplyLoad Data
RepackboxInline FabricationLee PrecisionSnyders Jerky
Titan Reloading Reloading Everything
Results 1 to 15 of 15

Thread: Seating die damaging powder coating

  1. #1
    Boolit Buddy

    Join Date
    Oct 2013
    Location
    North Carolina (mid/eastern)
    Posts
    142

    Seating die damaging powder coating

    I've powder coated quite a few rifle bullets (mostly 300 blackout) and everything has always gone smoothly.

    Did my first batch of 9mm bullets and the seating die seems to be crushing the powder coating as it's seated.

    The dies are a standard Hornady sizing die and then I run a Lyman M die. The bullets seems to seat relatively easy but the bullets kinda "stick" on the down stroke and when the bullet comes out it has a ring around it where the seating seating stem made contact.

    Anyone have this problem before and solve it? Do I need to run a harder alloy? Cure the bullets better? The powder is Smokes powder baked at 20min at 400F.

    Any help is much appreciated!
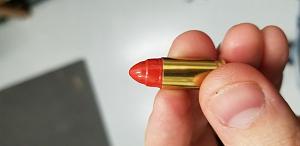
    Before
    Click image for larger version. 

Name:	20200201_232751.jpg 
Views:	74 
Size:	30.7 KB 
ID:	256688

    After
    Click image for larger version. 

Name:	20200207_223714.jpg 
Views:	84 
Size:	20.0 KB 
ID:	256685

  2. #2
    Boolit Buddy

    Flailguy's Avatar
    Join Date
    Dec 2017
    Location
    Bakersfield CA
    Posts
    192
    I would take the seating stem out and look to see the if it only contacts in a small spot. If so you will likely have to modify it or get a different one.

  3. #3
    Boolit Buddy
    Join Date
    Feb 2018
    Location
    Iowa
    Posts
    263
    Not sure, but you may using stepped brass. If you look in the empty case do you see a ring part way down?

  4. #4
    Boolit Buddy

    Join Date
    Oct 2013
    Location
    North Carolina (mid/eastern)
    Posts
    142
    It's definitely only contacting at one point. These are 147gr bullets from an NOE mold so I'm assuming they're not ideal for that seating stem.

    I don't have a lathe... Was considering ordering another stem and maybe using some JB weld or steel bonding epoxy and just shoving a bullet up there to form to it and let it cure to the contour.

    I don't know of any place that will do custom contoured seating stems and it being a lead bullet I can't exactly do the drill/lapping compound method.

    Not sure what I can do.

  5. #5
    Boolit Buddy

    Join Date
    Oct 2013
    Location
    North Carolina (mid/eastern)
    Posts
    142
    Quote Originally Posted by Camper64 View Post
    Not sure, but you may using stepped brass. If you look in the empty case do you see a ring part way down?
    No its just normal old 9mm brass.

  6. #6
    Vendor Sponsor

    Jhopson's Avatar
    Join Date
    Nov 2018
    Location
    Indiana
    Posts
    99
    I had the same type of problem, I changed my seating die stem to the flat point side and flared my cases a little more. This seemed to solve the problem. I am using the universal seating die for Mighty armory.


    Sent from my iPhone using Tapatalk
    John 15:13
    Greater love hath no man than this, that a man lay down his life for his friends.

  7. #7
    Boolit Master

    Sig556r's Avatar
    Join Date
    Feb 2014
    Location
    West of H-Town
    Posts
    1,064
    If you're seating & crimping at the same time, you may wanna separate those 2 steps.
    ...Speak softly & carry a big stick...

  8. #8
    Boolit Buddy

    Join Date
    Oct 2013
    Location
    North Carolina (mid/eastern)
    Posts
    142
    I just got off the phone with Hornady and ordered two replacement seating stems for my dies ($4.25/ea).

    Im just going to try putting some JB weld in the seating stem, lower it onto my bullet, and let the JB weld cure. I've heard of people doing this with success, looks like that's the best approach. I'll update if it works!

    I went ahead and ordered some stems for my 45acp die set too just in case I have the same problem. 4 stems with shipping was $21, so I'm happy doth that!

  9. #9
    Boolit Master
    Join Date
    Feb 2007
    Location
    South Western NC
    Posts
    3,820
    A shot from a common "hot glue" gun will fill the cavity of a seater stem quite nicely and do it almost instantly. And do it with much less mess than fooling around with epoxy glues.

    The photos show that your bullets require a lot of seating pressure. It might do you some good to size them a couple thou smaller.

  10. #10
    Boolit Buddy

    Join Date
    Oct 2013
    Location
    North Carolina (mid/eastern)
    Posts
    142
    Quote Originally Posted by 1hole View Post
    A shot from a common "hot glue" gun will fill the cavity of a seater stem quite nicely and do it almost instantly. And do it with much less mess than fooling around with epoxy glues.

    The photos show that your bullets require a lot of seating pressure. It might do you some good to size them a couple thou smaller.
    I think that's just a symptom of the tapered 9mm case.

    I actually size my bullets before and after I powder coat them. So these bullets are sized exactly to 0.356" as seated. I think Hornadys dies must be sizing these pretty aggressively and have way too much neck tension. I guess I could order another sizing die, but I think the stem fix would probably work.

    Thanks for the tip on the hot glue. I might try that first before I mess with the more permanent JB weld fix. I was planning on putting the stem in the drill press (no when it's on of course) so I can apply perfect downward pressure without risking overflow of the glue/JB weld inside the die body.

    Well see, will be a few days until the stems arrive.

    Thanks for the suggestion.

  11. #11
    Banned
    Join Date
    Dec 2018
    Posts
    3,409
    I agree partially with sig and 1hole

    it's not the PC, it's the seating die -- it will do that to uncoated boolits also, the profile of the seating stem is wrong

    clean the seating stem well and apply a thin coat of lube on the nose a the boolit whose profile you want.
    fill the die with hot glue and press the lubed boolit into the hot glue. when the glue has cured carve/sand the excess glue off.
    This will fix your problem.

    I agree with seating and crimping in 2 separate steps, you'll get better results AND if you change boolit type/lengths you don't have to mess with the crimp die.

    now the other possible problem.

    pull a freshly seated boolit and measure the drive bands and make sure you are not downsizing the boolit.

    if you are downsizing the boolit you will need to either get a case neck expanding die (the preferred method) or go with harder lead (which may not help)
    I use the NOE http://noebulletmolds.com/NV/index.p...o7h06slk17jaf7

    I use one the same size as my boolit and the brass will spring back .001 creating a perfect fit.

    .360 x .356 (P) Exp. Plug -- .360 = the flare at the mouth, .356 = the case expanding plug size

    PS, nice job PCing

  12. #12
    Boolit Master

    Join Date
    Sep 2010
    Location
    Colorado Springs, Colorado
    Posts
    2,085
    I got the same type of marking on a 30 cal boolit. I use Lee dies, and followed recommendations here. I took the seating plug and reformed with a dremmel and a die grinder, then used JB Weld to finish it off. I didn't mind the marks left before, now they are smooth as cast. I have a PC mix that looks just like copper gilding and I have fooled quite a few friends. Most of the time I just shoot black and the marks really showed up. Now, not so much.
    Common sense Gun Safety . . .

    Is taught at the Range!

  13. #13
    Boolit Buddy

    Join Date
    Oct 2013
    Location
    North Carolina (mid/eastern)
    Posts
    142
    Looks like the modified seating stem fixed it.

    I ended up getting some JB Weld Putty, mixed it up, waited a few minutes until it wasn't tacky anymore and almost dry, then I formed it with the bullet.

    Tested a few seated bullets and worked like a Champ! Thanks for the help guys.

    Click image for larger version. 

Name:	20200218_175635.jpg 
Views:	22 
Size:	31.9 KB 
ID:	257072
    Click image for larger version. 

Name:	20200218_175553.jpg 
Views:	21 
Size:	33.1 KB 
ID:	257071
    Attached Thumbnails Attached Thumbnails 20200218_165931.jpg  

  14. #14
    Boolit Bub
    Join Date
    Mar 2013
    Posts
    56
    Looks good. I might have to try this on my Lee 300 BO die. It cuts the nose on the c312-155 . Puts a perfect circle on the nose.

    Good job.

    Mark

  15. #15
    Boolit Buddy

    Join Date
    Oct 2013
    Location
    North Carolina (mid/eastern)
    Posts
    142
    Some advice...

    Use the Putty and give it a few minutes to start hardening before you form it. I tried it first when it was still tacky and even with the case lube on the bullet it stuck to the bullet pretty bad. So I took all the Putty out before it dried, then tried again waiting until it was less tacky.

    Which brings me to advice #2, have some acetone handy. Acetone seems to cut right through the Putty as long as it's not fully cured. When I screwed up I picked most of it out with a dental pick and an acetone dipped q tip got the rest.

    Good luck! I'm going to form a seating stem for every style of cast bullet I load for.

Posting Permissions

  • You may not post new threads
  • You may not post replies
  • You may not post attachments
  • You may not edit your posts
  •  
Abbreviations used in Reloading

BP Bronze Point IMR Improved Military Rifle PTD Pointed
BR Bench Rest M Magnum RN Round Nose
BT Boat Tail PL Power-Lokt SP Soft Point
C Compressed Charge PR Primer SPCL Soft Point "Core-Lokt"
HP Hollow Point PSPCL Pointed Soft Point "Core Lokt" C.O.L. Cartridge Overall Length
PSP Pointed Soft Point Spz Spitzer Point SBT Spitzer Boat Tail
LRN Lead Round Nose LWC Lead Wad Cutter LSWC Lead Semi Wad Cutter
GC Gas Check