Do what the old timers did for chinking. Most of the new ideas have flaws.

|
   
   
|


|


Do what the old timers did for chinking. Most of the new ideas have flaws.

I looked up alot of recipes and mixes and most of them require touch ups after only a few years. The mud and material washes away.Originally Posted by Plate plinker

Hammer and nails has worked well for centuries.
Like others have mentioned, nothing is going to last with the bark on the logs.
East Tennessee
Can someone enlighten me on how im supposed to nail a strip of wood inbetween the logs? Set the nails at an angle and try to get the log underneath? Im trying to figure this out. Small brads seems like they would be a hassle nailing them by hand...
Think of it as nailing a piece of quarter round into a corner. You'll want either thin, round saplings that cover the gap or quarters/ thirds of rounds that will cover. Nail the end into your log junction then alternate nailing top and bottom to the adjoining logs. Drilling them first will help to keep your angle consistent. Not an artist, but hope the drawing explains.
Sent from my Pixel 3 XL using Tapatalk

The strips of wood don't go between the logs, but on the outside of them right at the joint. So say you have a 1" gap, you stuff that with insulation, then you take a 1/4 of a large sapling or just a whole small round sapling that is 1" -1 1/4" and jamb it in the crack far as it will go and nail the edge at an angle into the log.
On the inside, you can do the same thing or use 1/2 a sapling sawn or split clean in half with the round side towards the wall. Then you have a flatter wall on the inside.

Are you doing this on the outside?
Yep! After packing in whatever insulation you have elected to shove in the gap.
Sent from my Pixel 3 XL using Tapatalk
Ok thats what I was thinking... A little sapling or quarter because a wood strip would be a challenge. I had a picture of an inch wide wood strip going in between the logs. I couldn't figure out a away to nail it in place. It would atleast need to be a 3 inch strip to go well. Thanks!
We used a recipe out of the book, �The Classic Hewn-Log House� by Charles McRaven. It was 9 parts sand, three parts Portland Cement, and 1 part lime. We just got started but it looks really nice! We also put down a metal lath with nails between the logs for the daubing to bind to. We will put our insulation in the middle. We are not worried about rodents because of the materials we are using.
I cannot get my pics to load. If you want a picture, let me know and we can email it.
Here is a pic!
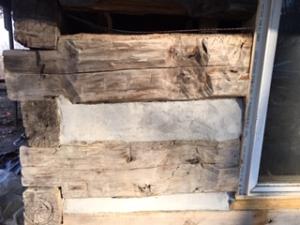
Looks good. My gaps arent that wide. Do you have any suggestions for log cabin books? I like old books with good info!
Who ever said mattresses has a good idea. Any way you can get your hands on used sofa or chair cushions? They adjust easily with a serrated bread knife. Then cover that with inch to two inch saplings in the cracks and 16d galvanized finish nails.
Thats another good idea. I dont know if that will insulate enough though?
It is unfortunate that you built before you asked your question. Around here, most folks who build with logs; peel the logs, use a chain saw to cut a "V" groove into the underside, lay a strip of fiberglass or spun rock insulation the length of the log and drop the "V" groove onto the lower log. This results in a very good, basically air-tight seal. Years ago I used Oakum to seal air-gaps in a frame cabin where I used round poles in place of 2x4's. The stuff I used came in rolls, called "rope-oakum" and was very easy to use. You just started one end of the "rope" into the crack and used an appropriately shaped piece of wood to pound in the oakum as it was fed off the roll.
R.D.M.
I know how they do it. And I barely measured anything. I did everything by hand or by chainsaw. I can't get any decent tools to where I am.
My.2 cents (American - I know you folks have done away with that nonsense) - WELL DONE!!! However you get the insulation part done, it will be an amazing place. Congratulations on your accomplishment and I hope you enjoy it!!
Sent from my Pixel 3 XL using Tapatalk
Thank you! I need the insulation, window, tin roof, floor, fire place. chimney.
Alot to do, none of it is hard work. Just long. Especially the chinking/insulation.
 Posting Permissions


| BP | Bronze Point | IMR | Improved Military Rifle | PTD | Pointed |
| BR | Bench Rest | M | Magnum | RN | Round Nose |
| BT | Boat Tail | PL | Power-Lokt | SP | Soft Point |
| C | Compressed Charge | PR | Primer | SPCL | Soft Point "Core-Lokt" |
| HP | Hollow Point | PSPCL | Pointed Soft Point "Core Lokt" | C.O.L. | Cartridge Overall Length |
| PSP | Pointed Soft Point | Spz | Spitzer Point | SBT | Spitzer Boat Tail |
| LRN | Lead Round Nose | LWC | Lead Wad Cutter | LSWC | Lead Semi Wad Cutter |
| GC | Gas Check |

 Reply With Quote