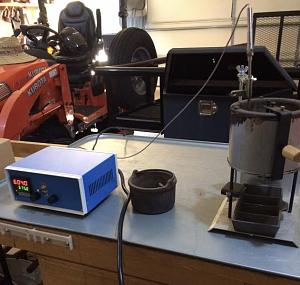
Thanks to all who have posted info on adding a pid to a lead pot , you inspired me to put one together.
It looks like it will help me get more and better boolits .
Here is a pic on my Lee pot.

|
   
   
|


|


Thanks to all who have posted info on adding a pid to a lead pot , you inspired me to put one together.
It looks like it will help me get more and better boolits .
Here is a pic on my Lee pot.
Nice! They are almost as much fun to build as they are fun to cast with.
Enjoy!


Nice looking unit, you will surely enjoy it immensely.

Way too clean.
Slim
JUST GOTTA LOVE THIS JOINT.
You got fancy building thata fuse for incoming power and a separate one for the PID controller.
I might look into a shorter thermocouple and use that one on your oven..
There's no comparison to casting with a known temperature.
So much better than that pot t’stat you can add to it later with extra sensors like a toaster oven for power coating or heat treating boolits. Very good job nice looking, the fun never ends.
You have a good eye for details . Don't know if I needed both fuses but it didn't cost much have a 3A and a 15AOriginally Posted by Conditor22

The thermocouple has about a 3" spring on top my guess so the wires won't get bent to sharply.
These things are pretty amazing to watch I just kept adding ingots and set and watching it bring the temp up and hold it within a few degrees of the setting.
I'm pretty easy to entertain

Very nice ! I built mine before i even started casting. It took one variable out of casting so i could concentrate on other things. I only had the internet at the time to help me learn.
You 'n me both, then, 'cause I do the same thing.
Very nice looking unit. Looks like it was built by a pro. I've been thinking about putting together a second one, as my son is now 18, and he wants to start casting. My 89 year old Dad gave me a vintage SAECO melting furnace from the '50's that still works like a champ, so I think I'll put together a second one for my boy to run the SAECO on.
Any chance you have a link to the enclosure you used? I don't like the enclosure I used, as it's way too big. Really like the looks of the enclosure you used. The only good thing I can say about mine is that it was big enough to swallow the huge heat sink I had to use on the 25 amp solid state relay I used. No idea why I thought it was necessary to use that big of a relay. Seemed like a good idea at the time, though.
I put mine together three years ago... hope I can figure out how to do another one.
"Things sure are a lot more like the way they are now than they used to be." --Yogi Berra
Is that an oil drip pan on top of your casting bench? What a gobsmackingly simple but great idea!
Phlier here is a link to a box like the one I used. The box is easy to work with the top and sides are one piece and the front and rear panels remove with 4 screws each. You can see braces that run from the front to the rear top corners.
This is how it looks inside before adding wire, plenty of space for the components I used.
The relay is on a heat sink and I drilled a 3/4 hole in the case under the heat sink.
Last edited by onelight; 11-14-2019 at 06:49 PM.
That drip pan is great for dumping a bucket of cases on for sorting or drying to .
Us okies can bring low tech to new heights


Looks great, same case I used and yes, it is fun to build things like this!
I see the picture, but no link.
Wow, the way the heat sink fits in there is just perfect. The enclosure itself looks like it's very well made, too. Mine is just powder coated sheet metal that had no real rigidity to it until it was assembled. But even then, it doesn't have a solid, quality feel to it. I spent extra to put in high quality, mostly name brand components, but it looks like it was put into a really cheaply made enclosure. The silver lining is that there is plenty of room to put a cooling fan in it, which I'll most likely do; I live in the desert, and when I'm casting in the garage in the summer it isn't unusual for it to be well over 100F.
Thanks for the information... I sense another father-son project in the not too distant future.
"Things sure are a lot more like the way they are now than they used to be." --Yogi Berra
Here is the link I forgot to post it I have seen these for 9.95 if ordered from China I chose to order from Amazon
I considered a fan but thought I would see how warm it got first after an hour the case was still room temp.
https://www.amazon.com/Electronic-En...xpY2s9dHJ1ZQ==


The dang things are addicting I'd say now having 4 of em'. And like the man above said about as much fun to assemble as to use them. I bought the first case and made the others out of scrap aluminum and plywood pieces. Don't live in the desert but did do some measuring of temperature of the SSR itself. Notes follow on my results and another guys comment later.
SSR Temperature
2-6-18
Lubed some bullets
69�F Room Temperature
SSR only ever got to 74� F
The SSR produces a little over 1 watt of heat for each amp of electricity while it's on or
about 7 watts of heat for a 120V Lee 4-20. Once the pot is up to temp the SSR is mostly
off producing much less heat.
Mike
Benefactor Member NRA
Life Member Iowa Firearms Coalition
US Army Vet
There are two ways to conquer and enslave a nation.
One is by the sword. The other is by debt.�
John Adams 1826
Nice to hear this . Thanks a lot .

I second getting a shorter temp probe It looks like that one sets right on the bottom of the pot.
I have the same pot. I used a 4 inch temp probe. To hold the probe I used the bare ground wire out of a piece of 10 ga house wire I had left over from another project.
Twisted four or 5 turns around a #2 Phillips head screwdriver shank. Left a tag end long enough to mount under a screw so it holds the probe about a half inch from the bottom and side of the pot.
If it touches the pot you won't get as accurate a lead temp.
Leo
It may be a mistake but I wanted to be able to remove and or swing the probe out of the pot and adjust depth and position in the pot so I got the 6" to have room for that clamp so I can do this with out tools.
Do you think it will cause a problem ?
Here is a better pic of the mount ..
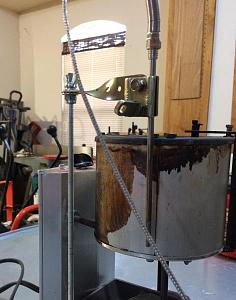
The general consensus when I researched things was the tip of the probe should be about 1/2" from both the side and the bottom of the pot so my holder accomplishes that. In fact with later experiments using 2 TC's in the pot at different depths I found the lead temperature consistent between the 2 TC's. I think the important part is to have that tip of the TC in the melt. I don't care how hot the pot is, just the lead itself. Even adding metal to the mix they rapidly became the same. Another thing of course is the TC reacts to changing temperature much faster than a dial thermometer. Some other soul on the web said lead rapidly conducts heat. I leave my TC's in all the time even though they're removeable and don't find them much of a nuisance even when fluxing.
Mike
Benefactor Member NRA
Life Member Iowa Firearms Coalition
US Army Vet
There are two ways to conquer and enslave a nation.
One is by the sword. The other is by debt.�
John Adams 1826
 Posting Permissions


| BP | Bronze Point | IMR | Improved Military Rifle | PTD | Pointed |
| BR | Bench Rest | M | Magnum | RN | Round Nose |
| BT | Boat Tail | PL | Power-Lokt | SP | Soft Point |
| C | Compressed Charge | PR | Primer | SPCL | Soft Point "Core-Lokt" |
| HP | Hollow Point | PSPCL | Pointed Soft Point "Core Lokt" | C.O.L. | Cartridge Overall Length |
| PSP | Pointed Soft Point | Spz | Spitzer Point | SBT | Spitzer Boat Tail |
| LRN | Lead Round Nose | LWC | Lead Wad Cutter | LSWC | Lead Semi Wad Cutter |
| GC | Gas Check |

 Reply With Quote