RotoMetals2MidSouth Shooters SupplyRepackboxTitan Reloading
Reloading EverythingInline FabricationLee PrecisionWideners
Snyders Jerky Load Data
Page 1 of 3 123 LastLast
Results 1 to 20 of 45

Thread: 80% AR lower tips?

  1. #1
    Moderator
    Texas by God's Avatar
    Join Date
    Mar 2016
    Location
    Texas
    Posts
    14,414

    80% AR lower tips?

    I'm going to build a couple of these in the future. I have the 80%Arms gen 2 jig, bits, two 80% lowers and all the stuff to make 2 5.56 ARs. Any tips for a first timer? This project kind of fell in my lap so here we go.
    Thanks in advance!

    Sent from my SAMSUNG-SM-G930A using Tapatalk

  2. #2
    Boolit Master trails4u's Avatar
    Join Date
    Feb 2013
    Location
    Upstate, SC
    Posts
    1,367
    Drill press and patience. And don't drill quite as deep as the jig....I mean not by much. Will be much cleaner with the endmill on the router as you won't have the drill tip dimples left behind....
    "Do not follow where the path might lead, go instead where there is no path and leave a trail" Ralph Waldo Emerson

  3. #3
    Boolit Master

    rancher1913's Avatar
    Join Date
    May 2015
    Location
    plains of colorado
    Posts
    3,646
    use a quality jig, the ones that you drill and dremil out are crap for a hobby guy to get right. I got the 5d tactical that uses a router and if I take my time you can not tell it from a factory one.
    if you are ever being chased by a taxidermist, don't play dead

  4. #4
    Moderator
    Texas by God's Avatar
    Join Date
    Mar 2016
    Location
    Texas
    Posts
    14,414
    Yes, this one uses the router. Good stuff, any videos you recommend?

    Sent from my SAMSUNG-SM-G930A using Tapatalk

  5. #5
    Boolit Master

    Sig556r's Avatar
    Join Date
    Feb 2014
    Location
    West of H-Town
    Posts
    1,064
    lotsa patience, measure twice/cut once...
    ...Speak softly & carry a big stick...

  6. #6
    Boolit Master
    Join Date
    Jan 2018
    Posts
    2,585
    I'm a little different I guess, I like the drill method. I use the included plate but then drill between the large holes with a 1/16" bit until no more holes will fit. Then I use a router to finish the material removal. I use headlight buffing compound to polish. There was a video on this on YouTube but I think it must have been taken down since I last used it.

    Sent from my Pixel 3 XL using Tapatalk

  7. #7
    Boolit Buddy
    Join Date
    Jan 2016
    Posts
    109
    Use a milling machine, you have total control and can see what you are doing.
    I've done a few.
    kurt get a long 2 flute tool

  8. #8
    Boolit Buddy
    Join Date
    Jan 2016
    Posts
    109
    oops, tried to edit, should be gap between kurt and the get 2 flute tool stuff

  9. #9
    Boolit Master

    merlin101's Avatar
    Join Date
    Mar 2010
    Location
    Rochester NY heading to Gaults Gulch
    Posts
    1,303
    Short of a milling machine the router method is next in line. When using the router chips fly EVERWHERE! After doing the first one I used a cheap harbor freight blue tarp and cut a hole in the center big enough to fit over my vice, the tacked up the back and sides. That made clean up a breeze. Cut slowly and carefully wear PPE! Make sure you check the collet is tight especially for the final cut they seem to want to loosen and the bit slides out making a deeper cut ending with a cut all the way thru the trigger area! Pay special attention to the difference in depth, notice that the rear is not as deep. Don't forget gloves, al. slivers are small and hard to get out.
    It's not the years in your life that count. It's the life in your years (Abe Lincoln)

    "A free people ought not only to be armed and disciplined, but they should have sufficient arms and ammunition to maintain a status of independence from any who might attempt to abuse them, which would include their own government.” George Washington

  10. #10
    Boolit Master
    Join Date
    Jan 2018
    Posts
    2,585
    Quote Originally Posted by merlin101 View Post
    Short of a milling machine the router method is next in line. When using the router chips fly EVERWHERE! After doing the first one I used a cheap harbor freight blue tarp and cut a hole in the center big enough to fit over my vice, the tacked up the back and sides. That made clean up a breeze. Cut slowly and carefully wear PPE! Make sure you check the collet is tight especially for the final cut they seem to want to loosen and the bit slides out making a deeper cut ending with a cut all the way thru the trigger area! Pay special attention to the difference in depth, notice that the rear is not as deep. Don't forget gloves, al. slivers are small and hard to get out.
    Excellent point, long sleeves and gloves (and something to keep them from going down your neck!!!) and face protection are definitely necessary. I built a mount for a shop vac on my vice which helps a ton. Good quality cutting oil helps with keeping the chips under control also.

    Sent from my Pixel 3 XL using Tapatalk

  11. #11
    Boolit Man ScrapMetal's Avatar
    Join Date
    Sep 2019
    Location
    Nebraska
    Posts
    81
    I haven't used the jig/router method and have only done it on my mill. The number one thing (after safety) that you need to make sure of is having a solid, stable vise to hold the work.

    I made a set of vise jaws to hold mine. There are some pics at the start of my first 80% build at AR lower build


    -Ron
    Last edited by ScrapMetal; 02-21-2020 at 04:37 AM.

  12. #12
    Moderator
    Texas by God's Avatar
    Join Date
    Mar 2016
    Location
    Texas
    Posts
    14,414
    It turns out that the router adapter is not present but Midway to the rescue. No directions either but the video is good.
    I don't have a mill- yet.....

    Sent from my SAMSUNG-SM-G930A using Tapatalk

  13. #13
    Boolit Master
    Join Date
    Dec 2010
    Posts
    586
    parts kits from palmetto state are reliable lately.

  14. #14
    Boolit Buddy
    Join Date
    Mar 2016
    Location
    Logan, Ut.
    Posts
    494
    WHOA !!!! Scrapmetal Dude !!!! You stopped Waayyyyyyy to soon with the pictures. ! We need to see that whole process, step by step. With NFL instant replays. PLEASE !!
    Good Judgment comes from Experience, Experience comes from Bad Judgment !

  15. #15
    Boolit Man ScrapMetal's Avatar
    Join Date
    Sep 2019
    Location
    Nebraska
    Posts
    81
    Quote Originally Posted by nun2kute View Post
    WHOA !!!! Scrapmetal Dude !!!! You stopped Waayyyyyyy to soon with the pictures. ! We need to see that whole process, step by step. With NFL instant replays. PLEASE !!
    Okay, but if this is deemed to be too "off topic" for the OP I'll pull this post. I'd hate to hijack someone's thread.

    I started with a set of 6" x 3" x 1.5" aluminum soft jaws from Monster Jaws, fired up the mill.


    Here is a shot of the completed "first operation". I set the quill stop for the proper depth and then "went to town" on drilling.


    I pulled the lower out and swapped out the jaws to do some other work and here I put the drilled out casting back in the vise and used the DTI to make sure it was true with the mill.


    I installed the pivot pin and touched off of it with the edge finder to set the "0" on my X-axis.


    To set the Y-axis "0" I touched off one side of the casting, set the zero on my DRO, then switched to the other side and used the "1/2" distance function to find the center line.


    Finally, here is a shot just as I'm finishing up the plunge/roughing out.


    Finished with the firing mechanism cavity.


    Switched back to a set of flat jaws and used some spacers to set the lower on it's side, level, and with enough clearance to drill through.


    Installed a 1/8" spotting drill and marked the location.


    Followed that up by drilling a 1/8" hole all the way through both sides of the casting.


    End of part I see next post for part 2.

    -Ron

  16. #16
    Boolit Man ScrapMetal's Avatar
    Join Date
    Sep 2019
    Location
    Nebraska
    Posts
    81
    Continued from part I

    To finish out the first hole I used a 5/32" chucking reamer. Back gear and around 80 rpm.


    Now it's on to the hole for the safety selector. Now with a 3/8" spotting drill.


    In the next pic I used a 23/64" drill to make the hole through the casting. I could have maybe used a 3/8" but I don't trust the drills to be accurate and that would have left very little room for error.


    Like the previous holes I chucked up a reamer, 0.376" this time, and put the finishing cut on the hole. Here you can see where I had to slide the aluminum spacer out of the way. Once again, back gear and 80 rpm.


    The "finished" lower (sorry, I didn't take pics of milling out the hole for the trigger.)


    A shot of the test fitting of both the hammer and trigger assemblies. I disassembled it and hit the milled area with Brownell's Aluma-Hyde II paint.


    Finished lower waiting for upper.


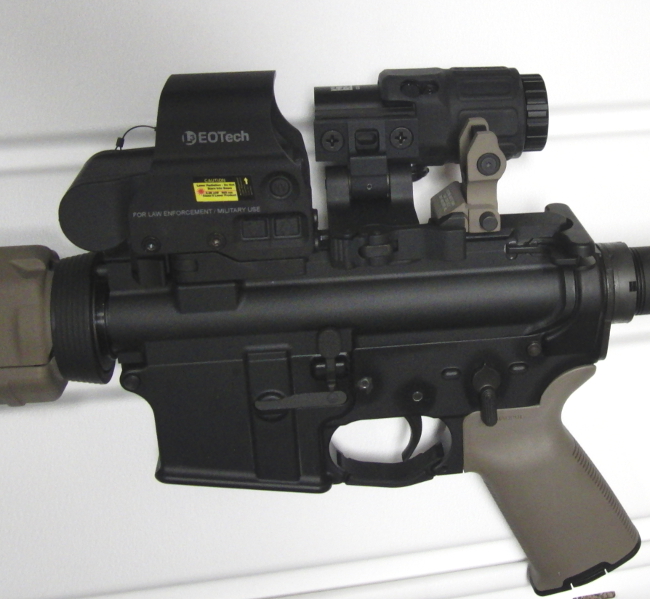
    I finished it up with Troy Industries folding battle sights, front and rear (in the lower picture the eyepiece is moved to the side in order to raise the rear sight), an EoTech holographic sight and magnifier, and all Magpul furniture. The Troy battle sight is high enough so that it can be used without removing the EoTech sight though it might not look it from the pictures.


    Sorry for all the pics/detail but I tried to trim it down to the essentials (I really did!)

    Let me know if this was too much,

    -Ron

  17. #17
    Boolit Buddy
    Join Date
    Mar 2016
    Location
    Logan, Ut.
    Posts
    494
    Beautiful !!! TY !
    Good Judgment comes from Experience, Experience comes from Bad Judgment !

  18. #18
    Moderator
    Texas by God's Avatar
    Join Date
    Mar 2016
    Location
    Texas
    Posts
    14,414
    Actually kind of fun this way.

    Sent from my SAMSUNG-SM-G930A using Tapatalk

  19. #19
    Boolit Master
    Join Date
    Jan 2018
    Posts
    2,585
    Quote Originally Posted by Texas by God View Post
    Actually kind of fun this way.

    Sent from my SAMSUNG-SM-G930A using Tapatalk
    Ok, that's cheating!!! But in a fabulous way!!

    Sent from my Pixel 3 XL using Tapatalk

  20. #20
    Boolit Master BNE's Avatar
    Join Date
    Mar 2013
    Location
    SC
    Posts
    1,210
    Ron,

    Thank you for the pictures and guide. I had always wondered what was involved.

    Texas by God: - What are you showing? We need more details / pictures!

    BNE
    I'm a Happy Clinger.

Page 1 of 3 123 LastLast

Posting Permissions

  • You may not post new threads
  • You may not post replies
  • You may not post attachments
  • You may not edit your posts
  •  
Abbreviations used in Reloading

BP Bronze Point IMR Improved Military Rifle PTD Pointed
BR Bench Rest M Magnum RN Round Nose
BT Boat Tail PL Power-Lokt SP Soft Point
C Compressed Charge PR Primer SPCL Soft Point "Core-Lokt"
HP Hollow Point PSPCL Pointed Soft Point "Core Lokt" C.O.L. Cartridge Overall Length
PSP Pointed Soft Point Spz Spitzer Point SBT Spitzer Boat Tail
LRN Lead Round Nose LWC Lead Wad Cutter LSWC Lead Semi Wad Cutter
GC Gas Check