Then my apologies for the confusion.
But today (rain willing) we'll see if PC protects the base on par w/ gas check.
(I'm not concerned w/ body/shank, as ALOX has already proved itself there)

|
   
   
|


|


Then my apologies for the confusion.
But today (rain willing) we'll see if PC protects the base on par w/ gas check.
(I'm not concerned w/ body/shank, as ALOX has already proved itself there)

I shoot my 7mm-08 with 45:45:10 since its a bore rider but the 350L is going to be PC only so that is what I will chrony. Sadly, we have an all day rain event today so no shooting.
Boundary value results as we say in the trade
(I think I'll stick w/ GC & ALOX)
It does seem that prehaps H335 or H4198 might be good in this caliber...
I am really looking at getting a nice 350 legend upper and playing with it... Wife is not gonna be happy.
WWG1WGA


H335 will work for subsonic. But I think it is too slow for anything else. From reports I have seen it is extremely dirty because of the low psi it generates. 4198 works so does 1680. This is the speed where it cuts off at for powder.
Hate to do this to you...but what are friends for? I just had this 18" mil-spec upper show up on my porch. Couldn't beat the price.Originally Posted by 44Blam

Bear creek Arsenal;
https://www.bearcreekarsenal.com/upp...er=473&stock=1
The better half said "Oh, did you get a new gun"? I said, well, gun parts actually. She said, "That's nice, happy fathers day"
I love that gal! Tomorrow, I'm going to my LGS and pick up my lower receiver and a 5 rnd mag to get things going.
https://tituskustoms.com/aero-precis...ck-apar501111/
So here I am, down the rabbit hole. Lurkin and lurnin about how to feed it.
Thanks guys!
Did that upper come with the bolt carrier group??? It sure looks like it does. I like the idea of the side charging handle over the standard AR charging handle...
WWG1WGA
BCA uppers do come with the BCG. I have 2 side chargers and love them but HATE the handles themselves so I turn ones from aluminum for my uppers.
I will get the next one with a left side charger and make it a bolt action.
Your rifle sucks! 10" AR target, the bright spots are the 10 shots for the chrony, about 2" from side to side, no gas check, PC, LEE 358-200. Just shot today.
Chrony results for 21gr H110 under the LEE 358-200.
10 1856 0.00 0.00
9 1857 0.00 0.00
8 1959 0.00 0.00
7 1869 0.00 0.00
6 1822 0.00 0.00
5 1848 0.00 0.00
4 1825 0.00 0.00
3 1867 0.00 0.00
2 1808 0.00 0.00
1 1892 0.00 0.00
Not as fast as I like but no pressure signs, accurate and a lot of fun to shoot!
Shooting bench: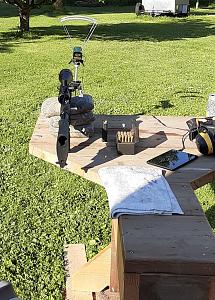
OK, right side up now.
Full target

Last edited by Dapaki; 06-20-2020 at 12:43 AM.
...or it "could" be that PC'g protects the base/edges of the bare gas check shank, whereas ALOX'g leaves the base/shank exposed.
Be that as it may, I find gas-checking no big deal since I have to pick the bullet up to size it anyway, and ALOx'g a dozen or so at a time allows small-batch experimentation.
(and I can dry the ALOX in my wife's oven w/o complaint)
Im sorry, I thought I had put a smiley face after my comment, pretty tongue in cheek. I do agree, I have several boolits that splashed off the steel that show a complete boolit base with no sign of gas etching on PC bases.
I do like Alox, I have a gallon on 45:45:10 that I use for the right load and anything that is a bore rider. I do use gas checks on them if I go super sonic.
Yes, it's complete and ready to go. Attach a lower receiver and optic of choice, and go have fun. I gave it a good complete scrub and loob today. One thing I noticed while cleaning it that gives me concern though. there appears to be what i would describe as a small bridge in the center of the feed ramp. Looks as though it's designed to guide bullets from the magazine to either the 5 or 7 o-clock position on the feed ramp leading into the chamber. Sort of a divider milled into the 6 o-clock position of the feed ramp. Could be a problem, especially with cast.
Anyone else have this feature or have an opinion on it? Maybe I can post a good picture of it tomorrow.
Last edited by fastdadio; 06-20-2020 at 11:42 PM.


Darned if they aint building so many side charger uppers I havent been able to find one for myself
for weeks!!
Im building another hunting upper and have to decide upon a caliber. Of coarse 350 is in the short list
Good luck with it man!!
NRA Life member � REMEMBER, FREEDOM IS NOT FREE its being paid for in BLOOD.
Come visit my RUMBLE & uTube page's !!
https://www.RUMBLE.com/user/Cwlongshot
https://youtube.com/channel/UCBOIIvlk30qD5a7xVLfmyfw
Harken back a page or two while we wait for the bodkin arrow points to come in so I can build my tip splitter rig so I can tip split me some powder coated air dropped WW bullets.
Harken back further to the fixing of the run out on my drill press. It started at a "too durn much" .016" worth of run out and that was an unusable whole bunch of a lot of run out, so I had worked on reducing it.
Lapping the jaw gripping surface tip line up on a hardened ground 3/8" dowel pin using 6 micron diamond paste proved out to be a nice slow controllable method and I got the run out down to .002-.003" and I stopped right there as I wanted that .002-.003" of remaining run out to add to my .3535" (9mm) ball end cutter diameter to hopefully get me very close to .356-.357" post cutting desired diameter on my plunge milled cavities.
(sounds good in theory, until you try it for realanyway)
I just spent the last hour indicating in the LEE mold block in the vise jaws so I don't get so much cavity to cavity depth variation (well, as much as I would have before paper shimming and tweeking and measuring and paper shimming and tweeking and measuring and paper shimming and tweeking and measuring ....... you get the idea).
I improved both the hole to hole depth setup variation and the hole to cut off plate angle setup variation, so that was all to the good and I consider it time well spent.
I have a total of .0035" side to side and front to back across the mold face, both swept off the same indicator zero. This same zero measures .002" variation as it bumps over the grooves so some of that groove number should perhaps be detracted from the .0035" total indicator reading, but how much to detract is up to debate.
I plan to flat sand the surface and remove all the cavity mouth machining burrs after I finish the machining, so some of the present .0035" total indicator variation reading is going to go away in any case. We shall see.
But I am all mentally shot for today, so tonight I get me good night's rest ---- tomorrow I make some chips and we see if we make a mold or if I make a mess of things ---- either outcome is out there in the cards, so to speak.
Broadly speaking, I am looking for a simple straight shanked round nose (no gas check) bullet form that will cast all 4 cavities somewhere between 185 and 200 grains after powder coating.
Not being silly about it, if the cast slugs from each cavity were "weight constant" within 5 grains I would be tickled silly, but I think a 10 grain total spread is more likely considering both cavity cutting variations and normal casting variations (and powder coating thickness variations).
Last edited by Oldfeller; 06-27-2020 at 12:53 AM.
All retired now, just growing tomatoes and building and shooting my guns.
Cavity machining went in a fairly typical fashion.
--- I broke a small bit in the gummy soft LEE aluminum and had to stop and get the shards out of the hole before proceeding. The drill press is violently over powered on small bits and it will snap them like a dry twig at the least opportunity. The gummy soft aluminum is the enemy of small thin HSS bits as exceeding their rotational strength is easily done in a strong drill press.
--- The drill press spindle construction allows harmonic vibrations to build up which get expressed in the hole you are machining. Lots of lube helps turn the internal vibration marks into a small repeated pattern instead of a LARGE repeating pattern. The vibrations originate in the belt drive system and in the clearances and out of round conditions of internal quill shafts, etc.
--- The HSS tooling cutting edges and drill bit cutting edges dull quickly in the gummy soft LEE aluminum --- faster than I would have believed possible before now. I question the LEE extruded aluminum mold block material for having lots & lots of little slag inclusions (recycled material, I suspect) .....
--- If you expect the built in quill based depth stop to just work the way it seems to work, you are young and naive about Taiwanese tooling. It does work, but the way it works is non-intuitive and is not covered by any literature.
--- The latter cavities (made with the abraded tooling edges) have very small "pressure ridge artifacts" at the cavity edges where the straight shank hits the round nose form. I will leave these pressure artifacts alone since the are part of the parting line and the cavity to cavity alignment now. They will wear away during lapping and cleaning, in as far as they need to be removed anyway. Lee cavity faces are designed to be interrupted surfaces for gas venting, and the small machining artifacts that take place in this intentional clearance envelope are natural parts of the LEE experience, IMHO, and should be left alone since removing them changes the closure geometry of the mold.
Because three of the four holes required a revisit with the finish cutter to get all the way down to final depth, three of my cavities are very slightly double cut. Good news is that the XY axis vise allowed me to "discover the holes" again and go back down inside them fairly cleanly.
Next good news, the fact I plan expand or "jack open" the bullets with the bodkin point and repack them back again in the sizing die means that the errors made so far in making the cavities really aren't so severe as they could be.
click on the pic to expand it
Tomorrow I dot mark the cavities (very small dots along the center line of the bullet shank near bullet base) then put the mold into the handles, put it all together with the sprue plate and make my lapping casts. Lapping will simply be done to aid release more than to change bullet size as I think I am "good enough" for bullet size right now anyway.
Last edited by Oldfeller; 06-28-2020 at 12:48 AM.
All retired now, just growing tomatoes and building and shooting my guns.


When I did an 80% AR lower, I found some Aluminum cutting fluid that worked great on the end mill. I had zero aluminum build up on the end mill.
Lar, I oiled both the cutter and the hole and had no notable cutter build up issues anywhere. The last motion of the round ball end cutter once it went past the drill bit relief hole was the highest pressure cut of the entire thing and that is what made the pressure artifacts in that area.
The vibration seen in the holes came from the 3 pulley drive system expressed through the quill shaft and I moderated that a good bit by loosening the motor bracket to take tension off the belts. They still grip and drive just fine, they just rattle the output shaft system a bit less.
click on pics to expand them
Tomorrow I warm the pot up and get some trial casts off of it, and I start learning the ins and outs of getting the cavity closest to the sprue plate pivot pin to drop free from the mold.
I may have to use the sprue plate's rotation motion to kick that innermost cavity free, but I will NOT be beating on the mold blocks with any wooden stick a la any standard LEE stupidity. I wear two to three sets of cotton gloves one over the other for heat protection and I use my hand to force the sprue plate over, getting there just as the sprue begins to harden.
And yes, I grip the hot mold with my gloved hands. Layered cotton gloves protect you very nicely and if the heat comes through (or you wear out a spot on the gloves) you add in another newish glove over the top of what you are already wearing. 2-3 layers of cotton gloves are enough for comfortable mold handling.
Casting at speed is very easy when simple hand motions do everything for you.
As always, my steel handles are adjusted as tight as they can be and still move acceptably, my mold halves are pinned to the handles and then treated with Primer T and heated up, then locktite is dripped into the handle to mold joint gap where it gells in minutes, taking out any loose clearance and giving a matching location to the big handle bolt joint that will always put the mold block alignment pins into their mating holes accurately and cleanly every time.
You don't beat on a mold once you do this trick, you teach the cavities to drop free by lapping and the use of hexagonal boron nitride powder.
Remember, this mold is going to catch pure thermal hell from speed casting frosty hot bullets and then resting on a wet rag briefly to get the sprue to jell quicker. My sprue plate has very generous linked pouring cones in it so it is going to get right hot too. With this one, the LEE Production Pot's ingot melt rate may well be what really limits my overall casting speed ......
I think I will like using the mold, it actually weighs less than what a dual cavity mold weighs because of the extra holes and the use of the lighter aluminum sprue plate.
Last edited by Oldfeller; 06-28-2020 at 04:03 AM.
All retired now, just growing tomatoes and building and shooting my guns.
First cast is done, and I got me some really really bad extremely oversized cavities due to VIBRATION and to quite large amounts of final cutter run out.
Having grabbed my quill and spindle and tugged at it some just now I can actually feel some of those clearances in the quill and spindle moving. These were the issues that originally gave me .016" of chuck run out and which were really not fixed by all my work on the chuck, but instead they were simply moderated and disguised.
Given some real full speed cutting action all the .016" of original run out plus the accompanying VIBRATION was allowed to re-express themselves inside the cut cavities.
First cut mold looks pretty, but it is scrap.
Now to digest what I learned, think about it all for a bit, and let it all settle out some in my mind .......
First thought is to progress through the drills up to the final pass with the ball end mill --- but stop there and set a STATIONARY ground center in the chuck and use a tap holder to hold the end mill in line with the undersized hole and advance the end mill like it was a reamer using the quill. Issue remains that the quill/spindle clearances will likely still be reflected in the final "reamed" hole as the chuck mounted center will still wander inside those same clearances.
Last edited by Oldfeller; 07-05-2020 at 08:40 AM.
All retired now, just growing tomatoes and building and shooting my guns.
Here are the measurements (averaged by measurement technique and intention). There is a good bit of form error that followed the helix form of the cutter, so that is another cause to be reduced if possible.
I tried hand reaming a piece of scrap aluminum with the milling cutter -- not gonna get anywhere with that "hand ream off dead center" idea as the cutter is not controlled by much during feeding and it wanders off and likes to go tilted.
Bad bad idea, hand reaming with a milling cutter.
small end___________________________large end
.360" - .370"________________________.370" - .380"
The two flute HSS ball end mill is too flimsy due to the more flexible HSS material and the deep deep relief grooves between the cutting edges. The cutter's general form is relatively too weak and the material is not inherently stiff enough to fight feedback vibration.
I feel the drill press speed was set too high and the cutter pressures used were too high as well. Drill Press RPM has been slowed down as much as possible for the next try. A slick coating on a four flute carbide ball end mill has been chosen for sharpness, better rigidity, better hole wall support and much better cutting edge durability to get rid of some of the vibration effects.
I will use a heavy oil to try to fight vibration marking next time.
Cutter size was reduced to 11/32" (by .010") which will bracket the small end to ~around~ .350" to .360". The better cutter will reduce taper and vibrational effects with the slick hard coating contributing to reducing the vibrational feedback.
I will be buying new jobber length drill bits for stock removal as the new carbide cutter is a good bit shorter (cutter length and drill bit length was found to be unnecessarily long on that last try as well). It is important that all cutters mount all the way up into the chuck to hit the same depth controlling surface so I can use a common depth stop setting.
Now we wait another 1 1/2 months for cutters to ship from China.
Last edited by Oldfeller; 07-05-2020 at 09:45 AM.
All retired now, just growing tomatoes and building and shooting my guns.
 Posting Permissions


| BP | Bronze Point | IMR | Improved Military Rifle | PTD | Pointed |
| BR | Bench Rest | M | Magnum | RN | Round Nose |
| BT | Boat Tail | PL | Power-Lokt | SP | Soft Point |
| C | Compressed Charge | PR | Primer | SPCL | Soft Point "Core-Lokt" |
| HP | Hollow Point | PSPCL | Pointed Soft Point "Core Lokt" | C.O.L. | Cartridge Overall Length |
| PSP | Pointed Soft Point | Spz | Spitzer Point | SBT | Spitzer Boat Tail |
| LRN | Lead Round Nose | LWC | Lead Wad Cutter | LSWC | Lead Semi Wad Cutter |
| GC | Gas Check |

 Reply With Quote