P Flados and Bikerbeans,
Mold will arrive Tuesday, 12/03/19 on USPS Tracking # 9505 5146 1253 9333 5597 55

|
   
   
|


|


P Flados and Bikerbeans,
Mold will arrive Tuesday, 12/03/19 on USPS Tracking # 9505 5146 1253 9333 5597 55
All retired now, just growing tomatoes and building and shooting my guns.

Copy, thanks.Originally Posted by Oldfeller

BB
I was disappointed in that I got no feedback at all from two other potential sources.
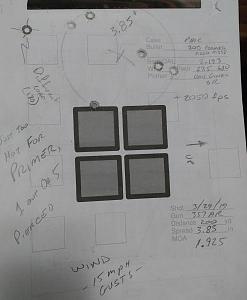
From my gun, my version of these boolits feed great with negligible damage. The 180s generally shoot under 2" at 100 yards but seem to end up around 6" - 8" at 200 yards. I got under 2 moa at both 100 and 200 yards with my 200s.
Last edited by P Flados; 11-29-2019 at 02:09 PM.
I also played around with a different nose punch to give me a slightly bigger (0.18") and flatter meplat version for the 200s. They also fed good with minimal damage and seemed to shoot just as good.

SOME MORE ERRANT IDEAS ARE LEAKING OUT AGAIN
I had a few days with no wife around to provide distractions, so I had a few errant thoughts that seemed to move around towards reality a little bit. The one above has to do with certain ribs in certain cheap plastic PMAG magazines that don't need to stand so tall such that they cause trouble with stacking the wide body 350 Legend rounds in the mag side by side, but in contrast these same ribs do still need to be there (to a lesser amount obviously) to give the magazine follower something to follow.
Whatever the answer is, it will require something to be built to "make it so" as Picard used to say on Star Trek .....
=========================
Conversations with P Flados got this chain of thought started. We were talking about multi-cavity molds in LEE blocks, and I put forward that the LEE stamped steel sprue plate seems to be a real issue with pursuing some of the Evil ARproject ideas I was popping off about.
Then I got to thinking about the cheapest way to scratch both itches and I really really really started to miss access to a milling machine at work .....
Then I remembered I have a spare little cast iron drill press sitting in a box in the storage shed that could make up a "screw it to a piece of plywood" combined tool assembly that I could put up on my work table just like I do the various reloading presses now.
Last edited by Oldfeller; 11-30-2019 at 09:24 AM.
All retired now, just growing tomatoes and building and shooting my guns.
In a P Mag, the guidance from the 357AR pioneers was to completely remove the side ribs and that you could take material off the front rib as needed.
My 20 rnd P mag has the side ribs 100% gone and I thinned the front rib. The follower does fine and the mag feed great.


Yup completely remove them!
Not needed at all. Even top that holds down follower from nose up profile. Then disassemble and stretch spring a bit.
CW
NRA Life member � REMEMBER, FREEDOM IS NOT FREE its being paid for in BLOOD.
Come visit my RUMBLE & uTube page's !!
https://www.RUMBLE.com/user/Cwlongshot
https://youtube.com/channel/UCBOIIvlk30qD5a7xVLfmyfw
Well, I spent Saturday afternoon and part of Sunday morning moving my small drill press from the garage to the computer/reloading room and in cleaning it up some.
I have decided that I was a good bit stronger back in the day, and my small drill press is still plenty heavy to be moving it around now that I am older.
And yes, this is my smaller drill press, the bigger one is a floor standing model that is out in the boxes in the storage shed.
Last edited by Oldfeller; 12-01-2019 at 06:03 PM.
All retired now, just growing tomatoes and building and shooting my guns.
FYI, the tooling in the picture plus a bench grinder and a propane torch is equivalent to the tooling I used to make the mold reamer and the custom boolit mold.
Yeah, I did my 7mm HBC bullet way way back in a previous list generation, back when I had access to a lathe and a milling machine at work.
By adding a small two axis slide with a vise to the heavy drill press table I pick up the ability to do most easy forms of gunsmith work and I get enough capacity to make a clean shot a making up a wooden slider block with bearings for a shaft that mounts that little rotary file from Vermont American such that I can start sliding the block into the butt of the PMAG, engage the rotary file driven by a light drill and then push the block slowly through the magazine and take those ribs out completely (cleanly I hope).
I will have to build 3 blocks with a bearing equipped hole on the right side, again on the left side and then the last block in the center so I can process all the right hand ribs, left hand ribs and center ribs.
I know I can do the aluminum sprue plate, as that is just flat work. Once I get the pivot hole and stop feature squared away I can layout the center line off the parting line of a mold with a pencil mark and then space out the cavities to be 4 up at 9mm size. This gives about .100" between the cavities, which is enough for mechanical strength, but does not do very much for cavity to cavity cooling of that much molten lead.
It's funny, the smaller the bullet gets, the more cavities I can put into the block.
Doing four larger diameter cavities will mean casting the lead, then slapping the mold on a wet rag and making a cloud of steam for a 3 count, then cutting the sprue just as soon as the elongated sprue puddle chrysalises (goes grainy and becomes solid).
Last edited by Oldfeller; 12-01-2019 at 06:06 PM.
All retired now, just growing tomatoes and building and shooting my guns.
For more than 2 in a standard Lee blank, you need to consider boolit length. You may need to watch out for getting too close to the alignment pins.
Full length 9mm bullets are likely limited to 3 bullets with a very minimal wall thickness between them. You could get tricky and stick in a couple of smaller diameter shorter bullets that were located over the pins themselves, say a .224" bullet on each side over the alignment pins?
This may be pushing it a bit too far, I do believe ......
Better would be to get the distributor to order the same length but slightly deeper long rifle blanks from LEE. This is possible because the base extrusions are like 8 feet long and LEE cuts them off to length and puts the pins in themselves anyway.
Last edited by Oldfeller; 12-22-2019 at 03:53 AM.
All retired now, just growing tomatoes and building and shooting my guns.
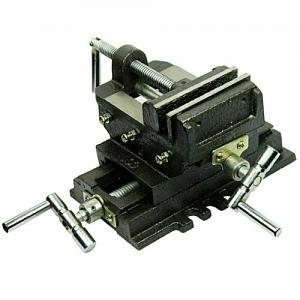
Update for new X & Y axis vise. This is not a precision piece of machinery, but set up as snug and tight as I have it set up now it should be able to poke some cavity holes using a belt sanded (formed drill) bit. This is the idea, anyway.
This offers the user the chance to put his own dream configuration into a 9mm drill bit using a cordless drill and a belt sander, then hand grind the cutting relief into the nose form such that the nose will remove aluminum cleanly while drilling out the basic starting hole that is already made by a smaller bit.
Once you have a hole and you can make some starter castings, you then follow the techniques laid out here to put whatever sizing and tapering you want into your dream powder coated configuration bullet.
http://castboolits.gunloads.com/show...ture-diameters
Next, I hope this fancy vise can reliably hold an assembled mold of the older LEE style while some smaller holes get modified into something new. Ditto for assembled molds of the new style LEE dual cavity molds.
Another trick that needs proving out is using a piece of this stock to control the depth of cavity drilling such that you can have multiple cavities that could be close to "weight same" in the same mold block (within reason). The face of the chuck will stop on the ring making the cavity depth fairly repeatable --- much better than an easily nudged "un-precise" drill press stop can do, anyway.
Don't want much, do I?
Once again, I remind all the lookie loos that this is an expert level thread, and this stuff is in no-ways as easy as it looks to actually go do it.
And I am seriously not volunteering to do it for you, just showing you a potential method that can get you there (I hope anyway) if you want to put forth the effort to go there on your own.
Right now this isn't proven out by any means, not any of it. It is a errant thought being followed up upon .......
............ still, it is looking like progress.
Last edited by Oldfeller; 12-03-2019 at 09:21 AM.
All retired now, just growing tomatoes and building and shooting my guns.
I saw a mini lathe in a previous post. That plus a grinder and a torch is all you need to make a D Reamer. D Reamers are probably better at making nice cavities than anything you can make out of a drill bit (I have tried).
0.375" W2 drill rod is cheap. I got mine from Grainger.
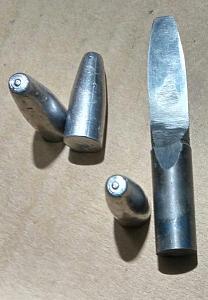
Turn down a 3" - 4" piece of drill rod to the desired shape, grind off one side, heat orange hot, quench in water, temper in your powder coat oven and you have a D Reamer. Drill a small pilot hole in the blank mold and then ream out to get a finished custom mold cavity.
Here is a pic of the one I used to make the 357AR custom mold:
Last edited by P Flados; 12-03-2019 at 12:52 AM.
My approach was different, I took a standard form drill bit and freehand sanded it on a fine belt sander to the desired form, then all I had to do was relieve the back side of the new form's cutting edges so they presented a narrowed cutting edge to the aluminum. I did not try to achieve a true cutting edge with grinding but simply removed down to a 1/64 edge that was presented to the aluminum, then I hand stoned that edge like a pocket knife with a fine diamond file to deburr and edge relieve and refine it some.
It was fine eye coordination stuff, but actually did not take very long to do compared to starting up on a knife blade. Having to get the approximate drill bit size is dead easy for 9mm, but will be a good bit harder to do for other bullet sizes.
You can see my plan should be able to plunge a somewhat repeatable hole into a multi cavity mold rig, but like most plans you do not see all the complexity that will arise in trying to actually go do it.
I have always had to hand lap any of my attempts at mold making, so I start undersized by intention and lap upwards. I also plan to multi-coat the powder coating as needed to get "throat fit" for different guns in 30 caliber and in 8mm since such large ranges of throat size are common in these guns.
My bit material is cobalt steel, intending to have the cutting edge survive accidentally touching a LEE bushing insert if such should happen (and with my luck, it will).
I trued the table to the spindle, accurate within the run out of the spindle of course. Best method to true the hardened jaws turned out to be lapping them with 50 micron diamond paste on a rolled steel mandrel. You have to use relatively light jaw pressure and some oil applied several times or the surface of the steel will tear up under the light clamping pressure of the jaws.
These cautions then double when tuning the main chuck jaws of my lathe, very very mild tightening force was needed or desired. In doing this kind of stuff you begin to see that run out changes from clamp up to clamp up, and if there is any dirt or machining fines involved in the chuck's motion you have to get it all out to see a result that will repeat itself.
Last edited by Oldfeller; 12-17-2019 at 03:01 PM.
All retired now, just growing tomatoes and building and shooting my guns.
Upon seeing what Titan supplied, I contacted them to please get up with LEE and provide the same block that is used for the 300 Blackout long bullet and the 45/70 long bullets. These blocks are a good bit deeper, and stand much less of a chance of hitting the pins when sinking a string of cavities into them.
Titan took a whole day to get the new mold block set up in their system. Kudos to Titan for a very fast response.
Here is the new listing for the longer deeper mold block.
https://www.titanreloading.com/lee-p...nk-bullet-mold
.......... back to the evil dreams ........
Last edited by Oldfeller; 12-08-2019 at 11:15 AM.
All retired now, just growing tomatoes and building and shooting my guns.
Modifying 30 round 5.56 PMAGs for the Legend
has binding issues with Legend brass due to the wider Legend head area.
Quick update on projects in motion ...... the milling vise is mounted and initially trued to the drill press output shaft and chuck. Chuck run outs have been reduced by half by lapping, but that is all I am likely going to get out of these jaw lapping efforts as I find my hardened steel shafts and cheap ball bearings that mount the chucks have some variability issues of their very own.
Sometimes I get .003-.005" readings, sometimes I get .001" readings, it changes reading to reading due to bearing shake ......
Still, since I am starting out .003" below desired cavity size, I think I can stand a little bit of run out while making the cavities. I think the misc. run outs in all the bits and pieces will tend to centralize once the bit is fully engaged in the aluminum block (using the side walls as a long bearing surface to contain all the various run out motions) ---- I like to think that this will happen anyway.
Now I move out to the garage to make up the first pass at the wooden block that will run down the inside length of the PMAG magazines holding the rib removing cutter shaft engaged to the work. This will be fun, I think.
Old style Jr. High woodshop vs post retirement gunsmithing ..... I am glad I lived in a time where they sent young boys to both wood shop and auto mechanics as requirements because both items were something a boy of my generation needed to know. I learned how to safely use a table saw, band saw, radial arm saw, disc sander, hand tools and how to make a knife, tune a car, use a timing light and set points correctly. All done in Jr. High, no less.
They also made me take a class in basic cooking, which I have also used a lot over the years. I make a mean egg sandwich that is simply to die for ......
Schools used to teach you how to be a minimally functioning adult in the 60's culture. This is so much more than what they teach today.
Last edited by Oldfeller; 01-05-2020 at 01:24 AM.
All retired now, just growing tomatoes and building and shooting my guns.
And as is typical, the switch on my table saw is bad and needs to have a switch ordered.
A lull in the action ensues while the table saw switch ships to me and I can reflect a bit on where this is all going.
350 Legend vs its predecessor, 357AR. Both do the same job, both are limited range cartridges that will self limit to within roughly 250 yards (unless you have an accurate range finder and a rainbow trajectory program in your phone in which case you can shoot a longer way with a pointy bullet).
The Legend is frustrating because it could have been sooooo much better and have fewer complications if Winchester had just factory adopted the larger 358 bullet and throat. Design decisions made early on had to be modified twice (the case taper and length) and the jacketed bullet selection isn't all it could be. Folks find appropriate bullets and work on load development because there isn't much out there yet about the gun. Putting a blunt end meplat bullet into an autoloader has its own fun to provide as there is a long way between magazine lips and forcing cone, some of it is in the air and is not controlled by either end.
That's the main theme here, 350 Legend is a gun for the experimenters among us. In that aspect it is a good one, since it will amuse you for YEARS and you will still have stuff left to do.
I know of one recent experimenter who got hooked into the gun because he wanted to understand what the fuss was about. One gun and two barrels later, he is looking for better bullets and finding a lot of pistol designs and very few rifle designs.
350 Legend just plain leads you into places you did not plan to go ..... I never planned to get back into custom bullet molds ever again, been there and done that --- could find the tee shirts if I scrounged around enough looking.
But the Legend needs molds and bullets, so here I am again.
As such 350 Legend is a journey, not a commodity destination.
Last edited by Oldfeller; 12-09-2019 at 07:53 AM.
All retired now, just growing tomatoes and building and shooting my guns.
NEXT! I am finished casting with P Flados's loaner mold and ready to ship it to the next user. Oldfellar lubed the mold before he shipped with it and after 100 cycles the boolits were still falling out of the cavities without encouragement. The mold is ready to cast as is so I left it alone.
Thanks Gentlemen.
Hopefully, one of the two of you will be able to report on function soon.
Have either of you loaded any dummy rounds to check for nose damage during feeding?
 Posting Permissions


| BP | Bronze Point | IMR | Improved Military Rifle | PTD | Pointed |
| BR | Bench Rest | M | Magnum | RN | Round Nose |
| BT | Boat Tail | PL | Power-Lokt | SP | Soft Point |
| C | Compressed Charge | PR | Primer | SPCL | Soft Point "Core-Lokt" |
| HP | Hollow Point | PSPCL | Pointed Soft Point "Core Lokt" | C.O.L. | Cartridge Overall Length |
| PSP | Pointed Soft Point | Spz | Spitzer Point | SBT | Spitzer Boat Tail |
| LRN | Lead Round Nose | LWC | Lead Wad Cutter | LSWC | Lead Semi Wad Cutter |
| GC | Gas Check |

 Reply With Quote