Once again, there I was, larger than life. I have started making a set of one piece grips out of Claro walnut.
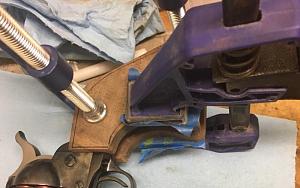
Shaping the spacer is more of a pain than shaping the grips, lol. I use Mothers Brazilian carnauba cleaner wax as a release agent.

|
   
   
|


|


Once again, there I was, larger than life. I have started making a set of one piece grips out of Claro walnut.
Shaping the spacer is more of a pain than shaping the grips, lol. I use Mothers Brazilian carnauba cleaner wax as a release agent.
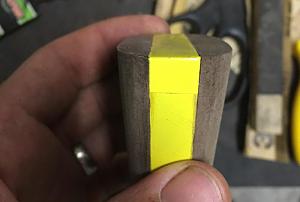
It comes out looking like this. I’ll let the epoxy cure overnight.
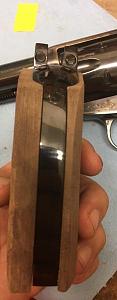
Both sides glued up.
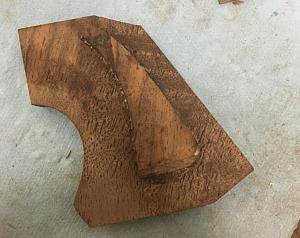
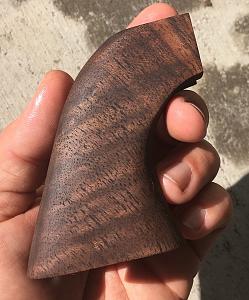
Rough shaping
Tagged to follow along. This very thing is going to be one of my next projects.
Do the best you can, with what you've got, where you're at. -Theodore Roosevelt
Getting there!!


Nice! I think I would glue the two together last but that's just me.. I am thinking about doing a Ruger with one piece grips from ResinS+ but use a piece of wood with the grain oriented parallel to the mainspring where if I ever needed to take them off just push a long thin screwdriver down beside the mainspring and pop the center section in two. Of course I would have to pin the hammer strut to the spring perch somehow and put it together against some spring tension but if a fella was crafty enough there might be a way to do it.
OR.... Instead of using a center block, one could simply superglue panels right to the grip frame but would have to devise a way to pop them apart if ever need be to disassemble the grip frame. Usually once we get a gun shooting like we like it, it never comes back apart anyway so... Superglue would hold grips onto the metal grip frame good enough for normal shooting and handling but a sharp enough impact would break the bond and you could get it apart without destroying the grips.
Last edited by DougGuy; 09-01-2019 at 01:18 PM.
Got a .22 .30 .32 .357 .38 .40 .41 .44 .45 .480 or .500 S&W cylinder that needs throats honed? 9mm, 10mm/40S&W, 45 ACP pistol barrel that won't "plunk" your handloads? 480 Ruger or 475 Linebaugh cylinder that needs the "step" reamed to 6� 30min chamfer? Click here to send me a PM You can also find me on Facebook Click Here.
I think next time I make a set I might glue together last. It would make shaping a bit easier...maybe. I plan to make another set this week so will give that way a try. For the adhesive I use JB weld clear epoxy. You aren’t popping this stuff off, lol.
Be careful prying the resin ivory and which way the grain is. It can crack on you.
The grips are fully shaped and now I am going to apply a clear grain filler. One piece grips aren’t my favorite, but I wanted to challenge myself and will make a couple more sets to get proficient with it. In a way, it was almost easier to make the one piece grips, lol. I also skim bedded the spacer for a nice and even contact fit.
I’ve sat back and pondered on ways to make a set of one piece grips for Rugers, but I just don’t see it being possible unless you glue them on. If you used superglue, acetone should loosen it up, and your finish, lol.

I am surprised at what I don't know! I never heard of doing this to a single action. Is the purpose to eliminate the screw, giving a pleasant clean look? I am intrigued and impressed at your ability to make beautiful grips!!
Look twice, shoot once.
From what I understand, is the Colt SAA was originally issued with one piece grips. Real one piece grips carved from a block of wood. Some say it was because Colt’s previous revolvers used one piece grips, so it was easy for the company to continue doing that. Others say it was because it was a martial firearm and the one piece grips were stronger and a screw couldn’t be lost.
I actually prefer two piece grips with a screw. Much easier to take the grips on and off for maintenance. With one piece grips, you have to remove the entire backstrap.
I have a Pietta clone that has 1 piece grips, but they're kind of plain. I've made several 2 piece sets before, but the Pietta doesn't have a pin to index and hold the individual sides, so they still tend to slip a bit no matter how tight I screw it down. Deciding if it would be easier to drill the frame and set a pin, or make 1 piece grips. Like Love Life said, I kind of want to challenge myself.
Do the best you can, with what you've got, where you're at. -Theodore Roosevelt
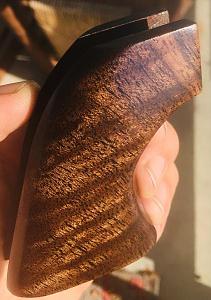
Making one pieces grips isn’t that hard. In some ways it’s easier than 2 piece grips. The most aggravating part was profiling the spacer. I just put the first coat of timberluxe on last night. This Claro walnut is pretty dark and I wish I’d have dyed it some. It has nice chatoyance and figure though. Once I get back from this hurricane evac I’ll put another coat on. At least I know the first coat will be dry lol.
Here they are with the 2nd coat of timbeluxe applied. I don’t like how dark these are. I didn’t apply any color and might try that next time.

They look excellent to me. Never thought of making them one piece.
I think once you rub in a few more coats of finish, the grain will start popping out and you won't mind the darker color.
NRA Life
NMLRA Life
F&AM
Mazo Kid- you were right!! The grips practically glow now and are about a mile deep. Here they are are 6 coats of hand rubbed timberluxe finish:
Last edited by Love Life; 09-12-2019 at 07:06 PM.


Really Pretty.
I prefer two-piece myself. Probably because that's what I grew up with.
I convert all the spaghetti Single Actions, I have to two-piece grips.
I did make a set of two-piece grips for a New Vaquero. They came with those lousy scrawny plastic "gunfighter" grips. Can't stand them.
I need a set of good handfilling walnut grips.
Mine are not as Beautiful as your's are. But they serve well.
Congrats on a really good job.
I HATE auto-correct
Happiness is a Warm GUN & more ammo to shoot in it.
My Experience and My Opinion, are just that, Mine.
SASS #375 Life
I also prefer 2 piece grips. Much easier for maintenance and I’ve never had a pair break. The one piece is a much cleaner look though.


Very nice job LoveLife. I like the fact that the grain looks like it is well filled. All too many factory grips failed miserably in that respect. I have stripped and re-finished factory grips over that one thing. I have no love for unfilled grain on handguns or rifles. james


Very pretty. Nicely done.
 Posting Permissions


| BP | Bronze Point | IMR | Improved Military Rifle | PTD | Pointed |
| BR | Bench Rest | M | Magnum | RN | Round Nose |
| BT | Boat Tail | PL | Power-Lokt | SP | Soft Point |
| C | Compressed Charge | PR | Primer | SPCL | Soft Point "Core-Lokt" |
| HP | Hollow Point | PSPCL | Pointed Soft Point "Core Lokt" | C.O.L. | Cartridge Overall Length |
| PSP | Pointed Soft Point | Spz | Spitzer Point | SBT | Spitzer Boat Tail |
| LRN | Lead Round Nose | LWC | Lead Wad Cutter | LSWC | Lead Semi Wad Cutter |
| GC | Gas Check |

 Reply With Quote
 DougGuy