Snyders JerkyReloading EverythingRotoMetals2Titan Reloading
Load DataInline FabricationRepackboxMidSouth Shooters Supply
Wideners Lee Precision
Results 1 to 14 of 14

Thread: H&I die question Raised Edge

  1. #1
    Boolit Master
    metricmonkeywrench's Avatar
    Join Date
    Apr 2016
    Location
    Virginia
    Posts
    1,108

    H&I die question Raised Edge

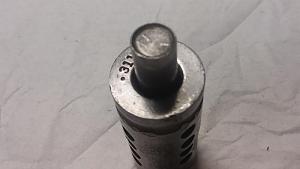
    I have a pair of .311 lube/size dies and in both cases the "I" rod have a machined in lip as shown below. I did a search here as to why they would be there but nothing relevant came up

    I'm not sure what bullet profile this is used for but it does not appear to be conducive to sizing flat based or gas check bullets.

    Short of buying a new die and as I don't have access to a lathe the thought is to chuck the rod up in the drill press and kiss a file and some sandpaper to finish to remove this lip.

    Thoughts?

    Click image for larger version. 

Name:	311 H&I 1.jpg 
Views:	37 
Size:	24.6 KB 
ID:	247154

  2. #2
    Boolit Master

    mattw's Avatar
    Join Date
    Oct 2014
    Location
    East Central Illinois
    Posts
    1,796
    I have a 225 that is the same way. Will not let go of the bullet on the up stroke and stinks for putting on gas checks.

  3. #3
    Boolit Master
    Bent Ramrod's Avatar
    Join Date
    Apr 2005
    Location
    Southern Arizona
    Posts
    4,288
    I’ve seen a fair number of factory dies with a slight dishing in the center of the “I” punch, and a couple with an aftermarket hole drilled down the center. The function of these configurations is, I believe, keeping the buildup of lube on the top of the punch from preventing bottoming of the boolit at the bottom of the lever stroke. (I made one once with a conical projection in the center for a hollow-based boolit.) Your punch might be a similar aftermarket attempt to reduce buildup on bevel bases.

    Chucking it in a drill and spinning it against a file should remove the lip. Neither die nor punch was hardened by the manufacturer.

  4. #4
    Boolit Master
    Join Date
    Jan 2011
    Location
    NE Kansas
    Posts
    2,433
    Agree with Bent Ramrod that the I portion has been modified to fit closely to the bevel base and prevent lube creeping between the base of the bullet and the push out rod.

    Mattw, are you able to just press on the side of the nose of the bullet to break the vacuum and remove the bullet from the die. If the rod is too short to allow that, you might try a spacer centered between the I portion of the die, and the flat end of the press part the lifts the I die in the H die.

  5. #5
    Boolit Master

    mattw's Avatar
    Join Date
    Oct 2014
    Location
    East Central Illinois
    Posts
    1,796
    Not able to push it out, bullet is to deep in the die.

  6. #6
    Boolit Grand Master Bazoo's Avatar
    Join Date
    Dec 2013
    Location
    Cecilia, Kentucky
    Posts
    6,785
    Without a lathe, you can chuck up in a drill press and flatten it. I made a flat nosed seating stem from a round nosed this way. I first used my grinder (while the press was running full speed), held against the drill press table for stability, to remove the unwanted portion. So this leaves a not perfectly square and somewhat rough end. So to clean it up, I put a piece of sandpaper on the press table and raised it into the spinning item to be squared. I think I used something like 220 then 600 to polish. Once the table is raised so the the paper is pinched between the table and the workpiece you can use the edges of the paper to move it around to get to fresh paper. Is it perfect, no, but it's so close I cannot detect any out of squareness.

  7. #7
    Boolit Master
    Join Date
    Dec 2007
    Location
    Colorado
    Posts
    772
    What does the other end look like?
    Some times it's the pot,
    Some times it's the pan,
    It might even be the skillet,
    But, most of the time, it's the cook.

  8. #8
    Boolit Master
    metricmonkeywrench's Avatar
    Join Date
    Apr 2016
    Location
    Virginia
    Posts
    1,108
    CF, the usual rounded end like most of my other ones.

    Was my first thought though...

  9. #9
    Boolit Buddy masscaster's Avatar
    Join Date
    Jun 2009
    Posts
    326
    The raised edge is for aid in seating Gas Checks.

  10. #10
    Boolit Master
    metricmonkeywrench's Avatar
    Join Date
    Apr 2016
    Location
    Virginia
    Posts
    1,108
    masscaster, more detail please...

    I can grasp the beveled base explanation, I cant imagine how the raised edge aids in gas check seating.

  11. #11
    Boolit Buddy
    jrmartin1964's Avatar
    Join Date
    Sep 2013
    Location
    MS
    Posts
    449
    John Barlow's original design for the gas check called for the surface to be slightly convex and the sides split (picture a shallow percussion cap), so that pressure upon firing would cause the convex surface to flatten out against the base of the bullet, which in turn would cause the leading edges of the gas check to be forced against the interior of the barrel for a better seal. Also note that originally, and for many years, gas checks were not crimped on but rather were something more akin to a friction-fit, and were actually anticipated to fall off somewhere between the muzzle and the target. Old Ideal and early Lyman handbooks stated that "I" punches to be used with gas check bullets should be slightly concave, to fit the curve of the gas check. The advent of the crimped-on gas check eliminated the necessity of the concave punch.

    The punch in the OP's pic appears to have been modified after it left the factory, possibly to fit the shank of a gas check bullet without the gas check? Who knows. At any rate, if the punch will not rise sufficiently in the die so that the bullet can be easily removed after sizing and lubricating, you really need to replace it with one of the correct length.


  12. #12
    Boolit Buddy masscaster's Avatar
    Join Date
    Jun 2009
    Posts
    326
    For one, the raised edge will help square up the gas check. Secondly, the die has a throat and the lip will have the most force on the outer edge of the check. The GC should always seat tight to the base of the boolit.
    All my old Lyman dies are this way. .30 Cal - .45. Most newer dies are not this way.


    Jeff
    Last edited by masscaster; 08-29-2019 at 11:38 AM.

  13. #13
    Boolit Grand Master

    gwpercle's Avatar
    Join Date
    Sep 2011
    Location
    Baton Rouge, Louisiana
    Posts
    9,298
    Someone went to a lot of trouble to fix the bevel base lube problem .
    Instead of removing the raised edge I would just fill the recess with JB Weld and smooth it flat , if you ever get a bevel base boolit mould you can remove the JB Weld and use it .
    Actually I would just buy , beg , borrow or steal another unaltered rod and hang on the BB one.
    Never know when you might need it !
    Gary
    Certified Cajun
    Proud Member of The Basket of Deplorables
    " Let's Go Brandon !"

  14. #14
    Boolit Master
    Join Date
    Nov 2006
    Posts
    3,901
    I believe that is there for facilitating the crimping of gas checks, just pushing on the edges of the check crimps it better than pushing on the middle of the check. I have dished ones for the Star sizer, same reason.

Posting Permissions

  • You may not post new threads
  • You may not post replies
  • You may not post attachments
  • You may not edit your posts
  •  
Abbreviations used in Reloading

BP Bronze Point IMR Improved Military Rifle PTD Pointed
BR Bench Rest M Magnum RN Round Nose
BT Boat Tail PL Power-Lokt SP Soft Point
C Compressed Charge PR Primer SPCL Soft Point "Core-Lokt"
HP Hollow Point PSPCL Pointed Soft Point "Core Lokt" C.O.L. Cartridge Overall Length
PSP Pointed Soft Point Spz Spitzer Point SBT Spitzer Boat Tail
LRN Lead Round Nose LWC Lead Wad Cutter LSWC Lead Semi Wad Cutter
GC Gas Check