Lee PrecisionLoad DataWidenersInline Fabrication
Titan ReloadingSnyders JerkyReloading EverythingMidSouth Shooters Supply
RotoMetals2 Repackbox
Page 1 of 4 1234 LastLast
Results 1 to 20 of 64

Thread: My new Rolling Block Project.

  1. #1
    Boolit Buddy
    Join Date
    Feb 2011
    Location
    Queensland Australia
    Posts
    215

    My new Rolling Block Project.

    This is a long term project.
    I am finding my 45-90 is getting to my crook back after a long session so will probably sell it.
    I have a 45-70 Roller I will keep but want to try a 40 cal so this is it.
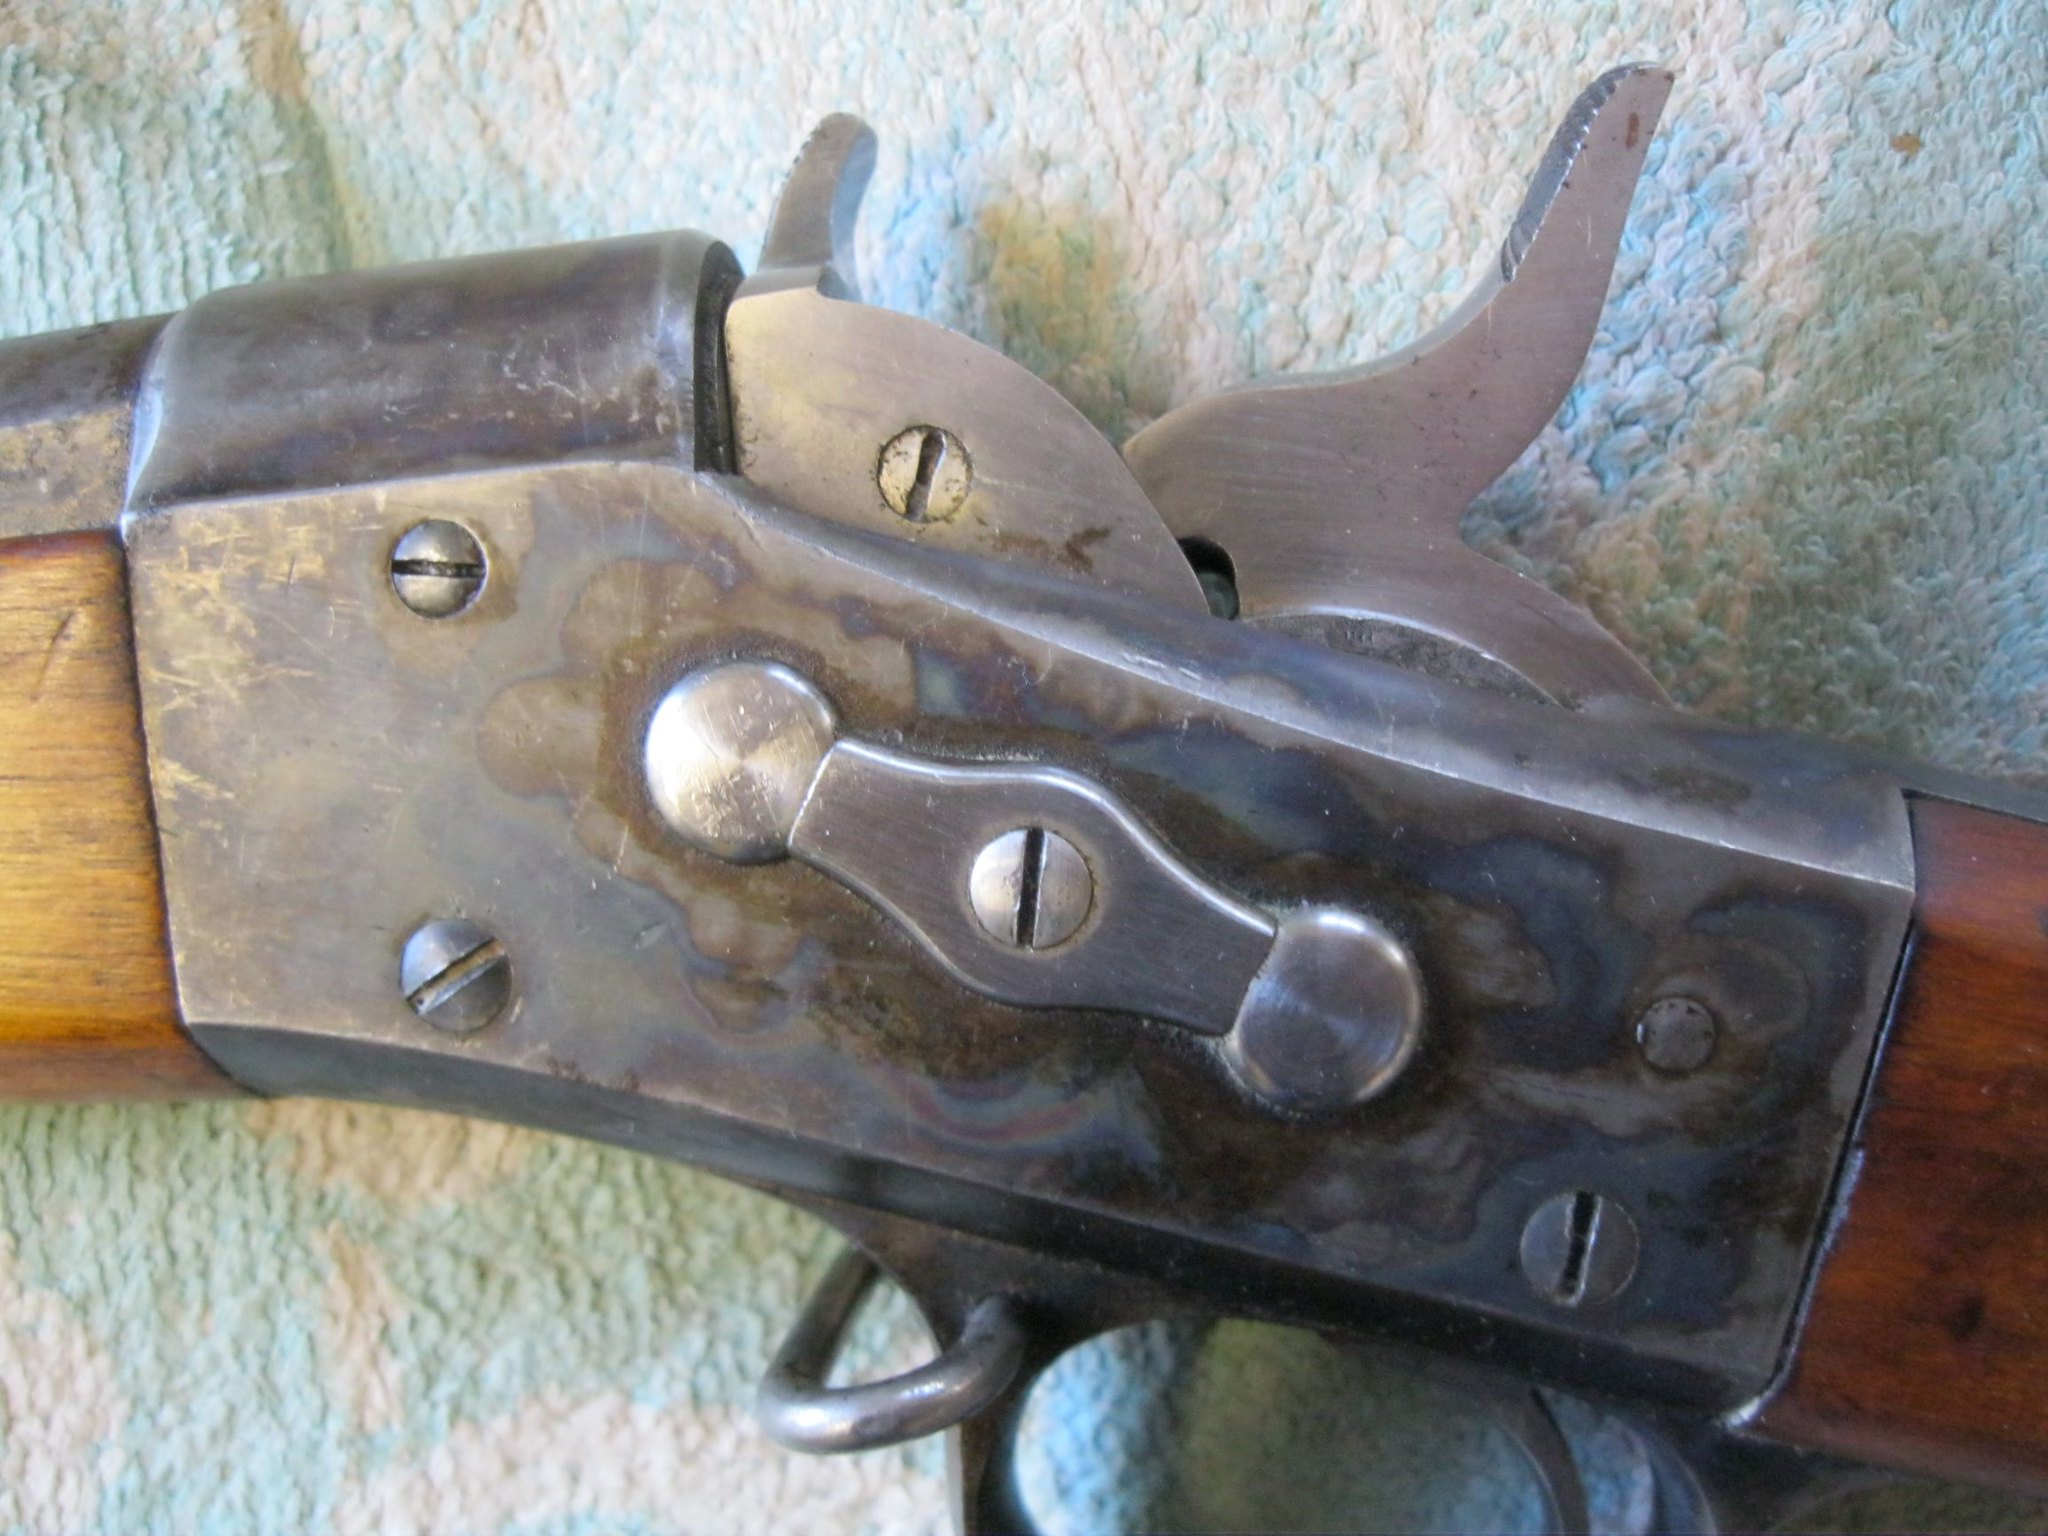
    Bought the action yesterday as a basis. It has V form barrel threads so not a Remington , but not much in the way of markings. One can just see a K under a crown and a bit of reading makes this one made at the Konigsberg Arsenal in Norway.
    I have never seen that Hammer lock business before. The receiver looks to be Nickel Plated although I first thought it was just polished. The pivot pins are a bit worn so I might have to drill them bigger and maybe make new pins from the drill shank. Any thoughts on this or the hammer lock?

    IMG_2434 by [url=https://www.flickr.com/photos/141809689@N05/]

  2. #2
    Boolit Grand Master

    Join Date
    Mar 2013
    Location
    Northwest Ohio
    Posts
    14,536
    Depending on your equipment I think I would bore the holes .100 bigger then sleeve and recut to size keeping the pins the same. A couple sleeves turned from 4140 0r 8620 with .0005-.001 press left with bore .050 small could be pressed in to new holes and bored to size on location.This would save making new pins and possibly the lock bar. If a standard rem hammer will inter change I would drop that in and fit to trigger and block. More so for the lines of it. If you decide you want to blue or case harden it for finish that nickel plate is going to be a problem. Sometimes under nickel is a copper plate coat also, neither of these will color. 40-65 is a good choice as the 45-70 extractor should work

  3. #3
    Boolit Master
    Join Date
    Dec 2016
    Posts
    1,092
    That style safety hammer was commonly used on Husqvarna rolling block shotguns,I believe around 1900 or shortly thereafter, to prevent a pierced primer from blowing the hammer back to full cock and unlocking the action.
    I've also got a Norway built rifle, a LARSENS VAABENFORR, KRISTIANIA, that has a thin second safety hammer mounted beside the normal looking main hammer. This is a heavy sporting rifle with an octagon barrel and a somewhat intricate adjustable for windage front sight. The caliber marking is CAL 450 , using a long bottleneck case.

  4. #4
    Boolit Buddy
    Join Date
    Feb 2011
    Location
    Queensland Australia
    Posts
    215
    Quote Originally Posted by country gent View Post
    Depending on your equipment I think I would bore the holes .100 bigger then sleeve and recut to size keeping the pins the same. A couple sleeves turned from 4140 0r 8620 with .0005-.001 press left with bore .050 small could be pressed in to new holes and bored to size on location.This would save making new pins and possibly the lock bar. If a standard rem hammer will inter change I would drop that in and fit to trigger and block. More so for the lines of it. If you decide you want to blue or case harden it for finish that nickel plate is going to be a problem. Sometimes under nickel is a copper plate coat also, neither of these will color. 40-65 is a good choice as the 45-70 extractor should work
    It did not come with barrel or extractor so I need to make that also. I think I will leave the finish as is, just give it a buff to remove the rust. The hammer pin is not so worn, just the BB really. Might just take a hair off with an adjustable reamer and make a new pin.
    It will be a 40-70 near enough when finished and I am getting a reamer made just for paper patch for it.

  5. #5
    Boolit Buddy
    Join Date
    Feb 2011
    Location
    Queensland Australia
    Posts
    215
    Quote Originally Posted by Gewehr-Guy View Post
    That style safety hammer was commonly used on Husqvarna rolling block shotguns,I believe around 1900 or shortly thereafter, to prevent a pierced primer from blowing the hammer back to full cock and unlocking the action.
    I've also got a Norway built rifle, a LARSENS VAABENFORR, KRISTIANIA, that has a thin second safety hammer mounted beside the normal looking main hammer. This is a heavy sporting rifle with an octagon barrel and a somewhat intricate adjustable for windage front sight. The caliber marking is CAL 450 , using a long bottleneck case.
    There is interesting stuff around. I have never seen one like this, or yours, before.
    I guess I will get used to it. I wonder why Remington went to the button pin retainer instead of the original captive screws the Swedes stayed with. They cant get lost in the field where as if a soldier dropped the screw or button in the mud its gone.

  6. #6
    Boolit Master
    Join Date
    Dec 2016
    Posts
    1,092
    Your question about the action pin retaining methods caused me to go digging in the armory for rolling blocks, and this is what I found , an original 1st contract of 10,000, Remington made rifle, dated 1867 on frame, which uses the Swedish style captive screws.

    Next was a Remington built action,of the 2nd contract of 20,000 and built into a rifle by Carl Gustaf and the stock dated 1868, but this rifle now uses the Rem button pin retaining bar. This rifle is in as new condition with the rimfire breech block, a real gem

    The next rifles,Husqvarna and Carl Gustaf, now use the captive screws, until I found a 1874 dated Carl Gustaf , that went back to the Remington button style retainer. I think all later arsenal produced rifles used the Rem method, but some commercial rifles and shotguns then used a screw threaded into the pins to retain them. I'm not sure which method is best, as they all seem to come with missing screws and parts

  7. #7
    Boolit Buddy
    Join Date
    Feb 2011
    Location
    Queensland Australia
    Posts
    215
    Does your Remington built Carl Gustaf look like this?
    This was rimfire but has been converted and has the stamped out number on the rear sight.
    Some I have seen dont have the front band at the very tip. This has no metal nose cap either. I think this is one of the 2nd contract 20,000 as well

    Remington 12mm 01 by [url=https://www.flickr.com/photos/141809689@N05/]

    Remington 12mm 03 by Remington 12mm 02 by [url=https://www.flickr.com/photos/141809689@N05/]

  8. #8
    Boolit Master
    Join Date
    Dec 2016
    Posts
    1,092
    Mine looks like it came out of the same crate, except someone decided to give mine a coat of shellac to preserve it, which it did. My first contract model is stocked in walnut, and the barrel bands are solid and attached with spring keepers, and has an iron nosecap.
    The rear sight appears like the later Swedish models, may have been replaced at one time. the old model is in very poor condition, missing the breech block, but maybe I,ll find one out of an old Egyptian rifle, as they are about identical.

  9. #9
    Boolit Buddy
    Join Date
    Feb 2011
    Location
    Queensland Australia
    Posts
    215
    Can anyone give me dimensions and pitch of this receiver. I dont have a barrel stub and cant find my internal thread gauges.
    Its a v form thread unlike the Remington. Save me some work if someone knows

  10. #10
    Boolit Master

    Dutchman's Avatar
    Join Date
    Nov 2005
    Location
    Siskiyou County, Calif
    Posts
    2,242
    The crown over K is for Kongsberg Vaapenfabrik Denmark.

    I've had my hands on one Swedish rolling block action that had vee threads. FYI.

    Dutch

  11. #11
    Boolit Grand Master

    Join Date
    Mar 2013
    Location
    Northwest Ohio
    Posts
    14,536
    if you cant check internally then pack the receiver threads with clay and remove carefully. or use cerosafe and make a casting of them to get pitch. Be sure to coat the threads with release agent before attempting these. It will make a mirror image or male of the threads to check. Clay is soft and needs to be handles carefully the cero safe is harder and more durable.

    Put a piece of square stock in the center of the receiver and it will aid turning the casting out. A washer that can be made to fit the square stock and sealed with tape and a big enough od to seal front of receiver clamped in place and warmed melt cerosafe warm receiver and insert again then pour in cerosafe let cool to instructions and remove. You can now measure pitch, and size from this. Max dia, min dia, pitch dia are all there very close

  12. #12
    Boolit Buddy
    Join Date
    Oct 2015
    Location
    Stephens City, VA
    Posts
    235
    It looks to be a shotgun action with the hammer nose shaped the way it is. I have two barrels that were taken off actions with V threads. Both are 1" diameter X 14 threads per inch. One is definitely a V thread but the other has rounded crest and root like a Whitworth thread but more pronounced and the thread angle seem less than 55 deg. Your action had a sliding extractor. The hardest part to fit a new barrel is getting it to fit the radius contour on the front of the breech block and look proper.

  13. #13
    Boolit Buddy
    Join Date
    Feb 2011
    Location
    Queensland Australia
    Posts
    215
    Quote Originally Posted by Dutchman View Post
    The crown over K is for Kongsberg Vaapenfabrik Denmark.

    I've had my hands on one Swedish rolling block action that had vee threads. FYI.

    Dutch
    Interesting.
    George Laymans book says the Crown over K was from Norways famous Konigsberg Arsenal.

  14. #14
    Boolit Buddy
    Join Date
    Feb 2011
    Location
    Queensland Australia
    Posts
    215
    Ok, so its been a shotgun by the sounds of it. I read that bit about the hammer nose on another forum this morning as well.
    What I ended up doing was getting a stick of chalk and holding it against the receiver threads with my finger , moved it back and forth untill it was scored by the threads. Its 18 TPI but I dont know if its 60 or 55 degree.
    I got a bit of inch rod and kept cutting a 18 tpi thread untill it screwed on.That gives me a start anyway. OD is a bit under an inch.

  15. #15
    Boolit Buddy
    Join Date
    Feb 2011
    Location
    Queensland Australia
    Posts
    215
    Quote Originally Posted by country gent View Post
    if you cant check internally then pack the receiver threads with clay and remove carefully. or use cerosafe and make a casting of them to get pitch. Be sure to coat the threads with release agent before attempting these. It will make a mirror image or male of the threads to check. Clay is soft and needs to be handles carefully the cero safe is harder and more durable.

    Put a piece of square stock in the center of the receiver and it will aid turning the casting out. A washer that can be made to fit the square stock and sealed with tape and a big enough od to seal front of receiver clamped in place and warmed melt cerosafe warm receiver and insert again then pour in cerosafe let cool to instructions and remove. You can now measure pitch, and size from this. Max dia, min dia, pitch dia are all there very close
    Good idea on the Cerosafe. I got impatient, did not think of that.

  16. #16
    Boolit Master

    Dutchman's Avatar
    Join Date
    Nov 2005
    Location
    Siskiyou County, Calif
    Posts
    2,242
    Quote Originally Posted by Keith View Post
    Interesting.
    George Laymans book says the Crown over K was from Norways famous Konigsberg Arsenal.
    I didn't check the book so you're probably right

    Dutch

  17. #17
    Boolit Buddy
    Join Date
    Feb 2011
    Location
    Queensland Australia
    Posts
    215
    The first thing I did was verify the threads by making a barrel stub. That went OK so I drilled it through and made a jig from it to lap the Breech block square. Glued a bit of 350 emery on the end of the rod with superglue and spun it with the drill.
    Had to renew it about 10 times before I was happy with it.
    Now I am not a machinist, just self taught from reading books so no doubt others will have better ways of doing things.

    Rebarrel 02 by [url=https://www.flickr.com/photos/141809689@N05/]

    Rebarrel 01 by [url=https://www.flickr.com/photos/141809689@

    Actually it was not the first thing I did. As the BB pivot pin was very worn I reamed out the holes and made a new pin. It can be seen in the photo as its a bit bigger than the hammer pin. I still might turn down the head of it a bit more. The BB is a nice solid fit now as it had to be before squaring.
    Last edited by Keith; 10-30-2019 at 05:16 PM.

  18. #18
    Boolit Buddy
    Join Date
    Feb 2011
    Location
    Queensland Australia
    Posts
    215
    The fast twist barrel I had on order did not eventuate. Been waiting since July. Phoned them and they said they stuffed it up as a bit of swarf caught when rifling. They were going to start another but it would be another couple of months wait.
    I cancelled, as I had a GM 16 twist here in 40 cal so will just go with that.
    Chucked it in the lathe and threaded it.

    Rebarrel 03 by [url=https://www.flickr.com/photos/141809689@N05/]

  19. #19
    Boolit Buddy
    Join Date
    Feb 2011
    Location
    Queensland Australia
    Posts
    215
    Cut most of the chamber in the lathe, all but about half a rim. Screwed the barrel on then used the reamer by hand for the last bit until the cartridge case cambered easily.

    Rebarrel 04 by [url=https://www.flickr.com/photos/141809689@N05/]

  20. #20
    Boolit Buddy
    Join Date
    Feb 2011
    Location
    Queensland Australia
    Posts
    215
    Removed the barrel again, back in the mill to cut the slot for the early bar extractor. Used a Dremmel and lots of filing to cut the slot across to the case.
    Had to use an angle vice to get the slot in the right place. It was a bit of guess work and I should have been a bit more up at 8 o clock instead of 7, but it worked out OK.

    rebarrel rolling block 01 by [url=https://www.flickr.com/photos/

Page 1 of 4 1234 LastLast

Posting Permissions

  • You may not post new threads
  • You may not post replies
  • You may not post attachments
  • You may not edit your posts
  •  
Abbreviations used in Reloading

BP Bronze Point IMR Improved Military Rifle PTD Pointed
BR Bench Rest M Magnum RN Round Nose
BT Boat Tail PL Power-Lokt SP Soft Point
C Compressed Charge PR Primer SPCL Soft Point "Core-Lokt"
HP Hollow Point PSPCL Pointed Soft Point "Core Lokt" C.O.L. Cartridge Overall Length
PSP Pointed Soft Point Spz Spitzer Point SBT Spitzer Boat Tail
LRN Lead Round Nose LWC Lead Wad Cutter LSWC Lead Semi Wad Cutter
GC Gas Check