Lee PrecisionRepackboxTitan ReloadingLoad Data
WidenersSnyders JerkyReloading EverythingMidSouth Shooters Supply
Inline Fabrication RotoMetals2
Page 1 of 2 12 LastLast
Results 1 to 20 of 32

Thread: Ruger New Vaquero grip making

  1. #1
    Boolit Master
    Join Date
    Dec 2016
    Posts
    993

    Ruger New Vaquero grip making

    Once again, there I was, larger than life. I wanted to make a set of grips for my Ruger New Vaquero. I'm partial to elephant ivory, but I'm saving my last bit for a rainy day. That being said, a new material called Resin Ivory+S is all the buzz right now as "THE" imitation ivory to have.

    So I ordered some to see what all the buzz was about. Well, it's all that and a bag of chips!! It is the same weight as ivory, and is even grippy when wet like ivory. It has pretty good grain, and has distinct "Shreger lines". Honestly, it'd be easy to pass this stuff off as real ivory. It's that good. It is softer than Ivory though when working the material. It saws and sands/files well. It can even be cut down with a chisel.

    This first picture is of a roughed out grip panel, and a blank block to see where I started from. I cut the panel out with a coping saw, and did all the rough shaping with files and sandpaper. The grips are sitting on the most important thing I have for grip making...a granite surface plate:

    Click image for larger version. 

Name:	1.jpg 
Views:	119 
Size:	48.8 KB 
ID:	244299

    Ever wonder why you can see light between your grips and the frame? It's because the grip frame, back of the grips, or both aren't flat. In the case of the Ruger, the grip frame needed a bit of uniforming to knock off the high spots. A file, layout fluid (or a giant permanent marker), masking tape, and sandpaper on a block will get you where you need to be. Careful masking, and being careful with a file will net you a flat(er) grip frame surface without destroying the visible bluing. I also true up the junction between the grip frame and revolver frame to achieve a no light showing fit at the corner. Ensure you remove the locator pin with a roll punch. It comes out left to right as you are looking down the sites. I'm looking for 90% clean up:

    Click image for larger version. 

Name:	2.jpg 
Views:	117 
Size:	65.5 KB 
ID:	244300
    Click image for larger version. 

Name:	3.jpg 
Views:	118 
Size:	73.0 KB 
ID:	244301

    Pictures 4 and 5 show the left grip panel (marked with an L) after roughing it out with the coping saw (shown whole blank in picture one) and the trusty surface plate with a sheet of 120 grit paper on it and a whole mess of dust. To get flat surfaces, you need flat surfaces, lol. The back of the grips are trued up on every grit of paper I move to until I hit 400 grit. Remember, I am making these without power tools...well except for the cordless drill...:

    Click image for larger version. 

Name:	4.jpg 
Views:	108 
Size:	66.3 KB 
ID:	244302
    Click image for larger version. 

Name:	5.jpg 
Views:	113 
Size:	62.6 KB 
ID:	244303

    Pictures 6,7, and 8 show the corner fit I'm looking for. If the grip frame to revolver frame isn't flush, you'll end up with light showing between the frame and grips. That offends me. When I make grips for a single action, I always get the corner right first. That is one of the most important parts to me. The blue taped thing is an oak block I trued up on all sides on the surface plate and gives me a place to clamp on the opposite side.:
    Click image for larger version. 

Name:	6.jpg 
Views:	114 
Size:	59.5 KB 
ID:	244304
    Click image for larger version. 

Name:	7.jpg 
Views:	108 
Size:	53.7 KB 
ID:	244305
    Click image for larger version. 

Name:	8.jpg 
Views:	111 
Size:	42.6 KB 
ID:	244306

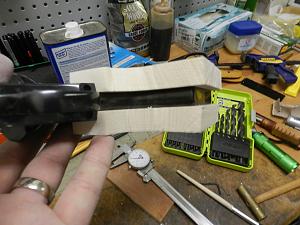
    Picture 9 shows how to get the locater pin hole correct for drilling. With the grips clamped firmly in place I use a TRANSFER punch to get my correct hole location for drilling. This punch fit perfect, however if you have a hole where the punch is just a bit wiggly, put a wrap or two of tape around the punch to center it in the hole. Picture 10 is the no light showing fit I want of the grips to the frame. The frame was trued up with a file and permanent marker to relieve all high spots, and the back of the grips were trued up on a surface plate. Flat+flat=no light. Also, the locater pin has been re-installed in the grip frame and the pin holes drilled. To do this without a drill press is pretty easy. Just buy a set of drill depth stops at your local Lowes or Home Depot. This allows you to get the right depth without drilling to far. For the initial hole drilling, use a Bradford point bit for a flat bottom hole. Then I use successively larger bits until I get the right size hole. This is achieved by measuring the locater pin diameter. The hole depth is figured out by using a depth gauge on the pin and frame...or you can just put the stop collar on the bit and push it against the frame and pin and lock it in...:
    Click image for larger version. 

Name:	9.jpg 
Views:	115 
Size:	70.4 KB 
ID:	244307
    Click image for larger version. 

Name:	10.jpg 
Views:	114 
Size:	63.9 KB 
ID:	244308
    Last edited by Love Life; 06-28-2019 at 07:10 PM.

  2. #2
    Boolit Master
    Join Date
    Dec 2016
    Posts
    993
    Some more shots of the corner fit. There is no light showing. The discoloration near the corner is from permanent marker, lol. The discoloration on the frame is from the grip dust mixing with the adhesive from the blue tape. It's a bit hot in my garage, lol. It'll all clean off once the grips are done. The next steps are to remove a metric buttload of material to profile and finish fitting the grips to the frame.
    Attached Thumbnails Attached Thumbnails 11.jpg   12.jpg   13.jpg  
    Last edited by Love Life; 06-28-2019 at 07:17 PM.

  3. #3
    Vendor Sponsor

    DougGuy's Avatar
    Join Date
    Apr 2013
    Location
    just above Raleigh North Carolina
    Posts
    7,408
    Cool! Thanks for posting. I really like animal bone, a whole species doesn't have to be "under the gun" to have a renewable supply, it is pretty on it's own but yeah it falls short of real ivory. I will have to give this some thought, where did you get the blanks?

    Have you thought of a blind screw on one side? drill a hole and sink an escutcheon into the hole with superglue and one panel will be all smooth and nice with no hole, like the one piece ivory grips you see on an old Colt SAA.
    Got a .22 .30 .32 .357 .38 .40 .41 .44 .45 .480 or .500 S&W cylinder that needs throats honed? 9mm, 10mm/40S&W, 45 ACP pistol barrel that won't "plunk" your handloads? 480 Ruger or 475 Linebaugh cylinder that needs the "step" reamed to 6° 30min chamfer? Click here to send me a PM You can also find me on Facebook Click Here.

  4. #4
    Boolit Master
    Join Date
    Dec 2016
    Posts
    993
    Quote Originally Posted by DougGuy View Post
    Cool! Thanks for posting. I really like animal bone, a whole species doesn't have to be "under the gun" to have a renewable supply, it is pretty on it's own but yeah it falls short of real ivory. I will have to give this some thought, where did you get the blanks?

    Have you thought of a blind screw on one side? drill a hole and sink an escutcheon into the hole with superglue and one panel will be all smooth and nice with no hole, like the one piece ivory grips you see on an old Colt SAA.
    The blanks came from Guitar Parts. They are legit!! I'm telling you, if I were to put these in your hands, you'd have a hard time telling they're not real ivory. Same weight, and most importantly, the same feel. They feel like ivory and best of all are tacky like ivory when damp or wet.

    As for the blind hole, not really my thing. They look like half finished grips to me. I've just never been a fan. What I do is install the escutcheon when I get close to final finished width, and then work the rest of the grips. Gives a nice and seamless fit of the escutcheon. Not to deep in the grips, and not standing proud.
    Last edited by Love Life; 06-28-2019 at 07:47 PM.

  5. #5
    Vendor Sponsor

    DougGuy's Avatar
    Join Date
    Apr 2013
    Location
    just above Raleigh North Carolina
    Posts
    7,408
    Quote Originally Posted by Love Life View Post
    What I do is install the escutcheon when I get close to final finished width, and then work the rest of the grips. Gives a nice and seamless fit of the escutcheon. Not to deep in the grips, and not standing proud.
    I do that too! The escutcheon is installed a tad bit proud, then sanded and filed flush with the grip panel and polished when the panel is polished. I like to place the head of the screw even or only slightly below the surface of the grip.
    Got a .22 .30 .32 .357 .38 .40 .41 .44 .45 .480 or .500 S&W cylinder that needs throats honed? 9mm, 10mm/40S&W, 45 ACP pistol barrel that won't "plunk" your handloads? 480 Ruger or 475 Linebaugh cylinder that needs the "step" reamed to 6° 30min chamfer? Click here to send me a PM You can also find me on Facebook Click Here.

  6. #6
    Vendor Sponsor

    DougGuy's Avatar
    Join Date
    Apr 2013
    Location
    just above Raleigh North Carolina
    Posts
    7,408
    Guitar Parts & More sells some 3/4" thick S grade blanks, these are expensive but at 3/4" thick I can split them and have two blanks 3/8" thick, minus the thickness of the saw cut. For gunfighter style grips, I would want a thin panel, finished at not much more than 1/4" in thickness. This would work for me, I could do two revolvers for $40 each.

    https://guitarpartsandmore.com/mainC...Grip-Blanks-58
    Got a .22 .30 .32 .357 .38 .40 .41 .44 .45 .480 or .500 S&W cylinder that needs throats honed? 9mm, 10mm/40S&W, 45 ACP pistol barrel that won't "plunk" your handloads? 480 Ruger or 475 Linebaugh cylinder that needs the "step" reamed to 6° 30min chamfer? Click here to send me a PM You can also find me on Facebook Click Here.

  7. #7
    Boolit Master
    Join Date
    Dec 2016
    Posts
    993
    If you want I can mail you some smaller scraps to play with to get a feel for the material. Small 1 inch pieces you can sand on and examine the grain.

    I like my grips fat so the escutcheon and screw usually end up a tad below flush unless I go with a longer grip screw. I use brass escutcheons that are .200 tall and .25 in diameter. The blanks I started with are .590 thick each. Lots of elbow grease!!

  8. #8
    Vendor Sponsor

    DougGuy's Avatar
    Join Date
    Apr 2013
    Location
    just above Raleigh North Carolina
    Posts
    7,408
    I have a bunch of antlers and bone here, I made quite a few grips, and hundreds of nuts for guitars over many years of guitar repair. I worked all kinds of bone, and a boatload of antler, and some ivory as well.

    Thanks for the offer tho, it is appreciated.
    Got a .22 .30 .32 .357 .38 .40 .41 .44 .45 .480 or .500 S&W cylinder that needs throats honed? 9mm, 10mm/40S&W, 45 ACP pistol barrel that won't "plunk" your handloads? 480 Ruger or 475 Linebaugh cylinder that needs the "step" reamed to 6° 30min chamfer? Click here to send me a PM You can also find me on Facebook Click Here.

  9. #9
    Boolit Master


    Walks's Avatar
    Join Date
    Jun 2016
    Location
    SoCal
    Posts
    3,028
    That's really cool, I'm making a seat of Walnut panels for my new Vaquero. I HATE the skinny gamer grips that came on it. Need Something to fill a real man sized hand.

    Have more Walnut, maybe I'll start over.
    I HATE auto-correct

    Happiness is a Warm GUN & more ammo to shoot in it.

    My Experience and My Opinion, are just that, Mine.

    SASS #375 Life

  10. #10
    Boolit Master
    Join Date
    Dec 2016
    Posts
    993
    Quote Originally Posted by Walks View Post
    That's really cool, I'm making a seat of Walnut panels for my new Vaquero. I HATE the skinny gamer grips that came on it. Need Something to fill a real man sized hand.

    Have more Walnut, maybe I'll start over.
    I like walnut. It’s classy and just feels right. If you want you can post your progress here too. I always like to see people’s methods. I also understand about the gamer grips, lol. I hate them. They are to thin.

    I started out making grips with scrap pine. Easy to work with and get the steps down. Using a belt sander I can turn out a well fitted pair of grips in a day. Using just elbow grease takes a couple of days doing a little here and a little there.

    I got tired of paying top dollar for grips, and they weren’t perfect, or I’d have to send a gun off to have them fitted and wait forever plus pay out the backside. After making several sets of grips I’ve come to learn some things, and will never pay top dollar to a grip maker again. I can order the material I want, with the figure I want, and fit them to my hand.

  11. #11
    Boolit Master
    Join Date
    Dec 2016
    Posts
    993
    Progress report

    The first picture is of a transfer punch pushed through the grip screw hole to check alignment:

    Click image for larger version. 

Name:	14.jpg 
Views:	101 
Size:	37.0 KB 
ID:	244411


    The next pictures are of the gun clamped to the table and how I mark the grips for material removal. It's not the best method of clamping, but it works, lol. I use a cherry block to support the trigger guard, and an oak block to spread pressure for the top of the clamp. You can see in the 1st picture where the material chipped out when drilling the hole for the escutcheon, but no worry, I have .190 of material to remove and it'll clean right up!

    The second picture is how I mark the grips for material removal. Just sand to the lines, lol. Once completed each grip panel will be .4 thick at the bottoms and taper up towards the frame.:

    Click image for larger version. 

Name:	15.jpg 
Views:	100 
Size:	50.1 KB 
ID:	244414
    Click image for larger version. 

Name:	16.jpg 
Views:	100 
Size:	42.0 KB 
ID:	244415


    This last photo shows the left grip panel about 85% done. I've done initial profiling and sanded closer to the frame. I flipped the gun at this point and began to work on the right grip panel. Once again, you can see the lines of where I'll remove material. About this point in time I got tired of working on them so called it quits. That's my rule. Once I start to get tired of it I walk away.

    Click image for larger version. 

Name:	17.jpg 
Views:	105 
Size:	61.9 KB 
ID:	244416
    Last edited by Love Life; 06-29-2019 at 08:51 PM.

  12. #12
    Boolit Master

    Hickory's Avatar
    Join Date
    Feb 2009
    Location
    The Great Black Swamp of Northwest Ohio
    Posts
    4,434
    Looking good!
    It is said that the last 10% of the work takes 90% of the time.
    Political correctness is a national suicide pact.

    I am a sovereign individual, accountable
    only to God and my own conscience.

  13. #13
    Boolit Master
    Join Date
    Dec 2016
    Posts
    993
    I’m m finally to the point where I can move up from 80 grit paper, lol. All I need to figure out now is how much bevel I want going to the front strap. Right now the back strap has minimal bevel and gives a nice, firm grip with much more surface area in contact with the palm. So much better than the factory grips and the custom “ larger” grips I’ve purchased. Skinny grips on a revolver are like skinny jeans on a guy...wrong.

  14. #14
    Boolit Master
    Join Date
    Dec 2016
    Posts
    993
    More progress

    At this point I am done shaping the left grip panel. In the first photo I tried to catch the grain. The second photo shows the end grain, or Shreger lines. The grip is currently finished to 400 grit. I'm going to finish the other panel to 400 and see how I like the feel. This stuff will polish up super shiny up to 2,000 grit but I'm not sure I want to go that high.

    Click image for larger version. 

Name:	DSCN9174.jpg 
Views:	41 
Size:	22.3 KB 
ID:	244477
    Click image for larger version. 

Name:	DSCN9175.jpg 
Views:	44 
Size:	36.3 KB 
ID:	244478

    My grip contouring jig is a 1/2 inch square piece of wood with double sided tape. 3M 10 lb capacity tape.

  15. #15
    Boolit Master
    Join Date
    Dec 2016
    Posts
    993
    Progress report

    At this time I'm about done. There are some minor tweaks I might make to the fit, but in reality, probably not. I'll just true up the butt and round the corners there. The grips are currently on the revolver with bedding compound around the alignment pin for a perfect snap on fit.

    This first picture is of my high speed, low drag grip holder for contouring. Its a half inch square piece of wood with 3M 10 lb double sided tape to hold it on. You can also see my catch bin for wet sanding drips and my super comfortable flip flops:

    Click image for larger version. 

Name:	DSCN9176.jpg 
Views:	35 
Size:	59.9 KB 
ID:	244545

    The next photo shows the "Shreger Lines" on the butt of the grips:

    Click image for larger version. 

Name:	DSCN9177.jpg 
Views:	41 
Size:	43.7 KB 
ID:	244546

    The next photos show the general fit. You can see a couple places where the material is still a tad high and I may or may not fix that. In these photos the grips have been wet sanded to 600 grit.

    Click image for larger version. 

Name:	DSCN9178.jpg 
Views:	33 
Size:	56.9 KB 
ID:	244547
    Click image for larger version. 

Name:	DSCN9179.jpg 
Views:	32 
Size:	38.8 KB 
ID:	244548
    Click image for larger version. 

Name:	DSCN9180.jpg 
Views:	33 
Size:	29.0 KB 
ID:	244549
    Click image for larger version. 

Name:	DSCN9181.jpg 
Views:	35 
Size:	36.5 KB 
ID:	244550
    Click image for larger version. 

Name:	DSCN9182.jpg 
Views:	33 
Size:	29.8 KB 
ID:	244551
    Click image for larger version. 

Name:	DSCN9183.jpg 
Views:	31 
Size:	33.7 KB 
ID:	244552

    You can also see some oopsies on the back strap, lol. The 80 grit paper has no mercy when it breaks through the blue masking tape, lol. I wasn't to concerned about it as the revolver already has bare metal showing on other places from holster wear and use. If I want, now I can sand the grips to the frame for the perfect-est fit and then send the frame off for a reblue. I can also rust blue it.

    Some thoughts on the material: It works well. It sands pretty well and is an easy material to work. Once you get to the 320 grit, you want to start wet sanding because it'll clog the paper up fast. Also, it clogs up files really fast. I used a lot of 80 grit for shaping and contouring. I wish I had switched to 120 grit a tad sooner as it take a lot of effort to remove the 80 grit scratches, lol.

    The material did chip around the escutcheon hole when drilling, so keep that in mind. Drill the hole first and then contour to shape. The blanks started at .590 thick, and finished at .400 at the thickest part. Lots of elbow grease required, lol. The grain looks nice and aren't as yellow as they look in the photos. At a 600 grit finish, they are smooth, but not slippery. Plus this material get slightly tacky feeling when wet or damp.

    As for final finish I may do ultra thin super glue and then hand buff to a shine, or I might just hit it with some renaissance wax and buff it to a shine. I'm not sure which yet. I'll have to experiment on a scrap piece.

    All in all a fun project.
    Last edited by Love Life; 07-01-2019 at 07:21 PM.

  16. #16
    Moderator Emeritus


    MrWolf's Avatar
    Join Date
    Apr 2013
    Location
    NE West Virginia
    Posts
    4,900
    Very nice job. Something to think about for me to make a grip that won't "twist" as much for me. Nerve damage in last three fingers of right hand.

  17. #17
    Boolit Master
    Join Date
    Dec 2016
    Posts
    993
    Quote Originally Posted by MrWolf View Post
    Very nice job. Something to think about for me to make a grip that won't "twist" as much for me. Nerve damage in last three fingers of right hand.
    I’ll be shooting the gun this week to see how they feel. The thicker grips are a huge change in comfort in holding the revolver for me. It doesn’t feel like I’m holding on to something to skinny. I can get all 3 fingers comfortably on the grips or I can still tuck my pinky. The fatter and flatter back strap has moved my knuckle back from the trigger guard as well.

    Just holding the gun and aiming, these grips give me a much better point and change the whole balance of the gun. The skinny factory grips were to narrow for me. Of course I also find the Beretta M9 grip comfortable as well and hate thin grips on a 1911, lol.

    If you want I can send these to you to borrow/try on and shoot with to see if the thicker grip is what you need/want.

  18. #18
    Boolit Master
    Join Date
    Dec 2016
    Posts
    993

    Last update

    The grips are pretty much done. I did a slight clean up of the action and trigger job before final reassembly. I'll be shooting this week with full power 45 colt loads, an as long as the grips still feel good in the hand, then I'll call it done.

    He are the grips mounted on the gun:

    Click image for larger version. 

Name:	DSCN9184.jpg 
Views:	31 
Size:	64.8 KB 
ID:	244592
    Click image for larger version. 

Name:	DSCN9185.jpg 
Views:	32 
Size:	61.7 KB 
ID:	244593

    Just enough white and just enough cream color. These were finished to 600 grit and waxed with renaissance wax. They are still very grippy at this level of finish, but not rough. This material is more grippy when wet or damp. It does not feel like a resin at all. I have a couple more sets of blanks coming to make grips for a couple more of my revolvers. I'll be making a set of "one piece" grips (actually 3 pieces glued together) my Uberti. If that goes well I'll make a set for my Colt. Plus I have a couple of friends who want me to make them a set fit to their hands as they have the same problem with skinny grips that I do.

    As an added bonus, this last picture is of my super awesome LLA lubed bullet drying box.

    Click image for larger version. 

Name:	DSCN9186.jpg 
Views:	27 
Size:	76.4 KB 
ID:	244594

  19. #19
    Banned


    Join Date
    Jan 2011
    Location
    Color Me Gone
    Posts
    8,401
    Way beyond my skill set
    Nice work
    Really like the New Vaqueros
    Well balanced and perfect fit for me

  20. #20
    Boolit Master
    Join Date
    Dec 2016
    Posts
    993
    Cocking the hammer is much smoother and the trigger pull is reduced. Gun passes all safety checks. I have a SBH hammer, hammer shims, and trigger shims on the way. Once those are installed the gun will be set up perfect for me. I am keeping the factory springs in so reliability is not sacrificed.

    At the end what I want is a good, reliable revolver that is smooth.

Page 1 of 2 12 LastLast

Posting Permissions

  • You may not post new threads
  • You may not post replies
  • You may not post attachments
  • You may not edit your posts
  •  
Abbreviations used in Reloading

BP Bronze Point IMR Improved Military Rifle PTD Pointed
BR Bench Rest M Magnum RN Round Nose
BT Boat Tail PL Power-Lokt SP Soft Point
C Compressed Charge PR Primer SPCL Soft Point "Core-Lokt"
HP Hollow Point PSPCL Pointed Soft Point "Core Lokt" C.O.L. Cartridge Overall Length
PSP Pointed Soft Point Spz Spitzer Point SBT Spitzer Boat Tail
LRN Lead Round Nose LWC Lead Wad Cutter LSWC Lead Semi Wad Cutter
GC Gas Check