

Once again, there I was, larger than life. I wanted to make a set of grips for my Ruger New Vaquero. I'm partial to elephant ivory, but I'm saving my last bit for a rainy day. That being said, a new material called Resin Ivory+S is all the buzz right now as "THE" imitation ivory to have.
So I ordered some to see what all the buzz was about. Well, it's all that and a bag of chips!! It is the same weight as ivory, and is even grippy when wet like ivory. It has pretty good grain, and has distinct "Shreger lines". Honestly, it'd be easy to pass this stuff off as real ivory. It's that good. It is softer than Ivory though when working the material. It saws and sands/files well. It can even be cut down with a chisel.
This first picture is of a roughed out grip panel, and a blank block to see where I started from. I cut the panel out with a coping saw, and did all the rough shaping with files and sandpaper. The grips are sitting on the most important thing I have for grip making...a granite surface plate:
Ever wonder why you can see light between your grips and the frame? It's because the grip frame, back of the grips, or both aren't flat. In the case of the Ruger, the grip frame needed a bit of uniforming to knock off the high spots. A file, layout fluid (or a giant permanent marker), masking tape, and sandpaper on a block will get you where you need to be. Careful masking, and being careful with a file will net you a flat(er) grip frame surface without destroying the visible bluing. I also true up the junction between the grip frame and revolver frame to achieve a no light showing fit at the corner. Ensure you remove the locator pin with a roll punch. It comes out left to right as you are looking down the sites. I'm looking for 90% clean up:
Pictures 4 and 5 show the left grip panel (marked with an L) after roughing it out with the coping saw (shown whole blank in picture one) and the trusty surface plate with a sheet of 120 grit paper on it and a whole mess of dust. To get flat surfaces, you need flat surfaces, lol. The back of the grips are trued up on every grit of paper I move to until I hit 400 grit. Remember, I am making these without power tools...well except for the cordless drill...:
Pictures 6,7, and 8 show the corner fit I'm looking for. If the grip frame to revolver frame isn't flush, you'll end up with light showing between the frame and grips. That offends me. When I make grips for a single action, I always get the corner right first. That is one of the most important parts to me. The blue taped thing is an oak block I trued up on all sides on the surface plate and gives me a place to clamp on the opposite side.:
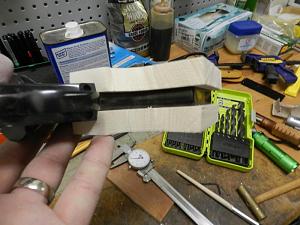
Picture 9 shows how to get the locater pin hole correct for drilling. With the grips clamped firmly in place I use a TRANSFER punch to get my correct hole location for drilling. This punch fit perfect, however if you have a hole where the punch is just a bit wiggly, put a wrap or two of tape around the punch to center it in the hole. Picture 10 is the no light showing fit I want of the grips to the frame. The frame was trued up with a file and permanent marker to relieve all high spots, and the back of the grips were trued up on a surface plate. Flat+flat=no light. Also, the locater pin has been re-installed in the grip frame and the pin holes drilled. To do this without a drill press is pretty easy. Just buy a set of drill depth stops at your local Lowes or Home Depot. This allows you to get the right depth without drilling to far. For the initial hole drilling, use a Bradford point bit for a flat bottom hole. Then I use successively larger bits until I get the right size hole. This is achieved by measuring the locater pin diameter. The hole depth is figured out by using a depth gauge on the pin and frame...or you can just put the stop collar on the bit and push it against the frame and pin and lock it in...:

|
   
   
|


|

 Reply With Quote
 DougGuy


