Titan ReloadingRotoMetals2Lee PrecisionRepackbox
Load DataSnyders JerkyWidenersMidSouth Shooters Supply
Inline Fabrication Reloading Everything
Results 1 to 15 of 15

Thread: Spring Bear Processing for Bacon Burgers

  1. #1
    USMC 77, USRA 79


    Markopolo's Avatar
    Join Date
    Jul 2017
    Location
    Remote island in SE Alaska
    Posts
    3,051

    Spring Bear Processing for Bacon Burgers

    Ok Guys... you asked for it..

    My son and I got a decent young spring bear the other day.

    Click image for larger version. 

Name:	28205-E40-434-E-4-AF8-8-B9-E-0-C655422179-A.jpg 
Views:	116 
Size:	76.8 KB 
ID:	241839

    We try to get 3 or so of these every year for bacon burger. Spring bears are a tradition around here, and springtime the bears around here wake up to spring grass, and a skunk cabbage diet. A spring bear in Alaska must be meat salvaged until June, and is excellent table fare. A bunch of you asked for details on how we process our young spring bears so here is my way. Your mileage may vary.

    Start off with a good bear and take care of it. Treat it like you would a deer or any other animal you prepare for table fare. Clean kill is a good bear. Get it bled, gutted, rinsed very well, get the hide off and get it cooled quick is always a great start for table fare no matter what your killing for food. Meat Hanging in the spring is always weather dependent here. If the weather co-operates, I hang for a couple days at least and prefer 3 days. My shop stays very cool usually and hovers around mid 40’s early season, but if it starts getting up over 50, I move the process along. I always make a weak dilute of vinegar water to clean the meat of any sort of blood debri or whatever, and bugs don’t like it.

    Click image for larger version. 

Name:	0-B5-E1962-8839-41-AB-8-E14-26-DA4-F20-ED67.jpg 
Views:	114 
Size:	40.3 KB 
ID:	241840

    This is how I setup for a bear butcher. I get everything lined out on a super clean counter in the house with lots of workspace, and I only bring in meat quarters at a time so there is plenty of room to work.

    Click image for larger version. 

Name:	ABDE7-A53-F9-DC-466-D-9-E40-2532965-B0-F22.jpg 
Views:	112 
Size:	58.1 KB 
ID:	241841

    Let’s talk about tools for a min. I use the usual knives, cutting boards, bowls, pots, baggies and so forth, but really the most important tool is your grinder. How you take care and prep your grinder will dictate wether you cruise right along or have a very frustrating time of things. The most important part of your grinder is NOT how much horsepower your motor is, but how sharp the knives in your grinder are. If your knives are not sharp, bit of meat and tiny pieces of missed sinew start to build up on the knives and disc and make for a huge mess. Lots of beginners dont realize that these things are easily maintained and sharpened. Here is how I do it...

    This is your grinder knife.

    Click image for larger version. 

Name:	74-B7-F8-C7-BAF6-4-C48-AD96-FD0-FB5-A5-E657.jpg 
Views:	111 
Size:	52.8 KB 
ID:	241842

    This piece sits against the disk with the holes in it. Usually 2 disks come with home type grinders, a course grind and a fine grind. Always start with course grind. I take the knifes and place them flat on a sharpening stone and use a circular motion in the same direction towards the leading edge of the knife flat on the stone...

    Click image for larger version. 

Name:	72-A1-EBE7-0747-47-E5-B9-B6-BBDFA9-DA8-BFF.jpg 
Views:	113 
Size:	57.5 KB 
ID:	241843

    You can check the knife with your finger and you will know when it it sharp. I also do the same thing to my grinding disc’s. This helps keep them trued up and flat and removes any debri that may have been missed.

    Click image for larger version. 

Name:	B7745-FD5-16-E8-4247-978-B-1-B63889-A61-F5.jpg 
Views:	111 
Size:	59.1 KB 
ID:	241844Click image for larger version. 

Name:	FFEFFC9-D-CDAC-4720-94-EC-601344-CEF2-FB.jpg 
Views:	110 
Size:	57.5 KB 
ID:	241845

    When I am done I check my knife and disc together to verify visually that they are fitting together as perfectly as I can possibly get them. What your looking for is visible gaps between the leading edge of the cutting side of the knife, and the disc... if you see a gap, something ain't right and your in for a long day. It should look about like this...

    Click image for larger version. 

Name:	31992-C9-B-2-F57-4-F03-BECB-CFE120-BAD7-A4.jpg 
Views:	110 
Size:	27.2 KB 
ID:	241846

    Again, time invested here will save much time and frustration later.

    On with the process... I usually start with about 3lbs or so of decent scrap bacon. Usually even I can find some when I go to town or Ketchikan and I try to stock up in the off season just for this. Ends and pieces are what your looking for...

    Click image for larger version. 

Name:	B1083-D5-E-D312-4-E32-A8-CA-E26-EC9-F605-FF.jpg 
Views:	110 
Size:	70.8 KB 
ID:	241849 Click image for larger version. 

Name:	473-B13-C5-F564-4-AF4-B694-76030-E5364-ED.jpg 
Views:	113 
Size:	57.0 KB 
ID:	241850

    And grind them once through course grind and set them aside in a bowl by themselves... then start cutting up the bear meat in preparation for grinding. An important rule of thumb. Never leave the grinder running between grinding.. cut up a bunch of meat in cubes or small strips all at once, then turn on the grinder and run the pile. If you let it run, small pieces of meat start to heat up with the grinder on long runs and can make things taste funny. You will also get years of service from your grinder instead of 1 or 2 seasons. So cut and stack, turn on the grinder and grind, then shut down. Repeat till finished.. also it seems like I do a better job of trimming meat when I am not feeding the grinder, and that is very important with bear.

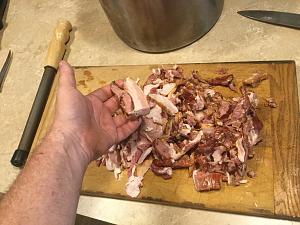
    Remember, when trimming bear meat, remember it is NOT beef. Only red meat. No sinews, no fat, no junk, no silver skin, nothing but red meat goes in. It’s a lot more work, but the rewards you can taste. Here is an example...

    Click image for larger version. 

Name:	AA29-AE3-D-9-CCB-4-F13-AF5-F-0100-E88472-E1.jpg 
Views:	113 
Size:	65.6 KB 
ID:	241852

    The stuff I am pointing to with my knife does not ever go into a grinder. Not only will it clog after a while, it will flavor the meat. Trim it. I setup with 2 cutting boards and assembly line things... first cutting board is rough trim, second board is final trim in case I missed something the first trim. Sounds like a lot of work, but so is weight sorting, and lubing boolits... be meticulous!!!!

    Once I have a almost full bowl, I dump the meat out on a cutting board, and pat it pretty flat. Then I grab a handful of the ground bacon mix and dribble it like flour over the top of the flat meat patty and off it goes back through the grinder again, as this step mixes it for you in a way you will never be able to do by hand mixing...

    Click image for larger version. 

Name:	7-F90-AB16-2-E97-4220-A9-A5-F2-C56476-B7-E0.jpg 
Views:	101 
Size:	73.3 KB 
ID:	241853Click image for larger version. 

Name:	F8-BABFCB-DB19-44-AE-993-A-30-C73-ED2765-C.jpg 
Views:	104 
Size:	68.9 KB 
ID:	241854

    Just run it through again and place the completed bacon burger into a larger pot as a holding place and go back to cutting, trimming and grinding till you have almost another bowl full.. and repeat. Resist the urge to fill the bowl to the top, as then when you add the bacon, the chance to accidently overflow become greater, and transferring overflow bowls to cutting boards and then storage pot becomes messier with spills..
    This is about as full as I let mine get.

    Click image for larger version. 

Name:	2-A0-C8-C3-A-04-D0-4831-BCF0-05810289450-E.jpg 
Views:	104 
Size:	65.1 KB 
ID:	241855

    After you have ground all that you are gunna do, chances are you will have some ground bacon left over. This is what I do with the left overs.. remember I started with around 3 plus pounds of bacon scrap. This batch of ground meat weighed around 30lbs. That is about 10% bacon scrap. I take all of the ground bear from the storage pot and lay it out on my cutting boards, and spread what is left of the bacon over the top evenly as possible. Like so...

    Click image for larger version. 

Name:	5577-B652-6-F12-43-C6-B2-DB-C47-C52-C7-F20-D.jpg 
Views:	105 
Size:	41.7 KB 
ID:	241856

    And run it through the course grind again... what comes out is my finished product. I package that up in quart sized freezer ziplock bags at about 25oz a bag, suck the air out of each one, LABEL and DATE the bags and lay them flat in the freezer. They freeze faster flattened out and stack better.

    Click image for larger version. 

Name:	image.jpg 
Views:	106 
Size:	63.9 KB 
ID:	241857

    That’s all there is to it..

    Enjoy and have a blessed Bear Hunt.

    Marko
    Last edited by Markopolo; 05-16-2019 at 11:07 PM.
    Any technology not understood, can seem like Magic!!!

    I will love the Lord with all my heart, all my soul, and all my mind.

  2. #2
    Boolit Master trails4u's Avatar
    Join Date
    Feb 2013
    Location
    Upstate, SC
    Posts
    1,367
    Pretty much the same way I treat a deer......and I have a mother-in-law that has NEVER and WILL NEVER eat deer. Never mind the years of spaghetti, tacos, hamburgers, etc., etc... She can tell when it's hamburger or when it's deer....and she WILL NEVER eat that nasty stuff!
    "Do not follow where the path might lead, go instead where there is no path and leave a trail" Ralph Waldo Emerson

  3. #3
    USMC 77, USRA 79


    Markopolo's Avatar
    Join Date
    Jul 2017
    Location
    Remote island in SE Alaska
    Posts
    3,051
    I think you read before I finished trails.... I always post in parts in case I loose my internet mid way...
    Any technology not understood, can seem like Magic!!!

    I will love the Lord with all my heart, all my soul, and all my mind.

  4. #4
    Boolit Master trails4u's Avatar
    Join Date
    Feb 2013
    Location
    Upstate, SC
    Posts
    1,367
    I think you're right Marko....I did jump the gun, but funny.....in the end, still not much different. I don't do bacon....but either boston butt or shoulder, whichever is cheaper any given day. Aside from that, our processing is scarily similar. You're spot on with being fanatical about the silver skin, tendons, etc., etc. If you process PURE red muscle fiber, you're gonna have good eats.
    "Do not follow where the path might lead, go instead where there is no path and leave a trail" Ralph Waldo Emerson

  5. #5
    Boolit Grand Master


    GregLaROCHE's Avatar
    Join Date
    Feb 2018
    Location
    Southern France by way of Interior Bush Alaska
    Posts
    5,293
    You guys are making me hungry. Bear makes good sausage too!

  6. #6
    Boolit Master
    Join Date
    Dec 2011
    Location
    Southwest MO.
    Posts
    1,886
    This is how I do my deer except I use breakfast sausage instead of bacon. Ive used bacon, pork butts, beef suet, fatty pork steaks etc but prefer Jimmy Deans extra sage sausage.
    I also salt cure my deer anymore before the process you described.

    You are absolutely correct that only red meat goes in the grinder.
    Good hunting and good eating.
    Woody
    Some people live and learn but I mostly just live

  7. #7
    Boolit Grand Master Bazoo's Avatar
    Join Date
    Dec 2013
    Location
    Cecilia, Kentucky
    Posts
    6,793
    Thank you for taking the time to write this up, very informative.

  8. #8
    Boolit Master
    Join Date
    Feb 2012
    Location
    Blackwater, Virginia
    Posts
    718
    Thanks Again for your time, efforts & Great Info!! Jim

  9. #9
    Boolit Grand Master Bazoo's Avatar
    Join Date
    Dec 2013
    Location
    Cecilia, Kentucky
    Posts
    6,793
    When you sharpen the blade for the grinder, do you spin it on the stone, or do a back and forth circular motion? From what I gather, you spin it. I've not sharpened one yet.

  10. #10
    USMC 77, USRA 79


    Markopolo's Avatar
    Join Date
    Jul 2017
    Location
    Remote island in SE Alaska
    Posts
    3,051
    I rotate it around in a circular motion, not in strokes, but round and round..,
    Any technology not understood, can seem like Magic!!!

    I will love the Lord with all my heart, all my soul, and all my mind.

  11. #11
    Boolit Master


    SSGOldfart's Avatar
    Join Date
    Sep 2011
    Location
    East Texas
    Posts
    2,179
    Thank-you Sir, just wish I had the bear to go along with your post.
    Last edited by SSGOldfart; 05-20-2019 at 12:38 PM. Reason: Small keyboard and large fingers
    I started out with nothing and I still have most of it left.
    Paralyzed Veterans of America

    Looking for a Hensly &Gibbs #258 any thing from a two cavity to a 10cavityI found a new one from a member here

  12. #12
    Boolit Man
    Join Date
    Jan 2018
    Posts
    82
    Marko,
    I had a boss years ago show me the vinegar trick when I gut-shot a deer...never thought of using it as bug repellent. Thanks
    Don't want no one to git hurt, but if you're gonna have a wreck, I wanna watch.

  13. #13
    Boolit Buddy
    Join Date
    Sep 2008
    Posts
    499
    thanks for the info I never thought about sharping the grinder blades and plates now I know what was not working.

  14. #14
    Boolit Grand Master Bazoo's Avatar
    Join Date
    Dec 2013
    Location
    Cecilia, Kentucky
    Posts
    6,793
    About what mix of vinegar / water do you use?

  15. #15
    USMC 77, USRA 79


    Markopolo's Avatar
    Join Date
    Jul 2017
    Location
    Remote island in SE Alaska
    Posts
    3,051
    About 10% ish...
    Any technology not understood, can seem like Magic!!!

    I will love the Lord with all my heart, all my soul, and all my mind.

Posting Permissions

  • You may not post new threads
  • You may not post replies
  • You may not post attachments
  • You may not edit your posts
  •  
Abbreviations used in Reloading

BP Bronze Point IMR Improved Military Rifle PTD Pointed
BR Bench Rest M Magnum RN Round Nose
BT Boat Tail PL Power-Lokt SP Soft Point
C Compressed Charge PR Primer SPCL Soft Point "Core-Lokt"
HP Hollow Point PSPCL Pointed Soft Point "Core Lokt" C.O.L. Cartridge Overall Length
PSP Pointed Soft Point Spz Spitzer Point SBT Spitzer Boat Tail
LRN Lead Round Nose LWC Lead Wad Cutter LSWC Lead Semi Wad Cutter
GC Gas Check