That is a fine looking "package" ! Hard to beat a perfect fit.

|
   
   
|


|


That is a fine looking "package" ! Hard to beat a perfect fit.
"Come unto Me, all you who labor and are heavy burdened, and I will give you rest." Matthew 11:28
Male Guanaco out in dry lakebed at 10,800 feet south of Arequipa.

Looks great! Perhaps they should be split in three 120 degree parts to ensure instant release when outside the muzzle?
Cap'n Morgan

I, too, really want to know the brand on that resin printer. Nice result!
Many resin printers will give that level of results. That is why so many people printing miniatures use them over a FDM filament printer. They are making strides with both the resin (smell, mess, cost) and the speed as well. There are resins now that can be cleaned off after printing with just water (vs acetone) and need minimal UV curing afterwards. Lots of discussion on various forums talking about printing components, sabots, 37mm and so forth. I'm still printing with PLA/PETG and haven't ventured into ABS and nylon due to the smell and additional tweaks to the printer.Originally Posted by Mr_Sheesh

Am following this thread to see where it goes. For now I'm redoing my reloading bench and safe so have been running my printer nearly 24x7 printing customized/color-coded organizers such as from
https://www.thingiverse.com/thing:3562433
Greetings Mike, on your post #76 what resin did you use, how well did they hold?
If you were to buy another 3D Printer with what you know now, which one will you buy?
I have been watching Table model CNC too.
Sure would appreciate your feed back.
Best regards,
Ajay K. Madan
Super Blazing Sabots
Good morning, here are some 3D printers
$679 https://www.amazon.com/dp/B00NA00MWS...27501816072150
A bunch of some nice ones
https://www.amazon.com/Creality-Prin...2s9dHJ1ZQ&th=1
XYZprinting - da Vinci mini w+ Wireless 3D Printer for $210
https://www.pcmag.com/picks/the-best-3d-printers
Sure would appreciate your feed back.
Best regards,
Ajay K. Madan
Super Blazing Sabots
Very sorry for the slow reply. For that model I used Elgoo Grey Resin and I used an Elgoo Mars 3d printer. I haven't actually tested this iteration yet unfortunately, due to the pandemic and the general lack of ammunition. Which 3d printer I would get now depends on the application. If you want to 3d print things that are smaller and could benefit from an absurd level of detail (literally down to about 1/10 the thickness of a human hair), I would get a resin printer like the Elegoo Mars 2 or whichever similar printer happens to be on sale. The majority of these resin printers pretty much use the same design and same screen. Just make sure you get one that has a monochrome screen. They can print about 3 times faster than the color screen version.
If wanted a printer to print larger objects in a variety of materials, I would consider getting an FDM printer. There are many different versions you can choose from but just make sure to get one with an all-metal hot end that will let you print higher temperature materials. I have a Lulzbot Mini but they are expensive and I would recommend a budget option to start out with to see if you like it. If I were getting one now I'd probably look at that Prusa Mini or the Ender 3. The Ender 3 has a bigger print volume than the Mini but the Mini has self-leveling and a hot end with a higher maximum temperature (which means you can print higher temperature materials). I personally have Lulzbot Mini with a similar print volume to the mini and basically never find myself needing anything bigger but which you should chose if you go with FDM is dependent on your application. The Prusa Mini should do you for 95% of what you need. If you need to print something larger you can probably break it up into multiple parts and I think the ability to print more materials is worth the small difference in print volume. I would go with Prusa Mini+ if you're going with an FDM printer.
That being said, if you are just getting into 3d printing, the resin printers are hard to beat. The level of detail you can achieve with your prints is insane and far exceeds what you'll ever get on an FDM printer. They are also probably easier to use and give you results that you'll be happy with. A good resin print literally looks like it is injection molded as post #76 will attest to. Also resin printers are cheap, the resins are also relatively cheap now (and getting cheaper), and the resins are being offered with various properties now (and expanding in the range of material properties). I would personally recommend looking into something like an Elegoo Mars 2 with the monochrome screen. They are about $300 USD on Amazon now but you might be able to find something with the same specs (and pretty much the exact same printer) from a different brand for about $250. Just be aware that the $250-$300 resin printers only give you a print area of about the size of a large cellphone screen and the range of material properties of resin doesn't currently compare to FDM but I do think resin is the future of 3d printing for the most part due to the flawless print quality and dimensional accuracy you can achieve. You can get larger resin printers but they are about $900-$2,000.
If you or anyone else are interested in the 3d model files for this project I'd be happy to share them, including the Fusion360 source files which you could modify to your heart's content. I don't have a problem sharing with experienced reloaders but wouldn't post this design for the general public because they might get themselves hurt due to lack of reloading experience which as we know can be dangerous if not done properly.
Also, feel free to reply to my post here with any questions. I should respond fast now. I didn't know that I could link this thread to my e-mail and receive notifications when someone posts on this thread until now.
Last edited by mikehill85; 03-06-2021 at 09:50 PM.
Sorry for the absurdly slow reply. I haven't been able to go out shooting because of the pandemic and general lack of ammo in the U.S. I haven't even seen 12 ga birdshot for some time now. As soon as I am able to I will share the results. I have been itching to test this out, believe me. The sabots fit like a glove!
Last edited by mikehill85; 03-06-2021 at 08:33 PM.
That's a good idea. I was thinking that myself. Haven't had a chance to test this iteration yet unfortunately due to the pandemic and general lack of the ability to buy ammo in the U.S. but as soon as I do I will update the results here and consider this design if things don't go as planned. I think this will detach from the slug because I am shooting it out of a rifled choke but if it has trouble or the results are erratic I will certainly consider a 3-part sabot design.
Last edited by mikehill85; 03-06-2021 at 08:13 PM.
Good morning Mike, thanks for your reply. What resin was used for the post #76? Did you look for those two pieces after firing it and were they re-useable condition or shattered?
Sure do appreciate you reply, I just added to my card a $380 ANYCUBIC Photon S 3D Printer, UV LCD Resin Printer with Dual Z-axis Linear Rail and Upgraded UV Module & Print Quietly and Off-line Printing, Build Size 4.53"(L) x 2.56"(W) x 6.49"(H), Black
What says you?
Thank you.
Best regards,
Ajay K. Madan
Super Blazing Sabots
I say get something like the Elegoo Mars 2 with a Monochrome screen. It is about $80 cheaper and has a monochrome screen. Resin printers with a monochrome screen print about 3 times faster than ones with a color screen (like the Photon S). The resin I used is called "Elegoo Grey" from Elegoo. I haven't been able to test that sabot design yet but I suspect it will function fine but likely won't be reusable after. Not even regular shot cups are re-useable after firing.
https://www.amazon.com/ELEGOO-Photoc...ustrial&sr=1-5
Hello Mike, I said that because for years I have been seeing those pieces at the range pretty much in good shape as they fly close-by being very very light.
I just added that ELEGOO Mars 2 Pro Mono MSLA 3D Printer UV Photocuring LCD Resin 3D Printer with 6.08 inch 2K Monochrome LCD, Printing Size 129x80x160mm/5.1x3.1x6.3inch to my cart its $300
Thank you.
Regards,
Ajay K. Madan
Super Blazing Sabots
Nice. That's a sick printer. Wish I had waited about 9 months and gotten that one. It seems that right after I got my resin printer all the monochrome screen printers came out that print 3 times faster. Oh well. They are cheap enough that I can just get one with the monochrome screen too.
Yeah. I see what you're saying about those sabots. If you print in a high strength or flexible resin they might nearly be reusable too. I actually designed an airgun pellet and printed it in that Elegoo Grey Resin. To my surprise not only do the pellets survive firing but they completely embed themselves intact into a pine board. I clocked them at over 1800 fps out of a normal springer air rifle (a Crosman Phantom 1000). They are super loud too (for pellets) because they break the sound barrier. I tested them on clay blocks. Normal pellets will drill through the blocks leaving a nice clean path. These basically explode the clay on contact leaving a gaping crater and ejecting out a ton of clay. Anyway, I know this resin can survive being accelerated to 1,800+ fps in a relatively short distance so the sabot may well stay intact and be nearly reusable. I'll have to test them to see, which I can't wait to do.
https://www.thingiverse.com/thing:4458265
Last edited by mikehill85; 03-07-2021 at 07:53 PM.
Update!
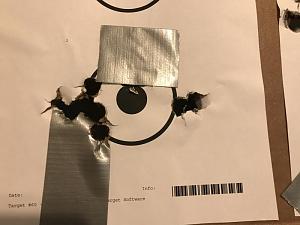
I went out shooting today with the two-part "Lightfield" style sabots. The results were less than stellar. The best 5 shot groups I got at 50 yards were about 3.5". See the full target below.
I was able to find some of the sabots. They appear to have traveled pretty far downrange (I found them around the 40 yard mark). The sabots did appear to have engaged the rifling in my rifled choke tube. I didn't recover any of the slugs. It rained last night and they were really buried in the soft dirt that makes up the backstop.
Next steps will be to try the shells without the rifled choke tube, to use a roll crimp instead of a star crimp, and printing a 3 part sabot which will hopefully release better. Some of the slugs hit the target going sideways. This leads me to believe that the sabots aren't separating consistently.
Any comments/suggestions are welcome.
Today's Target.
Some finished shells with star crimp.
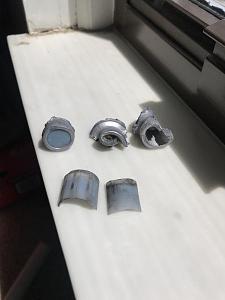
Some recovered sabots with a fresh slug and a complete sabot half for comparison. There are marks from the rifled choke tube on the recovered sabot fragments.
A 3 shot group.
A 5 shot "group".
An okay looking 5 shot group except for the wild sideways flyer in the upper right of the page.
The best group of the day...4 shots touching blown up by a sideways flyer...
Last edited by mikehill85; 05-29-2021 at 02:49 PM.
I think the three part sabot is the way to go. Also, if room permits it, increase the diameter for a better grip/fit. Judging from the targets, the concept clearly has potential if you can eliminate the fliers. It could be the rifled choke is shifting slightly or the sabot not releasing smoothly enough. Probably the sabot, though.Next steps will be to try the shells without the rifled choke tube, to use a roll crimp instead of a star crimp, and printing a 3 part sabot which will hopefully release better. Some of the slugs hit the target going sideways. This leads me to believe that the sabots aren't separating consistently.
BTW: What kind of sight are you using?
Cap'n Morgan
Thanks for the advice. I think your idea in the first place was to use a 3 part sabot. I designed and printed some up yesterday. loading them in the shells it just "feels" better than the two part sabot in terms of potential to release properly from the slug. I've also used a roll crimp on these. I will be testing them out today to see if it helps. The nice thing is the range is basically a ghost town due to the fact ammo prices are still really high. Luckily 12 ga birdshot still costs about $22 for 100 shells, just like before the pandemic.
As for the sight, I have a Nikon Prostaff P3 Shotgun 3-9x40 scope. I'm mainly using it to take sight alignment out of the equation as much as possible.
Yeah, it seems like most of the slugs that left nice round holes landed fairly close together. The most painful group was the last one, 4 touching and 1 flyer (which was the last shot in the string)...Clearly not the fault of my aim that the slug flew into the target sideways but there are few things more painful than blowing up a nice group on the last shot.
Last edited by mikehill85; 05-30-2021 at 10:57 AM.
Update 2:
I went shooting again today with the 3 piece sabot design and roll crimp. See results below (Please note all groups are 5 shot groups at 50 yards). I tried shooting with a cylinder bore choke instead of the rifled choke and the results were very poor so I switched back to the rifled choke.
I was able to recover 3 slugs and 2 sabots. One of the slugs which hit the target square on had the hollow base filler in the rear of the slug. Two that hit sideways had the base missing. It could have been dislodged on impact or maybe the base filler is partly to blame for the sideways flyers.
I feel like the results today were slightly better and I even got a pretty decent 2.8" 5 shot group. I'm very encouraged by the fact I got a decent group and seemed to have fewer sideways flyers.
Going forward I plan on:
1. Using hot glue for the hollow base, as some have suggested.
2. Replacing the notches on the sabots to index the sabot pieces relative to each other (I had removed them for simplicity and this may have been a mistake).
3. Printing the sabots in Nylon.
4. Increasing the diameter of the slug from 0.73" to something else. Any suggestions on a good diameter would be appreciated.
As always, any suggestions are welcome and appreciated.
Today's Target
Group 1 (Note there are two slugs in the same hole near the bullseye)
Group 2
Group 3
Group 4 (Note the crazy sideways flyer in the upper left.)
Group 5 (2.8" Center-To-Center). This group didn't appear to have any flyers. I'd love to see more of this!
The finished product with roll crimp
The recovered sabot pieces and slugs
Last edited by mikehill85; 05-30-2021 at 03:20 PM.

As I have never 3D printed anything much less a shotgun sabot, I'll try not to be too helpful past the point of mentioning that I've fired powder coated paradox slugs.008 over bore constriction with no ill effect. You might try upping the diameter of the slug-sabot a bit at a time like working up a powder charge and see if the groups improve. Gp
Thanks for your advice. It is much appreciated.
I can't stress enough how important a strong and solid wad is for good results.
If possible, your sabot should match the cavity in the slug for best support, but the hot glue filler should work as well.
I ran into all kinds of trouble with my first injection molded wads - both the Brenneke clone and the sabot "Sleeve-Slug"
This is what the first sabots looked like after launch. The set-back had compressed the bottom to half the height:
This pic shows a recovered Brenneke taken apart. The indentions from the wad in the rim of the slug
vividly illustrates the forces involved during those critical first few milliseconds.
This wad was made from HDPE. (High Density Polypropylen) which is extremely tough.
Notice how the wad nose match the cavity in the slug for maximum support.
This is what a bunch of Brenneke looks like after being fired into a sand berm.
The one in front was shot through modified choke (notice the flattened ribs)
The rest were shot through a true cylinder barrel. (Diameter of both slug & wad is 0.73)
And this is what it looks like when you finally get every thing in working order
This five shot group was shot at 64 yards from a smooth bore.

Cap'n Morgan
 Posting Permissions


| BP | Bronze Point | IMR | Improved Military Rifle | PTD | Pointed |
| BR | Bench Rest | M | Magnum | RN | Round Nose |
| BT | Boat Tail | PL | Power-Lokt | SP | Soft Point |
| C | Compressed Charge | PR | Primer | SPCL | Soft Point "Core-Lokt" |
| HP | Hollow Point | PSPCL | Pointed Soft Point "Core Lokt" | C.O.L. | Cartridge Overall Length |
| PSP | Pointed Soft Point | Spz | Spitzer Point | SBT | Spitzer Boat Tail |
| LRN | Lead Round Nose | LWC | Lead Wad Cutter | LSWC | Lead Semi Wad Cutter |
| GC | Gas Check |

 Reply With Quote

