

I seldom post here, but I've been benefiting from the knowledge and discoveries others post here for many, many years. If this helps somebody, then hopefully I've paid back some of what I've learned. Pics at the end if the explanation is too vague...
I've been using my Saeco Lubri-sizer for many, many years now. Mostly .35 caliber rifles, a few 30 calibers; no drama. Buy the right sizer die and nose punch; done. Even I can do it.
Now I'm a bit afield with a 1950 Long Branch No. 4 Mk1 Lee Enfield that I got new in the grease with 9 others like it, many years ago. After detail stripping and cleaning them all, each were equipped with a no-gunsmithing scope mount, a 12x Leupold, a few bedding shots fired, cleaning, and then ten shot groups of Greek HXP ball for group. This one grouped unbelievably well, and has been a lot of fun since, equipped with a 1940's era micrometer match sight.
If there's other Saeco owners there plagued with a lack of a big enough sizer for what they want to size to, I hope this helps.
I finally got the itch to see how well it would do with cast bullets: a cerrosafe casting and some mould design led to Accurate cutting two different designs into a set of blocks. And, some paint powder from Smoke, to try that at the same time. Everything arrived and casting began, as I went looking to the online dealers looking for the appropriate sizer die.
Then I discovered what a few other Saeco Lubri-sizer owners no doubt already know: there's a few calibers that Saeco makes a limited number of sizers for. The sizer dies available to those shooting .303 British are among the ones where choices are limited: the biggest sizer Saeco offers is .314". Which doesn't help people like me, who have cast their chambers/leades, and found that my rifle will probably do best with a bullet sized .316".
Sidebar: has anyone mentioned to Redding/Saeco that Lee Enfield rifles are well known for having generous sized chambers to deal with wartime ammunition in field conditions?
At this point it looked like first finding somebody who would make cusom Saeco sizers w/sizer punch, and then being willing to pay for the shop time to have that done.
About this time I went and found the Saeco's owner's manual - a small page with print on both sides. What it mentions is that there is a 7 degree taper to where the lube orifices are (where presumably the diameter is as the sizer is stamped). My Accurate moulds drop bullets that measure across the bands at .317". I have the largest Saeco makes in this range: .314" What if I didn't completely size the bullets - it's roughly .87" from the top of sizer to where the lube orifices are drilled, with that 7 degree taper?
A few experiments with some of them found that at one point in the sizing process, pushing the bullet partially into the sizer spit out a bullet sized .3155" across the seated gas check, and .316" at the top driving band. That would be the same as the .316" sizer I was thinking I would have to try and find somebody to make for me.
This solves sizing - there's still a bit more taper left to go before final dimensions are met at the lube orifices, so I can get smaller diameters yet if I want to. It doesn't solve lubing, however. At this point, not my concern because I hope to do nothing but powder coat from now on.
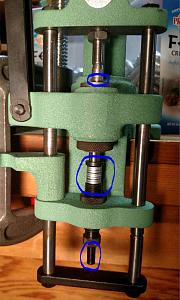
The last part of the puzzle is how to precisely and repeatedly get the same amount of sizing on every bullet that is being partially sized? Something like the gas check seating stop. The adjustment screw does not have enough vertical threading to work as a stop by itself to limit bullet travel in the sizer. And the push out rod needs to be able to freely travel inside the adjustment screw.
Happily, I came up with one of my rare good ideas (that also happens to work): I simply threaded about eight washers on the push out rod before placing it inside the adjustment screw. Now, by screwing the adjustment screw up and down, I can precisely and repeatedly control how much each bullet is sized within that 7 degree tapered section prior to the final diameter at the lube orifices. The machinist oriented guys here could simply make a new push rod with the rod itself threaded, or thread the original push rod and run a few nuts up the rod to be the stopper.
If I've lost anyone by this point, a picture will hopefully illustrate what I've failed to adequately explain:

|
   
   
|


|

 Reply With Quote


