Lee PrecisionLoad DataInline FabricationTitan Reloading
WidenersRotoMetals2RepackboxReloading Everything
MidSouth Shooters Supply Snyders Jerky
Results 1 to 8 of 8

Thread: Attempt at Kieth #5 on a Blackhawk

  1. #1
    Boolit Buddy cold1's Avatar
    Join Date
    Nov 2014
    Posts
    110

    Attempt at Kieth #5 on a Blackhawk

    This project started out several months ago as an effort to copy some of Sharps40 (a local Amateur Gunsmith) work by installing a colt 1860 army grip frame on a blackhawk. So I ordered the parts and as usual, i ordered the wrong back strap. It was an 1860 Navy. When I went back and ordered the right backstrap, I was told it was on backorder. Not wanting to waste a learning experience, I figured what the hell lets try making a bisley backstrap.

    The first attempt was to try to modify the Brass navy back strap. I silver brazed on a new lower front lug to the backstrap, milled out the slot, and cut off the upper ears. I quickly discovered that cast brass is very fragile when heated to bending temp. Dont drop hot cast brass. After about the 3rd brake i stopped trying.

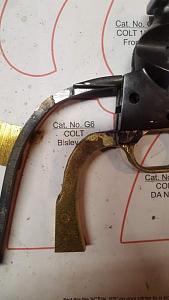
    After that "learning experience", I moved on to trying it in steel. I found that NC Ordinance (repro grips) has some grip templates that you could print out. I printed out the Colt early Bisley, Colt Bisley, and Ruger Bisley grip shapes to use as templates for the bends.

    Not having a steel supplier nearby i had to resort to the big box store rack O steel. I picked up some 3/16 X 1 (5mm X 25mm) hot rolled. I got it home and started heating and bending. I did not want to reduce the with until after the bends since one end would be 1 inch wide (25mm). I have found that for me, i would never be able to get all the bends the way I wanted if the piece isnt full size.

    After I got the bends to line up with the template, I milled down the width to close to where it needs to be. Then I needed to mil in the flats on the upper section. I am not showing my milling setups because they are sketchy as Frig.

    Click image for larger version. 

Name:	bisley1.jpg 
Views:	33 
Size:	23.2 KB 
ID:	239120
    Last edited by cold1; 04-02-2019 at 08:35 PM.

  2. #2
    Moderator


    Join Date
    Apr 2014
    Location
    Way up in the Cascades
    Posts
    8,184
    A learning experience!

  3. #3
    Boolit Buddy cold1's Avatar
    Join Date
    Nov 2014
    Posts
    110
    I tig welded a piece of 3/8 onto the 3/16 to make the "ears" where the screws go to hold the backstrap to the frame. This of course screwed up the flats that is had previously milled into the 3/16. So i had to add weld to them, which changed the size and squareness of the entire piece. Also, I did not realize that I needed to angle the 3/8 instead of square to the backstrap. So once that screw up was noticed, I had to mill in the face angle. Owning an old combo lathe/mill and only a few endmills and a vice, that was sketchy as hell.

    There are only two holes that needed to be drilled and I screwed that up. They did line up with the holes in the frame but they where shifted about .025 to one side. This caused the backstrap to not be centered with the trigger guard. I had to open the holes up with the files. Then I had to open up the counter bores. The back strap is able to be tightened up and it feels solid but I don't want to trust it not to shift.

    I am already thinking about how to make the next one. I think the screw holes will be the first thing I do and build back from there.


    Click image for larger version. 

Name:	Bisley2.jpg 
Views:	34 
Size:	45.4 KB 
ID:	239121


    This is the next version of backstrap that I obsessed over. Getting the angles where the upper block attaches to the frame was what was holding me up. I finally got the angles that i wanted but I ended up taking the majority of the mounting blocks width down. That got the proportions off but what the hey, right? I brazed in a block of steel for the trigger return spring legs. It aint pretty but it does work well. I used a 3/32 tig rod for the pin. I chucked it up and used some needle files to make the grooves for the spring legs.

    As for the trigger guard, I followed Sharps40 mods and it wasnt too difficult. I even used the bear cat plunger for the cylinder stop. I did deviate a little, I made bushings for the two rear screws and soldered them in. The shoulders on the bolts were too long and allowed the trigger guard to not tighten up. I also made a spacer (post pics later) for the front screw because the brass up front was too thin to let me countersink the screw.

    I picked up a bisley hammer and trigger from brownells. I must say that I am pleasantly surprised at how well the sear and hammer feel. Its not a custom trigger job feel but it is definitely as good as factory new. I had to shorten the trigger to fit inside the trigger guard. I dont know what kind of stainless they use but its harder than woodpecker lips. It dulled the **** out of my file in just a few strokes. I switched to the grinder and got it ground down.

    Click image for larger version. 

Name:	Bisley3.jpg 
Views:	35 
Size:	70.1 KB 
ID:	239122

  4. #4
    Boolit Buddy cold1's Avatar
    Join Date
    Nov 2014
    Posts
    110
    My first attempt at making grips. I had some spalted maple on hand so I started with that. I'm pretty sure that these will not be the permanent grips. I have already made a few mistakes and will probably make a few more before I'm done. This pic is still in the process of roughing them in.


    Click image for larger version. 

Name:	Bisley4.jpg 
Views:	33 
Size:	67.0 KB 
ID:	239123


    Here is where I deviated from Sharps40 directions on modifying the 1860 trigger gaurd. I did not like how much metal I had left after countersinking the front screw so I soldered in a spacer to give me a little more thickness. One other thing I did was to make bushings for the two screws at the back of the trigger guard, the bushings were 0.050 thick and I put a drop of solder on each one.

    Click image for larger version. 

Name:	Bisley5.jpg 
Views:	31 
Size:	52.3 KB 
ID:	239124

    Click image for larger version. 

Name:	Bisley6.jpg 
Views:	29 
Size:	44.8 KB 
ID:	239125

    Click image for larger version. 

Name:	Bisley7.jpg 
Views:	26 
Size:	44.3 KB 
ID:	239126

  5. #5
    Boolit Buddy cold1's Avatar
    Join Date
    Nov 2014
    Posts
    110
    So after a few months and many headscratches I finally was able to get everything done and put together. I finished rust bluing the backstrap yesterday and polished the brass today. It's not perfect by any means and there are several things that can be done better. Some of the oops are the fit between the metal and wood, I made the eschustion too big, and the grip screw does cause a slight bit of interference with the mainspring at full cock.

    Click image for larger version. 

Name:	Bisley8.jpg 
Views:	40 
Size:	55.4 KB 
ID:	239127

    Click image for larger version. 

Name:	Bisley9.jpg 
Views:	36 
Size:	55.3 KB 
ID:	239128

    Click image for larger version. 

Name:	bisley10.jpg 
Views:	41 
Size:	46.2 KB 
ID:	239129

    Click image for larger version. 

Name:	Bisley11.jpg 
Views:	37 
Size:	49.4 KB 
ID:	239130

  6. #6
    Moderator


    Join Date
    Apr 2014
    Location
    Way up in the Cascades
    Posts
    8,184
    Looking at it, I would say that it turned out very well. No one but yourself knows about the problems and mistakes you encountered. Looks good.

  7. #7
    Boolit Master
    Join Date
    Dec 2011
    Location
    Southwest MO.
    Posts
    1,886
    There’s nothing like them you make yourself.
    Some people live and learn but I mostly just live

  8. #8
    Moderator

    W.R.Buchanan's Avatar
    Join Date
    Mar 2011
    Location
    Ojai CA
    Posts
    9,885
    That's right! People who don't create anything never know. The fact that you know every little imperfection on that gun doesn't mean that anyone else would pick it up. It only means that you should try harder next time to do better.

    Nothing made by Human Hands will ever be perfect. Perfection is unobtainable. However the pursuit of it must be relentless.

    There are two components to Craftsmanship.

    1. Attention to Detail.
    2. Personal Responsibility.

    Attention to Detail is pretty obvious. You have got to find and address all the details. The devil is in the details, and so on.

    The Personal Responsibility part,,, is not letting all the details that aren't right, go out the door. This is sorely lacking in today's world.

    It doesn't matter if you are Flipping Burgers or Building Space Shuttles,,, if you don't care about what you do, I got no use for you.

    You done good on this project. What's next?

    Randy
    "It's not how well you do what you know how to do,,,It's how well you do what you DON'T know how to do!"
    www.buchananprecisionmachine.com

Posting Permissions

  • You may not post new threads
  • You may not post replies
  • You may not post attachments
  • You may not edit your posts
  •  
Abbreviations used in Reloading

BP Bronze Point IMR Improved Military Rifle PTD Pointed
BR Bench Rest M Magnum RN Round Nose
BT Boat Tail PL Power-Lokt SP Soft Point
C Compressed Charge PR Primer SPCL Soft Point "Core-Lokt"
HP Hollow Point PSPCL Pointed Soft Point "Core Lokt" C.O.L. Cartridge Overall Length
PSP Pointed Soft Point Spz Spitzer Point SBT Spitzer Boat Tail
LRN Lead Round Nose LWC Lead Wad Cutter LSWC Lead Semi Wad Cutter
GC Gas Check