Maybe the blocks are misaligned or it's undersized or whatever.
You sold the gun a year ago. Yeah, whatever.

|
   
   
|


|


Maybe the blocks are misaligned or it's undersized or whatever.
You sold the gun a year ago. Yeah, whatever.
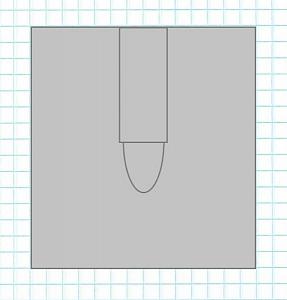
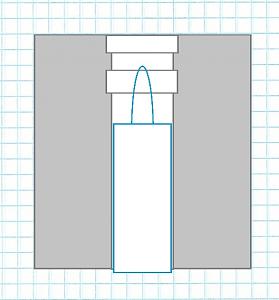
Ream straight through at the lube groove diameter for the new gun.
Last edited by Good Cheer; 10-05-2018 at 09:13 AM.
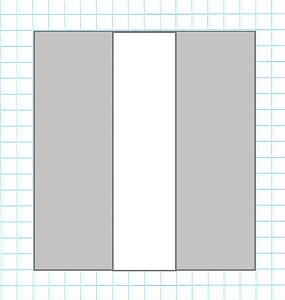
Add the drive bands you want, spaced to make the lube groove you want...
Last edited by Good Cheer; 10-05-2018 at 09:13 AM.
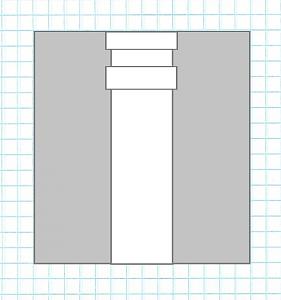
Add the nose plug you want...
Last edited by Good Cheer; 10-05-2018 at 09:14 AM.
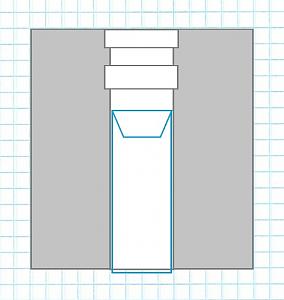
Then want a quick expanding design so add another nose plug...
Last edited by Good Cheer; 10-05-2018 at 09:14 AM.
Just thought I'd ask if anyone is doing this.
It's time for another cup of coffee.
It all worked before and now it says invalid attachments... go figure.

Typically if the image is too large you will get the "invalid attachment" msg. Reduce size to around 400 to 600 pixels (150K size) and it should work.
Are you talking about taking an old mold and machining it to a larger bullet?
I reduced the size on the jpegs re-upped the pictures.
Maybe that skinned the kitty.


Photos are working for me now.
I haven't done quite that, but I do have a few molds that work out to being pretty similar. I'll have to dig in the shop a little bit to find an example, but I think I've got one that you might like...
Nozombies.com Practical Zombie Survival
Collecting .32 molds. Please let me know if you have one you don't need, cause I might "need" it!
It's really nothing more than recycling an oldie for either a SWC or WC to fit a specific piece.
Just seemed something somebody has pro'bly worked with to get the diameters, length and weight they wanted.
Adjustable length plugs would really be the cats meow.
I still cannot figure out how to make "drive bands" or "lube grooves" in a swaging die. I know that you can do it on a mold with a self centering vise. (I am in the process of making a self centering vise) ...sorry going off track here and just spouting off the top of my head.
Does it take some seriously wedged together longitudinally split dies?
How do the corporations do it? I dunno!
I have never seen nor heard of a swaging die with either a set of drive bands or lube grooves. I have made them with only one band or groove, then have the die split at the largest diameter. But you couldn't even remove a swaged bullet from a die with drive bands. Unless some rings are involved. Sorry, off track again.Originally Posted by Good Cheer


Micro grooves or mini grooves might be done but the die would be a real chore. an angled bore and insert to match with the id of the insert machined to the bullet desighn. as pressed in the insert closes in the taper and the ID forms the bullets and grooves. You would need a lot of force to push in standard lube grooves also. It also would require 2 passes to completely form grooves one then turn bullet in insert 90* and again, to remove the needed chamfer on the edge
We had a few dies that bent ears and punched holes in the ears on pieces being pressed out, these dies formed the part with the first 3/4 of the stroke then a boss down and in with matching 45* angles pushed the punch in sideways with the last 1/4 of the stroke. timing of this and set up was very critical. If to soon the continued down forming would snap the punch. To late and the hole became cup not going thru.
For lube grooves a roll forming type swage might work better. 3 rolls with the grooves in mirror image 2 fixed one adjustable with guide pins and a lever to apply pressure. Place bullet in place between guides and roll while applying pressure to the stop.
Yes yes, roll forming swage. That is what I am trying to make for crimping 22lr. For me it is proving almost too difficult. Tried several times and failed every time. The only tools I have are a lathe and hand tools. This time I'm trying to use an electric can opener for the driving of the rollers. I have to gear them to work together otherwise it won't roll....sorry for hijacking the thread...no self control anymore.
Good Cheer for your original post... recutting an old mold is a great idea. I had never thought of it. Have you ever cut a mold? If not there are several youtube videos on it. The main ingredients are a cherry (the cutting bit) and a self centering vise. It is possible to cut them without the vise IF there are no restricted areas inside, like lube grooves and driving bands, I have cut one with a bullet pointed drill bit in aluminum, then went back and forged the aluminum down under the sprue plate so the end of the hole would constrict, Then I clamped (crushed) the mold onto a mandrel of the smaller diameter to make it exactly the size I wanted on the base of the bullet. That is how I made the heel of the 22lr bullet mold. Way too much work so I am now in the process of making myself a self centering vise. When I get it done I am going to make an instruction video so others can make their own. To buy one is very expensive. The main ingredient in a self centering vise is a screw with left and right hand threads on either end. Pretty simple actually. I am making one out of a turnbuckle. You can make cherries out of home made "D" style reamers. You can cut mold cavities in a drill press or a lathe or a mill. (preferably a mill) Once you see a video you will see that it is not rocket science. It does take some machining though.

One of these would be nice
I just spent 2 hours hunting on the internet for a deal on a self centering vise. The above type go for about a thousand dollars. There are some that would probably work for a little over $200. I may have found something that I can use for less than $50. If I end up getting it I will post for folks.
If you get it, or even better make it, be sure to post info. I LOVE making tools and other toys.
 Posting Permissions


| BP | Bronze Point | IMR | Improved Military Rifle | PTD | Pointed |
| BR | Bench Rest | M | Magnum | RN | Round Nose |
| BT | Boat Tail | PL | Power-Lokt | SP | Soft Point |
| C | Compressed Charge | PR | Primer | SPCL | Soft Point "Core-Lokt" |
| HP | Hollow Point | PSPCL | Pointed Soft Point "Core Lokt" | C.O.L. | Cartridge Overall Length |
| PSP | Pointed Soft Point | Spz | Spitzer Point | SBT | Spitzer Boat Tail |
| LRN | Lead Round Nose | LWC | Lead Wad Cutter | LSWC | Lead Semi Wad Cutter |
| GC | Gas Check |

 Reply With Quote