Titan ReloadingRepackboxMidSouth Shooters SupplyLee Precision
Reloading EverythingSnyders JerkyWidenersInline Fabrication
RotoMetals2 Load Data
Page 1 of 2 12 LastLast
Results 1 to 20 of 23

Thread: Range Lead Remelt

  1. #1
    Boolit Master redhawk0's Avatar
    Join Date
    Apr 2016
    Location
    North East, USA
    Posts
    1,428

    Range Lead Remelt

    I finally got around to remelting for consistent range lead. Here's the back story....I started many years ago getting buckets of indoor range lead from my local gun club. I was a newbee....I melted in a 10 lb pot over 300 lbs of range lead...yes...it took a very long time.

    Those ingots are sitting in the barn for 20+ years and I never trusted the consistency of my ingots from one to the next just because it was melted in such small batches.

    Since I finished my smelting pot (made from a 20lb propane tank)...I decided it was time to make some consistency from all those ingots.

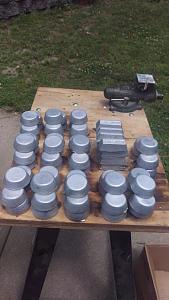
    So...here is how I did it with the remaining 195 lbs of Range Lead. My pot holds about 100+lbs so I split my ingots in half. Smelted half at a time...then poured new ingots....labeled so I could keep batch 1 separate from batch 2.....then split each batch 1 & 2 in half and smelted together again.

    I now have one large batch of consistent range lead. Quite happy.

    I used a front rotor from my Silverado as a lid to hold in heat. The ingots displayed are only half the batch.

    redhawkClick image for larger version. 
Name:	IMAG0877.jpg 
Views:	65 
Size:	46.4 KB 
ID:	222527Click image for larger version. 

Name:	IMAG0878.jpg 
Views:	66 
Size:	61.1 KB 
ID:	222528Click image for larger version. 

Name:	IMAG0879.jpg 
Views:	64 
Size:	39.6 KB 
ID:	222529Click image for larger version. 

Name:	IMAG0880.jpg 
Views:	65 
Size:	29.5 KB 
ID:	222530
    Last edited by redhawk0; 06-22-2018 at 06:30 PM. Reason: spelling

    The only stupid question...is the unasked one.
    Not all who wander....are lost.
    "Common Sense" is like a flower. It doesn't grow in everyone's garden.

    If more government is the answer, then it was a really stupid question. - Ronald Reagan

  2. #2
    Boolit Master


    Walter Laich's Avatar
    Join Date
    Aug 2005
    Location
    Cypress, Republic of Texas
    Posts
    3,493
    wasn't that kind of hard on the rotor?
    NRA Life
    USPSA L1314
    SASS Life 48747
    RVN/Cambodia War Games, 2nd Place

  3. #3
    Boolit Master redhawk0's Avatar
    Join Date
    Apr 2016
    Location
    North East, USA
    Posts
    1,428
    Haha...yeah...that's an old worn out rotor from 2 years ago that I still had hanging around. The cauldron is about ~12" diameter...and the Silverado rotor was ~13.5" It fit on there pretty good...and didn't get so hot that a gloved hand couldn't take it off. Plus..the center hub hole works good to preheat my iron ladle. That old antique ladle holds over 4# by itself so it fills two muffin tins at a time....each muffin is about 25 oz. give or take. For me...its a pretty sweet setup. Takes me less than 3 hours from start to finish for 100 lbs of material.

    redhawk

    The only stupid question...is the unasked one.
    Not all who wander....are lost.
    "Common Sense" is like a flower. It doesn't grow in everyone's garden.

    If more government is the answer, then it was a really stupid question. - Ronald Reagan

  4. #4
    Boolit Grand Master

    Join Date
    Oct 2009
    Location
    England,Ar
    Posts
    7,693
    That was a good days work! I've remelted stuff before to get better consistently. My pot holds 350-400# and I label the ingots from every pot full with a batch number and date.

  5. #5
    Boolit Grand Master

    Join Date
    Jun 2013
    Location
    NW GA
    Posts
    7,243
    Good job and a good way to repurpose the rotor. Plus if the tinsel fairy visits, any splash should be well contained

  6. #6
    Boolit Master redhawk0's Avatar
    Join Date
    Apr 2016
    Location
    North East, USA
    Posts
    1,428
    Yeah...that's what I figured too....I still don't like dropping material through the hub hole though....(I have...I just don't like the splash of molten metal)...This pot will hold a lot more than the 100# as I displayed in my picture...but the problem is without an insulation source around my pot the pot sides get just below molten temperature so the deeper the lead gets the more "oatmeal" consistency I get around the top edges. I just keep it to 100# or less and I don't have those problems. I figure I only use about 15-20 lbs of alloy at a time anyway...so to mix an alloy in a 100# lot still gives me good consistent bullets for my cast sessions.

    redhawk

    The only stupid question...is the unasked one.
    Not all who wander....are lost.
    "Common Sense" is like a flower. It doesn't grow in everyone's garden.

    If more government is the answer, then it was a really stupid question. - Ronald Reagan

  7. #7
    Boolit Master
    Dragonheart's Avatar
    Join Date
    Jan 2012
    Location
    Katy, Texas
    Posts
    2,705
    Attachment 222568

    My answer was to add a skirt to the propane tank pot, which made a huge difference in keeping in the heat. Melting time was cut in half. I typically do 200+ pounds in a cook.

  8. #8
    Boolit Grand Master OS OK's Avatar
    Join Date
    Dec 2015
    Location
    El Dorado County, N. Ca.
    Posts
    6,234
    Quote Originally Posted by Dragonheart View Post
    Attachment 222568

    My answer was to add a skirt to the propane tank pot, which made a huge difference in keeping in the heat. Melting time was cut in half. I typically do 200+ pounds in a cook.
    "Sweeeet lookin pot!"
    a m e r i c a n p r a v d a

    Be a Patriot . . . expose their lies!

    “In a time of deceit, telling the truth is a revolutionary act.” G. Orwell

  9. #9
    Boolit Master

    Rattlesnake Charlie's Avatar
    Join Date
    Nov 2007
    Location
    Victor, CO
    Posts
    1,379
    Just wrapping heavy duty aluminum foil around it for a shield helps too. I do it with my large cooking pots too. Really helps.

  10. #10
    Boolit Master
    Join Date
    May 2014
    Posts
    1,439
    Looks like a weather station. Is it bottom pour?
    QUIS CUSTODIET IPSOS CUSTODES?

  11. #11
    Boolit Grand Master

    Join Date
    Oct 2009
    Location
    England,Ar
    Posts
    7,693
    Quote Originally Posted by Dragonheart View Post
    Attachment 222568

    My answer was to add a skirt to the propane tank pot, which made a huge difference in keeping in the heat. Melting time was cut in half. I typically do 200+ pounds in a cook.
    Nice looking pot!

  12. #12
    Boolit Master redhawk0's Avatar
    Join Date
    Apr 2016
    Location
    North East, USA
    Posts
    1,428
    Quote Originally Posted by Dragonheart View Post
    Attachment 222568

    My answer was to add a skirt to the propane tank pot, which made a huge difference in keeping in the heat. Melting time was cut in half. I typically do 200+ pounds in a cook.
    Wow...that is a nice looking pot....it really stays white when you use it? I don't intend to use my pot very often (maybe 5 or 6 times a year) so doing 100 lb batches as the pot is will work for me. It takes just under an hour to melt 100lbs. That propane burner is rated at 200K BTU...so it really throws a lot of heat....just not up too high on the pot walls. I might try the aluminum foil trick though...that is a good idea for my limited use pot and will likely speed things up a bit.

    redhawk

    The only stupid question...is the unasked one.
    Not all who wander....are lost.
    "Common Sense" is like a flower. It doesn't grow in everyone's garden.

    If more government is the answer, then it was a really stupid question. - Ronald Reagan

  13. #13
    Boolit Master
    Dragonheart's Avatar
    Join Date
    Jan 2012
    Location
    Katy, Texas
    Posts
    2,705
    Made from scrap so cost was mainly time and TIG gas. Actually, I copied the bottom pour design from my RCBS Pro Melt furnace, so I can't take the credit for being original. I set the bottom pour to the side of the pot for several reasons; it allows me to easily stir and skim the pot, the ingot mold shelf is at the edge of the pot so it is easy to access and quickly fill the molds, the bottom of the propane tank is concave so I leave several pounds of molten lead in the pot, which speeds up the melting on future batches.

  14. #14
    Boolit Master redhawk0's Avatar
    Join Date
    Apr 2016
    Location
    North East, USA
    Posts
    1,428
    Just a question...I'm new to the cauldron thing here. I have had visits from Gretchen (my Tinsel Fairy's name) but only on my casting pot.

    I've been putting all 100# of material in at once and letting it heat up and melt down. The main reason I've done it this way is to cut down the risk of Gretchen's visit since as things heat up moisture that might be there will evap off before the material melts. How do you guys melt...same way...or do you add material as you go? I have dropped a few ingots through the hub hole as I mentioned before...but its usually onesy twosy for a piece here and there that I forgot to add during the initial fill.

    redhawk

    The only stupid question...is the unasked one.
    Not all who wander....are lost.
    "Common Sense" is like a flower. It doesn't grow in everyone's garden.

    If more government is the answer, then it was a really stupid question. - Ronald Reagan

  15. #15
    Boolit Master


    Bookworm's Avatar
    Join Date
    Jan 2016
    Location
    Central Oklahoma, on a dirt road.
    Posts
    1,186
    When I render dirty lead, I fill the pot and melt. Usually at least 100 pounds at a time. I ladle pour into ingots, using a stainless steel ladle that holds 3+ pounds, so 2 dips per 4-ingot mold, or 4 dips for my homemade 2.5lb (each) 4-gang ingot molds.

    By the time I ladle out that full batch, I'm ready for a break. I refill the pot, and start over. There may be a few pounds left in the bottom, so not a complete restart, but I generally don't add to a pot that's half full, or some such.

    When I'm blending, I do the same, with 100 pound batches. With blended alloy, I use the 1-pound ingots only. I have 4 of those moulds, so again, by the time I finish ladleing out 100 pounds, it's break time.

  16. #16
    Boolit Master
    Dragonheart's Avatar
    Join Date
    Jan 2012
    Location
    Katy, Texas
    Posts
    2,705
    I am melting down range lead, so there are bullets/fragments, sand, jackets, ect, etc that has been screened out. I just pour it all into the pot which already has several pounds of solidified lead in the bottom. Turn on the heat and let it melt. The lead at the bottom of the pot will melt first and speed up the melting. I use a GI stainless spoon welded to a steel bar for a stir stick. The jackets and debris will separate and float to the top as the lead goes to the bottom. I use a heavy wire scoop and my spoon to skim and remove the debris from the pot. I will continue to add scrap to the pot and remove debris as long as there is room available. Once I have 200+ pounds of lead in the pot I flux and clean the metal and start casting ingots.

  17. #17
    Boolit Master redhawk0's Avatar
    Join Date
    Apr 2016
    Location
    North East, USA
    Posts
    1,428
    OK...I'll be starting with dirty lead soon...I have a plumber friend who can get me lead from jobs that he does...so there could be an endless supply of small batch. What isn't shown in my pics are my spoons...I have two 18" stainless steel spoons that I use to stir. One is solid the other is slotted. Between the two I get a good stir, then sawdust cleaning, then a marble size of pure beeswax to finish it off. I get a beautiful silver mirror surface once all the cleaning is performed. So far...I haven't added any new material to the pot once that process is completed and all material (minus the little in the bottom) is cast out to ingots. But with a 4+ lb ladle...after 100 lbs you need a break anyway...its hot work and heavy work. Thanx for providing your methods...it sounds like I'm on the right track with large batches. Its kinda satisfying to see all my ingots in a nice stacked pile under the reloading bench.

    And....just today I purchased two new cast iron corn pans....they will be for my bullet alloy blends...the corn shaped ingots will fit in my 10# pot better.

    redhawk

    The only stupid question...is the unasked one.
    Not all who wander....are lost.
    "Common Sense" is like a flower. It doesn't grow in everyone's garden.

    If more government is the answer, then it was a really stupid question. - Ronald Reagan

  18. #18
    Boolit Grand Master

    Join Date
    Oct 2009
    Location
    England,Ar
    Posts
    7,693
    It sounds like you are off to a good start. I'm a big believer in large batches. Just be careful to watch out for zinc. The draw back of large batches is the danger of contamination. Its generally considered a no no to add lead to a pot with molten lead already in it. Your practice of loading the pot and then bringing it up to temp is a good one. The pot does not need to be cold when adding lead, just solid enough that the new lead does not go under the surface. Also be aware that your tools, like ingot molds and spoons, can contain moisture and attract your friend Gretchen. Pass them through the flame or float them on the surface for a few minutes before using them.

  19. #19
    Boolit Grand Master

    Join Date
    Mar 2013
    Location
    Northwest Ohio
    Posts
    14,536
    I cut of the smaller stand ring off my propane tank pot when I made and installed the full dia stand ring. This allow heat and flame to lap up the sides easier. I also in the to edge cut 8 half holes 12" dia around it. these allow the heat to flow up and our not trying to get in to a dead area. I use a 500,000 btu weed burner for heat source and can met 150 lbs in about 20 mins.

    I ladle cast from this pot and I set ingots on the side edge to pre heat when adding them to preheat them and dry any moisture from them. With your heavy rotor lid a pan cound be set on top with small chunks ( individual wheel weights, type, range lead, bullets.) to pre heat then added back in thru the hole. You don't need 700* heat for this just 250*+ to make the water steam and evaporate. Setting the ingots around the ring of the rotor for 10 mins or so should accomplish the task also for them.
    Last edited by country gent; 06-23-2018 at 04:27 PM. Reason: mis spelling

  20. #20
    Boolit Master dikman's Avatar
    Join Date
    May 2013
    Location
    Sth Oz - A Land Downunder
    Posts
    2,087
    I overfill the pot initially, as in mounding it up, when it's melted down and the crud is cleaned out (range scrap, so very dirty!) it holds roughly 120 lbs. of clean lead. I ladle out as much as I can but leave a few lbs. in the bottom 'cos there's always extra crud in there, then add extra scrap (dry, of course) using a small dustpan and holding a lid over the pot so any unexpected surprises are deflected away from me. A couple of dustpans is enough to solidify the molten stuff and then I pile more into it. Saves me having to cool everything down first - I'm using a portable coke forge so it's better to keep the heat going once started.

    I need to get another propane cylinder to cut down so that I can weld a skirt around the sidewall as I'm wasting heat up the sides.

Page 1 of 2 12 LastLast

Posting Permissions

  • You may not post new threads
  • You may not post replies
  • You may not post attachments
  • You may not edit your posts
  •  
Abbreviations used in Reloading

BP Bronze Point IMR Improved Military Rifle PTD Pointed
BR Bench Rest M Magnum RN Round Nose
BT Boat Tail PL Power-Lokt SP Soft Point
C Compressed Charge PR Primer SPCL Soft Point "Core-Lokt"
HP Hollow Point PSPCL Pointed Soft Point "Core Lokt" C.O.L. Cartridge Overall Length
PSP Pointed Soft Point Spz Spitzer Point SBT Spitzer Boat Tail
LRN Lead Round Nose LWC Lead Wad Cutter LSWC Lead Semi Wad Cutter
GC Gas Check