RotoMetals2Reloading EverythingTitan ReloadingMidSouth Shooters Supply
WidenersSnyders JerkyLee PrecisionRepackbox
Inline Fabrication Load Data
Results 1 to 13 of 13

Thread: Methods of Work: Swaging with Heavy Walled Jackets

  1. #1
    Boolit Buddy


    Join Date
    Apr 2009
    Location
    Cleveland, OH
    Posts
    427

    Methods of Work: Swaging with Heavy Walled Jackets

    Some might remember a thread I posted last year about drawing jackets from Strip. I have been using and enjoying that tooling set for the past year, and thought I would post a thread which shows how some of those heavy jackets can be used. The thread below is sort of a "how to" thread which shows some of Corbin's tooling in use. Many probably look at his website and the stuff he sells there, but it always left me wanting as there is very little of it shown in action. In this thread you will see some of that.

    The object is to make 500 grain and up .50 caliber bullets. These are actually .500, not .510. They are for use in the new Bighorn Armory.50 caliber autolader which you can see here

    The first step is to make the core and trim the jacket. The core is 292 grains made from .365 wire I extruded and swaged to yield .370 cores. The jacket was trimmed in a pinch trim die. The preswaged assembly can be seen here:

    Click image for larger version. 

Name:	IMG_2202.jpg 
Views:	32 
Size:	23.3 KB 
ID:	218378


    I wanted to put a boat tail on these bullets for a bunch of reasons, but mainly because for heavy bullets they are more accurate. Here you can see the core and jacket loaded into the BT1 die ready to get swaged:

    Click image for larger version. 

Name:	IMG_2203.jpg 
Views:	24 
Size:	25.1 KB 
ID:	218379


    Since these jackets are .065" thick, it takes 1600# of dial pressure to get the jacket to expand and seat the core. It actually takes three hits from the press to get the kind of definition you need. Further, since so much pressure is required, you need to use an external punch which prevents the lead from squirting past the punch or rupturing the jacket. This takes a lot of trial and error to get the right core and jacket length combination. The result can be seen here after being processed through the BT1 preform die:

    Click image for larger version. 

Name:	IMG_2204.jpg 
Views:	34 
Size:	39.7 KB 
ID:	218380


    The bottom of the swaged bullet:

    Click image for larger version. 

Name:	IMG_2206.jpg 
Views:	27 
Size:	21.0 KB 
ID:	218381


    And the top:

    Click image for larger version. 

Name:	IMG_2207.jpg 
Views:	34 
Size:	22.0 KB 
ID:	218382

    Next is to finish the boat tail using the BT2 boat tail finish die. It puts a sharp ring on the boat tail which is similar to, but superior to ordinary boat tail designs. According to Corbin, the sharp ring diverts the gases at right angles upon exiting the bore and it makes the bullet more accurate. The tooling that does this is shown here:

    Click image for larger version. 

Name:	IMG_2208.jpg 
Views:	27 
Size:	24.9 KB 
ID:	218383


    As before, it took multiple hits inside the BT2 die at 1600# or dial pressure to get the boat tail finished. It's not as sharp as a thinner jacket would yield, but good enough to get the desired effect:

    Click image for larger version. 

Name:	IMG_2210.jpg 
Views:	31 
Size:	22.2 KB 
ID:	218384


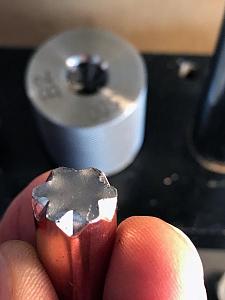
    Next, to help the jacket open up upon impact, I used the "saber tooth punch" which you use in the BT2 finish die. The only difference is you put the bullet in upside down and press the bullet nose first into the die which is opposite it's normal function. The external punch has a mirror image of the boat tail machined into it to press it into the die. Punch shown here:

    Click image for larger version. 

Name:	IMG_2212.jpg 
Views:	25 
Size:	21.6 KB 
ID:	218385


    The result at 500# of dial pressure. Starting to look like a real bullet:
    Click image for larger version. 

Name:	IMG_2214.jpg 
Views:	33 
Size:	22.5 KB 
ID:	218386
    Last edited by Zbench; 04-14-2018 at 03:54 PM.
    Zbench

  2. #2
    Boolit Buddy


    Join Date
    Apr 2009
    Location
    Cleveland, OH
    Posts
    427
    All that high pressure comes at a cost in that it makes the finished bullet very close to final diameter. The result is that the bullets needs to be run through a Bullet Reducing die to get the bullet .001" under final size before it is run through the point form die. Otherwise, it would hang up and deform the hollow point. Shown loaded and ready to go below. The punch has the boat tail shape machined into it and it sits on there perfectly:

    Click image for larger version. 

Name:	IMG_2215.jpg 
Views:	22 
Size:	29.1 KB 
ID:	218388

    Through the other side:

    Click image for larger version. 

Name:	IMG_2216.jpg 
Views:	25 
Size:	27.3 KB 
ID:	218390

    Last is to run it through the Point Form Die. I opted for one of Corbin's synchronized honed ejector set ups. The main difference between that and a regular PF die is that it uses a metal probe to define the Hollow point and push the bullet out of the die. It is not pressure sensitive as it is essentially a blind hole, not like the wire affair which can allow lead to flow into the ejection hole. After using this die, I will never go back to the other type of die. Tooling shown here:

    Click image for larger version. 

Name:	IMG_2217.jpg 
Views:	22 
Size:	30.3 KB 
ID:	218395

    Ready to get swaged for the last time. Using 1000# of pressure to get the hollow point defined and nose filled. As before, the external punch has the Boat Tail Shape machined into it:

    Click image for larger version. 

Name:	IMG_2218.jpg 
Views:	20 
Size:	26.0 KB 
ID:	218397

    After ejection, sitting as pretty as you please on the hollow point punch:

    Click image for larger version. 

Name:	IMG_2219.jpg 
Views:	23 
Size:	31.3 KB 
ID:	218399

    The finished result.. You will notice how the lead flowed back into the cuts made into the jacket by the saber tooth punch:

    Click image for larger version. 

Name:	IMG_2222.jpg 
Views:	36 
Size:	34.1 KB 
ID:	218400
    Click image for larger version. 

Name:	IMG_2220.jpg 
Views:	31 
Size:	23.3 KB 
ID:	218401
    Click image for larger version. 

Name:	IMG_2221.jpg 
Views:	28 
Size:	24.8 KB 
ID:	218402

    Taper Crimped and ready to kill most anything needing killed:

    Click image for larger version. 

Name:	IMG_2224.jpg 
Views:	25 
Size:	22.5 KB 
ID:	218403

    There are reports that you can lauch a 700 grain bullet out of this rifle. I'm planning to work up a 700 grain pill next. Hope you enjoyed the rundown.
    Zbench

  3. #3
    Boolit Buddy uncle dino's Avatar
    Join Date
    Apr 2015
    Location
    thumb of Mi.
    Posts
    432
    Z. A little something to think about when running at higher pressures.. I run an additional split 1 1/2" nut on the underside of the external punch holder, to lock those threads in top plate..A single nut on the holder will cause wear in the head plate and threads become loose. It's only an issue when you run at the higher pressures. I wore out 2 top plates.. Haven't had any issue since I added the additional nut..d

  4. #4
    Boolit Master
    NoZombies's Avatar
    Join Date
    May 2009
    Location
    N. Florida
    Posts
    2,493
    Very cool projectiles you're making there, and thanks for the photos. I agree, Corbin's site has a lot of information about his equipment, but is a little thin on the actual process.

    I don't have any Corbin dies set up for defined length punches, but have them for other systems, and I'm an absolute believer. I find they provide more consistent HP's, better point definition, and easier ejection.
    Nozombies.com Practical Zombie Survival

    Collecting .32 molds. Please let me know if you have one you don't need, cause I might "need" it!

  5. #5
    Boolit Buddy
    Join Date
    Mar 2016
    Location
    Logan, Ut.
    Posts
    494
    Fantastic "Z" !!! Is that a CSP-2 ? or a Hydro-mite ? I Have kicked the boat-tail idea around for a 458, but not sure it's worth the money for a 200 yard gun. (maybe for my 308) But that saber tooth punch and a hollow point punch would do wonders I think. Any time you want to post more pictures of your methods and means, Don't let me stop you ! I can't get enough either ! Beautiful projectile and cartridge you have there !

  6. #6
    Boolit Buddy


    Join Date
    Apr 2009
    Location
    Cleveland, OH
    Posts
    427
    Thanks Nun2Kute. I make all my stuff on the CHP-1 Hydro Press. Its the one in the free standing cabinet. I do plan to make a bullet just like this in 458. With the jacket draw kit I got, I have a draw die to make heavy wall .458 style jackets. I'll use the same process to make heavy 500 grain or so bullets for the 45-70/90 and even 458 SOCOM for subsonic use.

    Will post more when that comes to pass.
    Zbench

  7. #7
    Banned
    Join Date
    Dec 2016
    Location
    Reloading Bench
    Posts
    352
    Yep. Not enough info there. Great job on those bullets.

  8. #8
    Boolit Buddy PaulG67's Avatar
    Join Date
    Mar 2016
    Posts
    295
    Excellent post Zbench, very informative. thanks.
    Paul G


    I am Retired, I was tired yesterday and I am tired today!!!

  9. #9
    Boolit Buddy marten's Avatar
    Join Date
    Apr 2011
    Location
    UK
    Posts
    186
    It puts a sharp ring on the boat tail which is similar to, but superior to ordinary boat tail designs
    Translated: It is impossible to make a punch to swage the boat tail without the 'ring' in this system.
    “Son, self praise is no recommendation.”
    self-ag·gran·dize·ment n. The act or practice of enhancing or exaggerating one's own importance, power, or reputation.


  10. #10
    Boolit Buddy


    Join Date
    Apr 2009
    Location
    Cleveland, OH
    Posts
    427
    Quote Originally Posted by marten View Post
    Translated: It is impossible to make a punch to swage the boat tail without the 'ring' in this system.
    Interesting perspective if it were true. As you can plainly see in the production sequence above, to get a "traditional" boat tail, one only needs to proceed to point forming after the use of the boat tail preform die. The preform die puts the boat tail shape on the bullet without the ring. You can read the merits of the annular ring supplied by the second die here: http://www.corbins.com/rbt.htm Scroll down to the section "Why doesn't everyone use RBT"
    Zbench

  11. #11
    Boolit Buddy
    Join Date
    Dec 2011
    Location
    Montana
    Posts
    194
    Very informative Zbench! I prefer the RBT over standard boat tails. You get close to the ballistic profile of regular boat tails with less throat erosion (theoretically anyway) and I've found them to be just as accurate in most cases.

  12. #12
    Boolit Buddy


    Join Date
    Apr 2009
    Location
    Cleveland, OH
    Posts
    427
    While the 500 Auto Max is still not here, I got another set of dies to make bullets in .510 for my 50-70 Sharps. These use the same heavy walled jackets. Shown is a 550 grain bullet ready to go. It has a DEEP 1/2" hollow point that is 1/4" wide at the top. Can't wait to shoot these, will report back after some range time. I made some boat tailed bullets too, going to do some side by side accuracy comparisons.

    Click image for larger version. 

Name:	5070.jpg 
Views:	26 
Size:	30.8 KB 
ID:	222735
    Zbench

  13. #13
    Banned
    Join Date
    Dec 2016
    Location
    Reloading Bench
    Posts
    352
    Those are some pretty rounds.

Posting Permissions

  • You may not post new threads
  • You may not post replies
  • You may not post attachments
  • You may not edit your posts
  •  
Abbreviations used in Reloading

BP Bronze Point IMR Improved Military Rifle PTD Pointed
BR Bench Rest M Magnum RN Round Nose
BT Boat Tail PL Power-Lokt SP Soft Point
C Compressed Charge PR Primer SPCL Soft Point "Core-Lokt"
HP Hollow Point PSPCL Pointed Soft Point "Core Lokt" C.O.L. Cartridge Overall Length
PSP Pointed Soft Point Spz Spitzer Point SBT Spitzer Boat Tail
LRN Lead Round Nose LWC Lead Wad Cutter LSWC Lead Semi Wad Cutter
GC Gas Check