The one I posted the link to has no springs. I did a little sanding on the slide portion of the die and made it pretty slick. The weight of the drop tube and spring makes it function just fineOriginally Posted by TylerR


|
   
   
|


|


The one I posted the link to has no springs. I did a little sanding on the slide portion of the die and made it pretty slick. The weight of the drop tube and spring makes it function just fine
The one I posted the link to has no springs. I did a little sanding on the slide portion of the die and made it pretty slick. The weight of the drop tube and spring makes it function just fine

Now that you have done some testing, I would like your opinion on whether I should just do ribs on the stock collator plates I generate in my download, and skip the sliding troughs? There are a couple advantages to getting rid of them. For one, the plate would not have to be as tall. Also, I have found that they tend to allow bullets to ride to the top kind of balanced halfway in the hole and halfway out. Usually they fall back to the bottom but sometimes they end up dropping right at the last second on the slide plate, which can cause bad results.
Also, what setting did you use for the bevel in the print you did for the above video? Looks like it is less then the 1.3 default for bullets.
Last edited by TylerR; 10-30-2020 at 11:08 AM.
Good feedback, thank you. I am very tempted to go that route, and eliminate the need for any adapters.
Thank you for reading the entire thread! It really helps to save on questions that have been covered multiple times.
I agree with GWS. Most of the action happens at the bottom with tiny rifle bullets, I was watching it and I don’t think a single bullet used a trough for anything i wonder if no troughs and short ribs is the answer? Would reduce size and print time. I’ll be watching this one..oh yea, the knocker serves no purpose on my 223 plate. I did the same and disable it
Just a tip that I’m sure most know. When printing a feeder die, make sure in cura or whatever slicer you are using that you set the Z seam to random otherwise a Z seam will be on the back side and it WILL cause issues when you try to get the 2 pieces sliding together well......ask me how I know. Haha
That is excellent advice. I actually wasn't doing that. Just made the change.
Last edited by TylerR; 10-30-2020 at 11:38 AM.
Well glad it helped.
Look forward to seeing your results
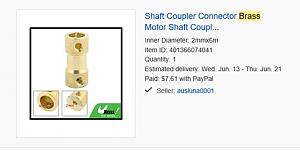
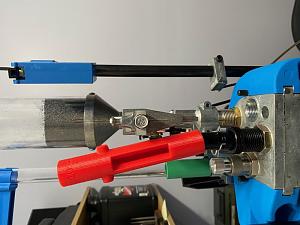
I got some help much earlier in this thread on how to pin the motor shaft, figured I would share with all the people looking at hex plates. Picture of the standalone coupler shows a hole drilled for the roll pin. With the taller AM plates I was able to run it right through the set screw hole (picture of collator).
Here's my updated electronics box. I also tested the nubs I added to my plate and they worked great. I loaded 200 rounds of 9mm last night letting the feeder run empty a few times and the nubs made sure all the bullets dropped in.
It would be great if we could have an FAQ on the first page or something. Or even just a public Google doc that we could point people to that gets updated occasionally. Stuff like what are the best motor and spring options gets lost so quickly and reading a 100 page thread is a big ask.
Hi - Would someone be able to try modifying the drop tubes to work with a Dillon 750? I think what is needed is a 15 degree angle from vertical. Alternatively, maybe just a coupler for the tube to the feeder die? The 750 charge bar comes out and interferes with a drop tube in position 3 or 4. DAA came out with a smaller charge bar which would help for pistol for $30, but won't drop enough of a charge enough for rifle. If this works I would really appreciate tubes for 9MM, 45ACP and 223. Thanks! I have saved the file in multiple rotations and for the life of me I can't get it right
If someone wants to put something together I would be more then happy to host it on my drive.
Yeah, right...I don't ever move that fast....but I figure if I can get it to go that fast without problems slowing it down a tad would come with no problems. I would prefer to not use a ramp....but I haven't tried the baffle for rifle bullets in particular or base down in general.....but I plan to look into it. It's really hard to beat a good ramp....and DAA knows it....that's why they bought Ricks design and patent.
You know I've never been a fan of the troughs....I love what Ammo Mike has done, but I've always thought troughs were details not necessary. I could still be wrong....they might be needed for some things....but to just run em in every plate seems counter productive to my mind. About tall....for bullets, I think they need to be as tall as the tallest bullet you are going to feed in them, But riding bullets in troughs are a bad thing, IMO. On the original Hornady Pistol Bullet Feeder....the bullets rose and fell over and over and over and over!.... and they were louder than hell! Mind numbing...then the flipping bullet trick came and the noise went way down, because they were so efficient that the plates emptied the first time around. Then the troughs came and it was still efficient except where bullets rode the trough and the crashing down came back.
I did not change the 1.3 on the bevels.....they look smaller because the troughs are gone. Worked pretty darn good that way, so I won't be changing that.
This has been a day from hell for me at work. But it's handled......I hope....and maybe I can get back to the fun stuff this evening.
Last edited by GWS; 10-30-2020 at 05:01 PM.
Time to get another print going without the troughs. Even with 10% infill and 2 walls these rifle plates take forever to print.
I don't have one stl, I have four......so far. this is a design in process that started on page 54 and continued on pages 55,56 then improved using a 3 piece more easily printed design on page 57and 66. Then page 75, a .22 downtube with offset interior path on page 77. I do love it, but it's not a finished product for those who expect to print and use without some TLC, and tweaks here and there. One more thing...it's not designed for the small diameter proximity sensors. Make sure you have one like I have.
I'm not ready with the files just yet. I'll get the files together and post a link in this post. So if you want to print them at your own risk, and try them you certainly welcome to. Just return to this post in a few hours and download them if you want. They work great for me.
With TylerR's help....... https://drive.google.com/drive/folde...y0qvUSP9B4MwvV
One more thing....in the picture above shows the .223 version of the upper in the middle. It has a funnel going into the top, and a curved path to keep falling bullets within range of the sensor. Now that funnel is stair stepped because of how 3d printers print. That causes those tiny bullets to pile up if not smoothed out with a round file, or something....I also painted mine with acrylic wax (use to be called Pledge) and before it dried I rubbed fine powdered graphic in it.....making it slicker than snot......no more problems....bullets fall like water, just like my last video showed.
Last edited by GWS; 10-30-2020 at 07:53 PM.
r4ndy,
I was having the same problem and per this video https://www.youtube.com/watch?v=zvUNLwiAB2g I removed my failsafe rod and added springs like he did in the video. I didn't buy the Dillon springs though. I have an assortment of springs and I grabbed them out of there. My powder measure can now be turned to any position. YMMV. Good luck!
Okay, you know how. I thought it would be easy to share the stls stlmacgeek wants....until I tried. Guess I don't have a clue. Any advice?
Thanks STL, I am hoping to find a solution to leave the rod on but I will keep this in mind. I have springs on my Lee Pro's, so familiar territory.
Check your email. I just added you as an Editor to my google drive folder. You can now add/remove files.
And now I see your files. Aint that cool?
Might make more sense to zip your stl's up and then just drop that as a file in the main bf folder.
Last edited by TylerR; 10-30-2020 at 07:07 PM.
 Posting Permissions


| BP | Bronze Point | IMR | Improved Military Rifle | PTD | Pointed |
| BR | Bench Rest | M | Magnum | RN | Round Nose |
| BT | Boat Tail | PL | Power-Lokt | SP | Soft Point |
| C | Compressed Charge | PR | Primer | SPCL | Soft Point "Core-Lokt" |
| HP | Hollow Point | PSPCL | Pointed Soft Point "Core Lokt" | C.O.L. | Cartridge Overall Length |
| PSP | Pointed Soft Point | Spz | Spitzer Point | SBT | Spitzer Boat Tail |
| LRN | Lead Round Nose | LWC | Lead Wad Cutter | LSWC | Lead Semi Wad Cutter |
| GC | Gas Check |

 Reply With Quote
