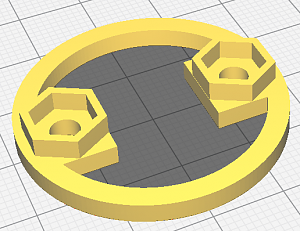
So the new lock ring will have captured nuts. No socket required. These are for #6. Metric guys will have to make due, although I suspect M3-M3.5 will work fine.

|
   
   
|


|


So the new lock ring will have captured nuts. No socket required. These are for #6. Metric guys will have to make due, although I suspect M3-M3.5 will work fine.
I like the captured nut ideaOriginally Posted by TylerR


Hi TylerR,
Looks good! Depending how tight the socket is on the #6 nut, the M4 screw & nut will work, but will be loose. The M5 nut will fit exactly, but the M5 screw shaft will be a little too big.
Ed
______________________________________________
Growing old is mandatory, growing up is totally optional!
I looked at doing that GWS, but found that it was not necessary. The design is plenty strong as it is based on my testing.
Hey,
I'm trying to print the main body on a fairly standard Ender 5. Cura says it cannot be sliced. I do notice in Cura that it goes into the "Gray zone" around the edges of the print bed. Can the main body be printed on an Ender 5?
Hi,
Welcome to the forum. Yes, you should be able to print on an Ender 5. I believe it has a 220 x 220 printing surface, correct? I printed mine on an Ender 3, and I believe it's the same size. Check to see if your skirt is too big. That will usually push the grey "no print" boundary in too far and cause your print to fail in Cura.
Ed
______________________________________________
Growing old is mandatory, growing up is totally optional!
Yep, turn off border . Brim,skirt,raft.
thanks, guys. i had skirt turned on from a previous print. Problem solved!

You don't really need 4 holes do you? Depending on the bolts you use you just have to turn the handle.....right? Or does it have to do with the recessed slotted bottom somehow?
The 4 hoes are required depending on how the user wants to secure the handle, and how tall the screws that were used to attach the clutch.
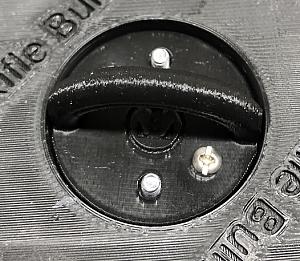
Guess I'm too dense to get that. I decided to print a ring with a recess for the nuts.....it works without square nuts of course....just a little slower to screw on the nylocs that far.....but once done no difference.

Because you are still using the screws that are part of the clutch mechinism to connect the handle. I wanted people to have the option to use those, or some #4 machine screws instead.
Like this:
OR this:
Last edited by TylerR; 03-09-2021 at 02:06 PM.
I get that part, so you're saying the clutch screws will still be high enough to require a second set of holes, and the recess in the bottom too?
The clutch screws may be higher then the recommended 1/2" like in my second pic, in which case they will just pass through the holes. It's all about options. I don't like to limit people.
No you got me messing with it. Slightly less options but cleaner? We shall see.
OK GWS, you convinced me. One set of holes. You can either use the recommended 1/2" #6 screws, and then machine screws (#4) to attach the handle, or you can use longer #6 screws and two extra nuts to secure it.
Last edited by TylerR; 03-09-2021 at 03:58 PM.
Finally Got my Press in, XL750 My question how did you adapt the Drop tube to the case feeder on the machine?
Running on Ender 3 I use a Skirt of 3mm and 10mm distance, with no issues
Hey, Never mind.... I now see the dillon tube adapter!
Wait... That's not it either.... I need from bottom of Drop Tube to Fit over Dillon Case Feeder Tube which is 18.5mm
Last edited by Anuccite; 03-10-2021 at 08:37 AM.
The part that is out there currently uses a section of Dillon clear tube in between. I am making another version that will eliminate the need for the clear tube.
 Posting Permissions


| BP | Bronze Point | IMR | Improved Military Rifle | PTD | Pointed |
| BR | Bench Rest | M | Magnum | RN | Round Nose |
| BT | Boat Tail | PL | Power-Lokt | SP | Soft Point |
| C | Compressed Charge | PR | Primer | SPCL | Soft Point "Core-Lokt" |
| HP | Hollow Point | PSPCL | Pointed Soft Point "Core Lokt" | C.O.L. | Cartridge Overall Length |
| PSP | Pointed Soft Point | Spz | Spitzer Point | SBT | Spitzer Boat Tail |
| LRN | Lead Round Nose | LWC | Lead Wad Cutter | LSWC | Lead Semi Wad Cutter |
| GC | Gas Check |

 Reply With Quote