I like it. good on you for setting your buddy up.Originally Posted by Anuccite


|
   
   
|


|


I like it. good on you for setting your buddy up.
I was dumb and had to look up the base specs for 45lc cases. Are there any plans to say do a 14/15mm drop tubes/adapters? I'm probably one of the few doing 45lc on a progressive. The DAA spring is just big enough to let the cases flow down through them. If not I can keep on hand feeding.
The DAA large output spring is over 13mm ID, and the 13mm drop tube and spring adapters are just over 13mm, so with those parts and maybe a little sanding you should be able to get it to work most likely. That being said, there is no technical reason I could not add a 14mm version. You guys just like to put me to work don't you. haha
I can sand lol, I didn't know if you had a easy template that could be editable without having to remake the entire thing just for 14mm.
Before I print a drop tube, the 40 bullet insert will fit in the #10 drop tube right?
Oh but I do. That's the beauty.
40 feeder die should allow 10-11mm drop tube.
Just to clarify, you may have some issues with the 14mm spring tube because it allows a 14mm dia, but the DAA large spring ID is more like 13.5mm. So there is a slight chance things could get caught on the spring on the way down. So going with the 13 and doing some light sanding might still be your best bet. I will let you experiment and report back.
Last edited by TylerR; 01-14-2021 at 01:53 PM.
Awesome thank you! I'll print now and report back.
Happy to report back that it's working perfectly! Thank you for creating the files. Some of the cases shoot down, some like to gumball swirl down but no issues getting through the Adapters or drop tube.
Now I get need to get my hands on some 460 sw brass
Last edited by Falconpunch; 01-14-2021 at 09:24 PM.
Just some input to help folks when printing and fitting parts. If anyone has issues with parts not fitting properly after its printed, this is the best way to go about it. I don't sand my prints anymore, I used to do it years ago but stopped because you could see the sand paper marks or the discoloration from sanding on the prints. Plus, sanding takes a long time compared to softening the plastic briefly.
1. Use a heat gun on the part that you are trying to get to fit, heat up the area not too hot.
2. Once the plastic is a little heated you can press the piece into the the other piece that you are trying to get a good fit into.
3. You will have to work a little fast as the plastic is going to cool down very fast, if it does cool too fast just repeat the process.
Example these two parts from looking at the manual. On page 7 of the user manual if you look at parts F & G, you will heat up the core of part G and then press it into F. I had issues fitting this piece and I had to use the heat gun, that's when I realized that not everyone is going to be familiar with heating parts to make it fit without sanding. No matter how accurate the print is the filaments are always a +/- % when it expands.
What layer height are you using for these prints?


Hi,
That's a really good tip, and it seems that you've been 3D printing for a while. I wanted to suggest that if your parts aren't fitting well, it could be a calibration issue. o416 had a really good link on post 2748 to check and fix this. I did and found one of my printers was way out of spec. I changed/fixed it, and now have almost not fitment issues.
Ed
______________________________________________
Growing old is mandatory, growing up is totally optional!
I am using .2 and .12. I normally use a .8 nozzle when printing but I had to go down to a .4 to print these parts just for accuracy. Pretty much everything I printed didn't fit correctly or needed to be sanded. I haven't used cura in years, I just use simplify3d now. My printer is very calibrated, all the steppers are calibrated, my esteps are calibrated.
Sometimes when I print I do get good fit, but so far I haven't been able to get a good fit when I print these parts. I blame it all on filament, or it could be too much calibration. I use linear slides on my printers now, everything is totally upgraded.
.4mm nozzle and .12 layer height is a requirement for any small parts where fit is a concern, in order to match to what I have designed to. Originally I designed around .2 layer height, but things were too lose for people printing at .12, so I went back and tightened up the tolerances some.

And don't forget the bottom layer spread. An xacto knife or scalpel is my best friend for for dealing with those. Usually it only takes a second....just a little cleanup.
Two more little things....the start and stop spots at each layer......and sharp edges where the typical .4 needs a trim to zero. These printers are better than I anything I could dream about....but perfection isn't reality anywhere among mortals.
Tyler, I know your tolerances are good, I would say they are perfect. But when printing there are always differences depending on the printer. In the manual it suggested that you use brims for printing the drop tubes. I use brims 100% of the time in all prints due to past issues. When I printed my first drop tube yesterday along with a larger electronics box I was looking at the print progress remotely and I could see the spaghetti from the tube. The tube dislodged from the bed and it was a mess, I had to wait until I got home to clean it up. If I did stop the print remotely I would have ruined the electronics box, so I let it go.
I had to use a raft in order to print my tubes, as I am writing this now I am printing 4 tubes with rafts and monitoring it remotely (i have never had to use rafts before). Some might say that you need to use some stuff on your bed, I use the Borosilicate Glass for my bed so I don't need glue or blue tape or anything else besides heat to hold my prints down.
Believe me, all my printers are setup differently, and they all function differently. When I do marlin firmware upgrades on my printers I have different settings for them all. I used to apply the same settings when I didn't know any better and all I had were issues.
I basically wanted to point out the heating tip to others because there will be fitment issues for some and I just didn't want them to ruin their prints by sanding too much, this is something I have done in the past and still do at times.
Tyler, nothing needs to be changed, everything is fine. Different printers do different things and only from experience and frustration would a person see these issues.
The bottom layer spread sounds like elephants foot. That is normally fixed by using brims, the brim holds the print to the bed so the corners doesn't lift up. Also, if you keep too much heat on the bed after the first few layers the weight of the print will press down and spread the bottom out.
I normally give my first layer 70 degrees celc on the bed and then move to 60c every layer afterwards. Some people use 50c but my prints fall over when using 50c.
This deburring tool is what I use to cleanup the corners and edges of my prints and it works great.
https://www.amazon.com/s?k=deburring...f=nb_sb_noss_2
A little off topic but
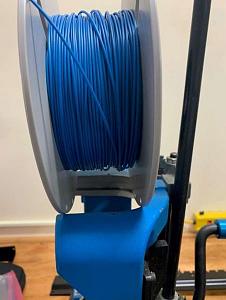
What filament have you found that match the Dillon blue the best? Looking for PLA or PLA+.
Thanks.
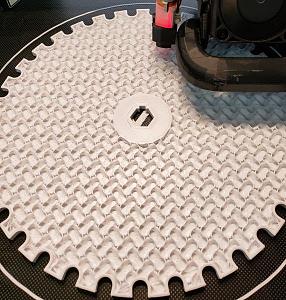
This is my 1st attempt at Using Varying levels of infill for a part.... I wanted to print around the HEX connector at 100% for strength and the rest at 10%... I think it's coming out as expected.... For anyone that wishes to use this method..... Watch This video Attention at the 2:00 minute mark (Thanks o416)
Here are the start of the results.... I will update with a few pic as it progresses. and NO, I didn't do a great Job of centering that! but it should get the job done.
Last edited by Anuccite; 01-15-2021 at 12:44 PM.
I printed this with a ZIRO PLA.... But my amazon link brings me to not having the blue anymore....
I just ordered this as a replacement for that color.... don't have it yet.
https://www.amazon.com/gp/product/B0...?ie=UTF8&psc=1
Hi,
I think the blue Duramic PLA+ comes pretty close.
Ed
______________________________________________
Growing old is mandatory, growing up is totally optional!
Absolutely, and the heat trick is great advice. I also use acetone at times to smooth things out and that helps with fit.
I just want to make sure everyone is using the finer print setting because it also has a large affect on how parts fit together.
 Posting Permissions


| BP | Bronze Point | IMR | Improved Military Rifle | PTD | Pointed |
| BR | Bench Rest | M | Magnum | RN | Round Nose |
| BT | Boat Tail | PL | Power-Lokt | SP | Soft Point |
| C | Compressed Charge | PR | Primer | SPCL | Soft Point "Core-Lokt" |
| HP | Hollow Point | PSPCL | Pointed Soft Point "Core Lokt" | C.O.L. | Cartridge Overall Length |
| PSP | Pointed Soft Point | Spz | Spitzer Point | SBT | Spitzer Boat Tail |
| LRN | Lead Round Nose | LWC | Lead Wad Cutter | LSWC | Lead Semi Wad Cutter |
| GC | Gas Check |

 Reply With Quote