Reloading EverythingLoad DataTitan ReloadingRotoMetals2
Inline FabricationRepackboxMidSouth Shooters SupplyWideners
Lee Precision Snyders Jerky

Thread: Making that Bullet Collator

  1. #2501
    Boolit Master GWS's Avatar
    Join Date
    May 2019
    Location
    New Mexico
    Posts
    1,355
    TylerR, what I see in the new picture is stuff that will catch an edge and turn it......unfortunately it reminds me of a construction accident I experienced when I was 24. I was roofing a building, and a freak gust of wind caught the plywood I was carrying, and threw me backwards into an open skylight.....I would have hit the ground head and shoulders first except that I hit my head on the way through and it turned me enough that I hit back first and only broke my back in two places. Getting airlifted to a hospital and surviving was the difference.

    What I think you want here is NOTHING visible in the hole....IOW's you have the outlet screwed to the bottom of the base, and the parts twist screwed into the bottom of it BIGGER than the outlet....so all you see is air......thus giving the bullets a chance to use the slight weight difference at the base a chance to stabilize base down.

    You have the right idea for the bevel to a diameter where the bullet can't turn at all, but you can't have edges that a bullet can knick.

  2. #2502
    Boolit Master lablover's Avatar
    Join Date
    Aug 2015
    Location
    Macomb Michigan
    Posts
    749
    Quote Originally Posted by TylerR View Post
    If that doesn't work, we will go to plan C. Offset drop hole. Will work perfect, just have to design the part so the offset sits on the outside edge.

    Attachment 272327
    Yea, that’s brilliant! Kudos

  3. #2503
    Boolit Master TylerR's Avatar
    Join Date
    Dec 2008
    Posts
    2,001
    Quote Originally Posted by GWS View Post
    TylerR, what I see in the new picture is stuff that will catch an edge and turn it......unfortunately it reminds me of a construction accident I experienced when I was 24. I was roofing a building, and a freak gust of wind caught the plywood I was carrying, and threw me backwards into an open skylight.....I would have hit the ground head and shoulders first except that I hit my head on the way through and it turned me enough that I hit back first and only broke my back in two places. Getting airlifted to a hospital and surviving was the difference.

    What I think you want here is NOTHING visible in the hole....IOW's you have the outlet screwed to the bottom of the base, and the parts twist screwed into the bottom of it BIGGER than the outlet....so all you see is air......thus giving the bullets a chance to use the slight weight difference at the base a chance to stabilize base down.

    You have the right idea for the bevel to a diameter where the bullet can't turn at all, but you can't have edges that a bullet can knick.
    That is one heck of a story GWS!

    I am not sure if you are talking about the last pic I posted of the offset hole, but there will not be any edges for any bullets to hit. That is a must. All the offset hole does is allows the bullet to fall from the very outside of the plate without having to be "funneled" in to a smaller diameter to fit the small spring.

    I will get one printed and demo it using my 9mm rounds, but it will basically be a 10mm hole from top to bottom. No funnel.

  4. #2504
    Boolit Master GWS's Avatar
    Join Date
    May 2019
    Location
    New Mexico
    Posts
    1,355
    No, didn't see the last picture of yours, you posted just before I did!....I was looking at at least two edges in lablover's last picture.

    The only thing I worry about with the new part you just posted is that it might be too small to drop that bullet in fast enough....but then it's not tall, and you can run it slow enough to let it fall.

    Now on my "other" problems....

    This is incarnation #4 for the proximity switch. Made to print small side down, because I'm sick and tired of trying to print the female twist turn at the bottom and have a terrible mess to clean up in it.


    I was hoping TylerR will see this and critique before I print it. And BTW, the little outlet he just designed would have taken me 2 days......at my age I have to relearn over and over and over......it's a real pain....hope you all don't get old.
    Last edited by GWS; 11-29-2020 at 11:11 PM.

  5. #2505
    Boolit Master lablover's Avatar
    Join Date
    Aug 2015
    Location
    Macomb Michigan
    Posts
    749
    Quote Originally Posted by TylerR View Post
    If that doesn't work, we will go to plan C. Offset drop hole. Will work perfect, just have to design the part so the offset sits on the outside edge.

    Attachment 272327
    Last adapter did not work at all. Was just like the original design done. Bullets would not even drop. Seems like when the adapter goes to the top of the bowl is when the problems start. The one design you made that was longer but shorter in the area that went up into the collater was the best so far.

  6. #2506
    Boolit Master TylerR's Avatar
    Join Date
    Dec 2008
    Posts
    2,001
    Quote Originally Posted by lablover View Post
    Last adapter did not work at all. Was just like the original design done. Bullets would not even drop. Seems like when the adapter goes to the top of the bowl is when the problems start. The one design you made that was longer but shorter in the area that went up into the collater was the best so far.
    Great feedback, thanks. I think this idea is going to solve your issue. Printing one now.

  7. #2507
    Boolit Master TylerR's Avatar
    Join Date
    Dec 2008
    Posts
    2,001
    Quote Originally Posted by GWS View Post
    No, didn't see the last picture of yours, you posted just before I did!....I was looking at at least two edges in lablover's last picture.

    The only thing I worry about with the new part you just posted is that it might be too small to drop that bullet in fast enough....but then it's not tall, and you can run it slow enough to let it fall.

    Now on my "other" problems....

    This is incarnation #4 for the proximity switch. Made to print small side down, because I'm sick and tired of trying to print the female twist turn at the bottom and have a terrible mess to clean up in it.

    I was hoping TylerR will see this and critique before I print it. And BTW, the little outlet he just designed would have taken me 2 days......at my age I have to relearn over and over and over......it's a real pain....hope you all don't get old.
    I definitely like the look of it! My only question is the support webbing at the top. That would not seem necessary to me.

  8. #2508
    Boolit Master GWS's Avatar
    Join Date
    May 2019
    Location
    New Mexico
    Posts
    1,355
    Quote Originally Posted by TylerR View Post
    I definitely like the look of it! My only question is the support webbing at the top. That would not seem necessary to me.
    The support webbing at the bottom is to prevent support garbage.
    The support webbing at the top will be the bottom when used, so it'll provide physical support for the Sensor hanging out there and maybe last longer. I guess I don't trust the plastic holding that up without a fillet long term.

    How about the little nubs at the bottom? Will they print without support problems if the bottom is rounded that way? Is it enough?

    You notice I left off the finger grip......heck since it has a "handle" to turn it, I guessed the finger grip was not necessary.
    Last edited by GWS; 11-30-2020 at 12:06 AM.

  9. #2509
    Boolit Master TylerR's Avatar
    Join Date
    Dec 2008
    Posts
    2,001
    Quote Originally Posted by GWS View Post
    The support webbing at the bottom is to prevent support garbage.
    The support webbing at the top will be the bottom when used, so it'll provide physical support for the Sensor hanging out there and maybe last longer. I guess I don't trust the plastic holding that up without a fillet long term.

    How about the little nubs at the bottom? Will they print without support problems if the bottom is rounded that way? Is it enough?
    Looks like they should print fine to me.

  10. #2510
    Boolit Master GWS's Avatar
    Join Date
    May 2019
    Location
    New Mexico
    Posts
    1,355
    Thanks....you'd know....I'm just trying to get past beginner still with this 3d printing skill.

  11. #2511
    Boolit Master lablover's Avatar
    Join Date
    Aug 2015
    Location
    Macomb Michigan
    Posts
    749
    Quote Originally Posted by GWS View Post
    Thanks....you'd know....I'm just trying to get past beginner still with this 3d printing skill.
    I think you have the printing down pretty good!

  12. #2512
    Boolit Master GWS's Avatar
    Join Date
    May 2019
    Location
    New Mexico
    Posts
    1,355
    Quote Originally Posted by lablover View Post
    I think you have the printing down pretty good!
    Ha! Just when I think I got the bull by the horns, I find out there's a lot more bull than I thought! Case in point: The last incarnation of this part looked perfect while printing, then it finished, I took it off the bed, and the inside looked like spaghetti. Hard spaghetti. Took hours to clean it out and the result was.....well....ugly! The inside of the twist joint showed open filler, not the nice smooth I got printing it topside like TylerR's angled down spout.

    IOW's an unsupported ledge inside, even 4mm wide is a no no. So I redesigned it to print upside down with another web support. One to counter the weight in use....the other to counter lack of support.

    And now I have to use separate glue-in threads for the sensor, because they won't print worth a darn horizontally without support.

    Bottom line: It's a lot easier to print tried and true prints perfected already by TylerR and others than to design your own. But I'm learning....a slow process above 70!

  13. #2513
    Boolit Master TylerR's Avatar
    Join Date
    Dec 2008
    Posts
    2,001
    Quote Originally Posted by GWS View Post
    Ha! Just when I think I got the bull by the horns, I find out there's a lot more bull than I thought! Case in point: The last incarnation of this part looked perfect while printing, then it finished, I took it off the bed, and the inside looked like spaghetti. Hard spaghetti. Took hours to clean it out and the result was.....well....ugly! The inside of the twist joint showed open filler, not the nice smooth I got printing it topside like TylerR's angled down spout.

    IOW's an unsupported ledge inside, even 4mm wide is a no no. So I redesigned it to print upside down with another web support. One to counter the weight in use....the other to counter lack of support.

    And now I have to use separate glue-in threads for the sensor, because they won't print worth a darn horizontally without support.

    Bottom line: It's a lot easier to print tried and true prints perfected already by TylerR and others than to design your own. But I'm learning....a slow process above 70!
    You hit the nail on the head. Designing every part to not require supports is always a factor. And as I have said, I hate supports. But sometimes they can't be avoided.

    I like your idea of the threaded section being a seperate part. It may be possible to make the tolerance tight enough to not even require glue.

  14. #2514
    Boolit Master TylerR's Avatar
    Join Date
    Dec 2008
    Posts
    2,001
    Lablover. I just uploaded the final copy of the offset spring adapter. If you are using my drop hole adapter connected to the body with the pre-drilled holes, It should just line up. Otherwise you would want to reposition the drop hole adapter to get it lined up. It is compatible with my small pistol bullet plate and I have tested it with 9mm.

    Click image for larger version. 

Name:	body.jpg 
Views:	21 
Size:	21.9 KB 
ID:	272374

  15. #2515
    Boolit Master lablover's Avatar
    Join Date
    Aug 2015
    Location
    Macomb Michigan
    Posts
    749
    Quote Originally Posted by TylerR View Post
    Lablover. I just uploaded the final copy of the offset spring adapter. If you are using my drop hole adapter connected to the body with the pre-drilled holes, It should just line up. Otherwise you would want to reposition the drop hole adapter to get it lined up. It is compatible with my small pistol bullet plate and I have tested it with 9mm.

    Click image for larger version. 

Name:	body.jpg 
Views:	21 
Size:	21.9 KB 
ID:	272374
    Outstanding! I’ll give it a try in a bit. Thanks Tyler

  16. #2516
    Boolit Master GWS's Avatar
    Join Date
    May 2019
    Location
    New Mexico
    Posts
    1,355
    Quote Originally Posted by TylerR View Post
    You hit the nail on the head. Designing every part to not require supports is always a factor. And as I have said, I hate supports. But sometimes they can't be avoided.

    I like your idea of the threaded section being a seperate part. It may be possible to make the tolerance tight enough to not even require glue.
    You could do the same thing with your offset in a regular outlet.....just stuff that center piece into the big one! and glue it.....or not depending on whether you use it for other bullets that don't want or need the offset. (running and ducking)

  17. #2517
    Boolit Master lablover's Avatar
    Join Date
    Aug 2015
    Location
    Macomb Michigan
    Posts
    749
    Quote Originally Posted by lablover View Post
    Outstanding! I’ll give it a try in a bit. Thanks Tyler
    Print done and tested. First round got stuck trying to go down. Took it out and did a little sanding as for some reason it was a tad too long. Started getting some success 95% of the time now. I think because I had to sand the length down a tiny bit I also now shortened the bevel on the one side. I’m going to do some more sanding and see what happens. So far this has been the most reliable option and I’m very excited.

    Tyler, if you find you need to adjust it could you shorten the length of the part that goes into the bowl 1/2 mm . Right now for some reason it sits a little proud of the bottom of the bowl. I also think a very slight bevel to the offset hole at the top may or may not help. I’m going to sand a little radius there and see what happens. I’m so damn geeked right now

  18. #2518
    Boolit Master TylerR's Avatar
    Join Date
    Dec 2008
    Posts
    2,001
    Quote Originally Posted by lablover View Post
    Print done and tested. First round got stuck trying to go down. Took it out and did a little sanding as for some reason it was a tad too long. Started getting some success 95% of the time now. I think because I had to sand the length down a tiny bit I also now shortened the bevel on the one side. I’m going to do some more sanding and see what happens. So far this has been the most reliable option and I’m very excited.

    Tyler, if you find you need to adjust it could you shorten the length of the part that goes into the bowl 1/2 mm . Right now for some reason it sits a little proud of the bottom of the bowl. I also think a very slight bevel to the offset hole at the top may or may not help. I’m going to sand a little radius there and see what happens. I’m so damn geeked right now
    Excellent! I just shortened it by .75mm, and re-posted. I can add a bevel to the inside radius but have found with the regular drop hole it does not tend to fix problems. Let me know what else you try that helps it be more reliable.

  19. #2519
    Boolit Master lablover's Avatar
    Join Date
    Aug 2015
    Location
    Macomb Michigan
    Posts
    749
    Quote Originally Posted by TylerR View Post
    Excellent! I just shortened it by .75mm, and re-posted. I can add a bevel to the inside radius but have found with the regular drop hole it does not tend to fix problems. Let me know what else you try that helps it be more reliable.
    Awesome, and I’ll defer to you on the bevel. I may not get it printed until tomorrow but will report back then. Appreciate you help.
    Joe

  20. #2520
    Boolit Master GWS's Avatar
    Join Date
    May 2019
    Location
    New Mexico
    Posts
    1,355
    Quote Originally Posted by TylerR View Post
    You hit the nail on the head. Designing every part to not require supports is always a factor. And as I have said, I hate supports. But sometimes they can't be avoided.

    I like your idea of the threaded section being a seperate part. It may be possible to make the tolerance tight enough to not even require glue.
    You are absolutely right! I didn't need glue!


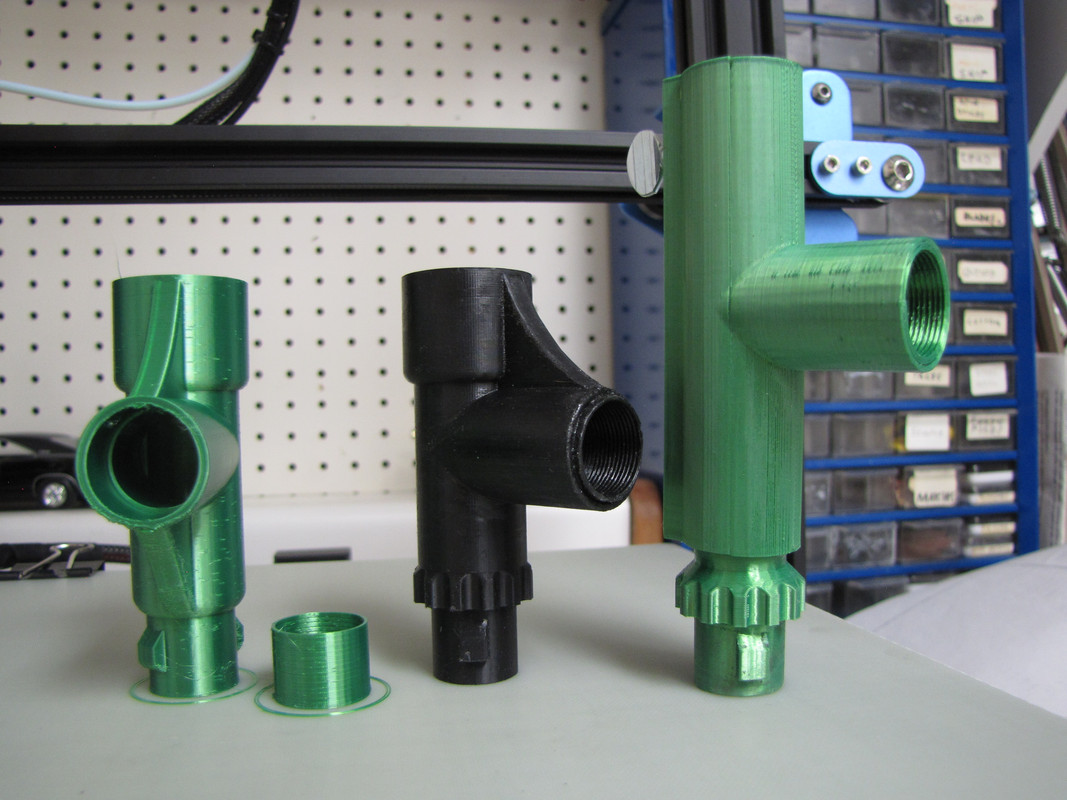
    I did have to use a Dremel sanding cylinder on the inside of where the thread insert goes...you can see that the hole didn't close at the top without artifact hanging. Also I used acetone to smooth the inside up. Two pictures Below you will notice that my first design is dull.....that's what acetone does to the pretty green finish....but you can polish it back up.
    h
    Also I had elephant's feed at the bottom to sand off.....easy enough....and once done the fit was good.


    Below is the proximity sensor downtube progression from right to left.....I sure like the compact model better. I have one little tweak to do to the .223 offset bullet tube and I can use this design for both the case feeder and bullet feeder. Happy, finally!

    Below: I've got two things left to do....make a tube transition to the clear tube on RCBS's tube feeder, and make a slot instead of a hole so I can slide the collator forward 3/4" to mate with the tube.
    Last edited by GWS; 12-01-2020 at 10:03 AM.

Page 126 of 361 FirstFirst ... 2676116117118119120121122123124125126127128129130131132133134135136176226 ... LastLast

Posting Permissions

  • You may not post new threads
  • You may not post replies
  • You may not post attachments
  • You may not edit your posts
  •  
Abbreviations used in Reloading

BP Bronze Point IMR Improved Military Rifle PTD Pointed
BR Bench Rest M Magnum RN Round Nose
BT Boat Tail PL Power-Lokt SP Soft Point
C Compressed Charge PR Primer SPCL Soft Point "Core-Lokt"
HP Hollow Point PSPCL Pointed Soft Point "Core Lokt" C.O.L. Cartridge Overall Length
PSP Pointed Soft Point Spz Spitzer Point SBT Spitzer Boat Tail
LRN Lead Round Nose LWC Lead Wad Cutter LSWC Lead Semi Wad Cutter
GC Gas Check