Yes, you can only get one of the upper screws in on that side, but I think you are going to want it secured to some extent. I have mounted them this way in the past.Originally Posted by GWS


|
   
   
|


|


Yes, you can only get one of the upper screws in on that side, but I think you are going to want it secured to some extent. I have mounted them this way in the past.
Dear Team,
Anyone facing the same challenge as I do, and have a cool resolution ? APP_Bullet_Slide_9mm.stl
Sunlu PLA+, calibrated printer, follow settings in the manual.
Med v�nliga h�lsningar/Best Regards
///Roger

It appears you are printing on a raft.
My guess is that could be the problem with the little point of the hook adhesion even though the manual says to use raft. I use "skirt" as bed adhesion is good with polypropylene bed I use. If you need better adhesion possibly try "brim" and see how it goes.
Maybe the hook will break off when removing from standard bed after printing?
GD
Last edited by Gillie Dog; 09-03-2023 at 11:34 AM.
#2 member of the 10%ers
Thanks GD,
Yes printing on raft. Will try skirt/brim once my current print is completed. Will revert.
///Roger


Orient the model with the top on the build plate.
Set your resolution to the highest setting available on your slicer.
Enable Brim.
Enable supports, (everywhere).
Hope this helps.

I am a network engineer so my cad skills are lacking. I'm better with electrical systems. I am waiting on my mounting plate still.
Hi Tom !
Will the support not leave plastic residue that will cause friction ? I will give your suggestion a shot. Brim on standing up didnt fly .....
///Roger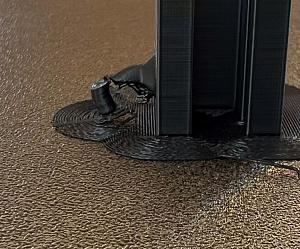
Yes. it probably will leave residue. You can take a small flat bit screwdriver and run along inside the grooves to scrape most of it off then use a small flat file to smooth the grooves to fit your slider rail.
Support residue is, in my opinion, the greatest bugaboo in 3D printing.
From looking at your last attempts my curiosity got the best of me and so printed a sample.
There must be something else wrong like maybe the slicer, I do not know. I agree with Tom about supports as do many others, and avoid when possible.
This was printed .12 layer, Z hop enabled.
GD
Last edited by Gillie Dog; 09-05-2023 at 02:01 PM.
#2 member of the 10%ers
Roger which slicer and printer are you using?
I took a closer look at the model and I believe that, if the slider were to be oriented to stand on it's end then use a raft, 0.12 resolution, and use supports with the overhead angle set to 65 degrees, that should give you a good clean print with little support residue to clean up.
I need one of these any way so, as soon as my printer completes the present project, I will load it up with the 9mm slider and can then give a definite recommendation.
My Slicer is Cura Ver 5.4.0 amd my printer is an Ender 3V2 with Auto Bed Leveling. If I pay attention and get everything set just right, I does a really wonderful job on the models.
"Tree"
This is the way right here. I use 60 degree overhang which is specified in the manual, and standard supports. I do not use supports for round holes printed horizontally. This is one of the more difficult parts in the whole project, and the only one that requires support for the little tab. I print on a poly bed and when it is leveled and cleaned properly I have no issues.
Tyler,
My old brain is getting more and more feeble. I am running a new computer and cannot remember what is needed to open and how to run your partsgenerator.
It sure is frustrating to be unable to do what used to be so easy to comprehend.
I am starting to understand the feeling my friend. You need to install Java.
https://www.java.com/download/ie_manual.jsp
Tyler,
Thanks for your response.
I just discovered that I had some off-brand Java installed. Deleted that and installed the real thing. All is well now
Thanks again.
Printed with Tree supports and a raft. It turned out OK but took a lot of time and filament .
Next, to compare appearance and functionality, I'll print one with the same orientation but with no supports and no Bed adhesion.
I am using Creality Slicer, but will make a test with Cura as well.
Printer is Creality Ender-3 S1 Pro. Calibrated. Will revert after Cura test.
Tested with Cura => No luck (same issue)
Tested with Skirt => No luck (same issue)
Tested with Raft and Support => No luck (same issue). See picture. Very strange.....

It looks like the hook is falling over on it's support. If the support under it is only a thread or two wide, it could happen. I Never use rafts, for me they are more a pain than they are worth. On this model with it oriented vertically...probably the best way....I would look at your support options and use larger columns and make sure "support to the bed" only is checked.
The picture above shows a really rough bed and glossy.....what kind of bed is it? Could you sandpaper it smoother with some 220 grit wet/dry....which would smooth it up some yet, make the bed surface less glossy and get more adhesion. That said support under the hook is not wide enough to keep it from toppling over.
Another thing is the printer head has to be clean...no blobs that could touch the model. If it touches that hook in any way it will cause a fail.
I use the polypropylene bed TylerR turned me on to......tried others.....refuse to deal with glue or tape. No need with polyp. Most of my printing problems went away.....but with any bed it has to be clean......I use 99% isopropyl alcohol to wipe my bed down before every print......no exceptions....worth it.
Last edited by GWS; 09-06-2023 at 10:03 AM.
Printer bed is spring steel PEI magnetic build plate that comes standard with the printer. Not had any issues before.
Will test other orientation and live with the residue. Thanks for the help !
Last edited by rogerandre; 09-06-2023 at 02:01 PM.
I've been where you are, and it's very frustrating. Try a good alcohol wipe on your PEI plate. I've never printed this part because I don't process bullets, so I decided to get some first hand experience. Printing as I post (and found out I assumed wrong about hook support....there is no support for the hook since it sits on the plate).....but I have got past the hook already and no problems at all using no supports no raft and no brim, just a skirt to help me set initial Z height.....which I do every time looking for the perfect slight flat on top of the first layer.
Here's a video to show you how it worked on my Creality CR10v2 machine, using Overture PLA Professional black, using a .12 layer height zero support on my polyp bed....temp. 215C , 65C on the bed. No Z hop.....doesn't work well with either my slicer or printer. Fill is set to 18 percent. I stopped the video to show you, but the print is still going for another 2 hours.
I don't expect you to sit and watch the video....boring....but you can use your cursor and slide through the video quickly to see how it worked, with no raft or support.
The more I think about this, the more I think bed leveling may be your problem. So that the nozzle hits the print....it don't take much at .12mm layer height to give you a bad day.
I bought TH3D's EZabl 2 system that uses a prox sensor to level and it has been simple & wonderful.
Print is done......not bad....
Minimal cleanup to do..... notice above how one can "baby step" the Z while printing the skirt, until it's a little flat on top?
Because I have TH3D's software that came with the leveler...I just click Creality's control button twice quick and it automatically goes into "babystepping Z" mode and I can turn the knob and the nozzle goes up and down ever so slightly until you get the flat top you want. Then click once and you are back to the main screen.
Somebody is bound to ask where TylerR, I and others purchased the Polyp beds:
https://www.amazon.com/s?k=Mamorubot&ref=bl_dp_s_web_0
I should explain why babystepping.....my first layer height is set as is yours by the slicer software. But the problem is, that media differs.....Overture Professional lays down different from Zyltec PLA, for example, even Zyltec PLA and Zyltec PLA composite, like their "Satin" colors differ. Not much different, but enough that causes the first layer to vary. Then there is imperfections in the printers....where EXACT height can vary a little.....I mean how thick is .012mm!? can a printer vary a hundredth or two from print to print? In my experience, yes it can.....so to start from an even playing field, (printing field), I babystep Z height at the beginning of each print....to make sure the setting for the first layer is where I want it. Perfect first layer often means a perfect print, unless the nozzle is worn, or the media tubing is gunked up.
Last edited by GWS; 09-06-2023 at 10:10 PM.
 Posting Permissions


| BP | Bronze Point | IMR | Improved Military Rifle | PTD | Pointed |
| BR | Bench Rest | M | Magnum | RN | Round Nose |
| BT | Boat Tail | PL | Power-Lokt | SP | Soft Point |
| C | Compressed Charge | PR | Primer | SPCL | Soft Point "Core-Lokt" |
| HP | Hollow Point | PSPCL | Pointed Soft Point "Core Lokt" | C.O.L. | Cartridge Overall Length |
| PSP | Pointed Soft Point | Spz | Spitzer Point | SBT | Spitzer Boat Tail |
| LRN | Lead Round Nose | LWC | Lead Wad Cutter | LSWC | Lead Semi Wad Cutter |
| GC | Gas Check |

 Reply With Quote

