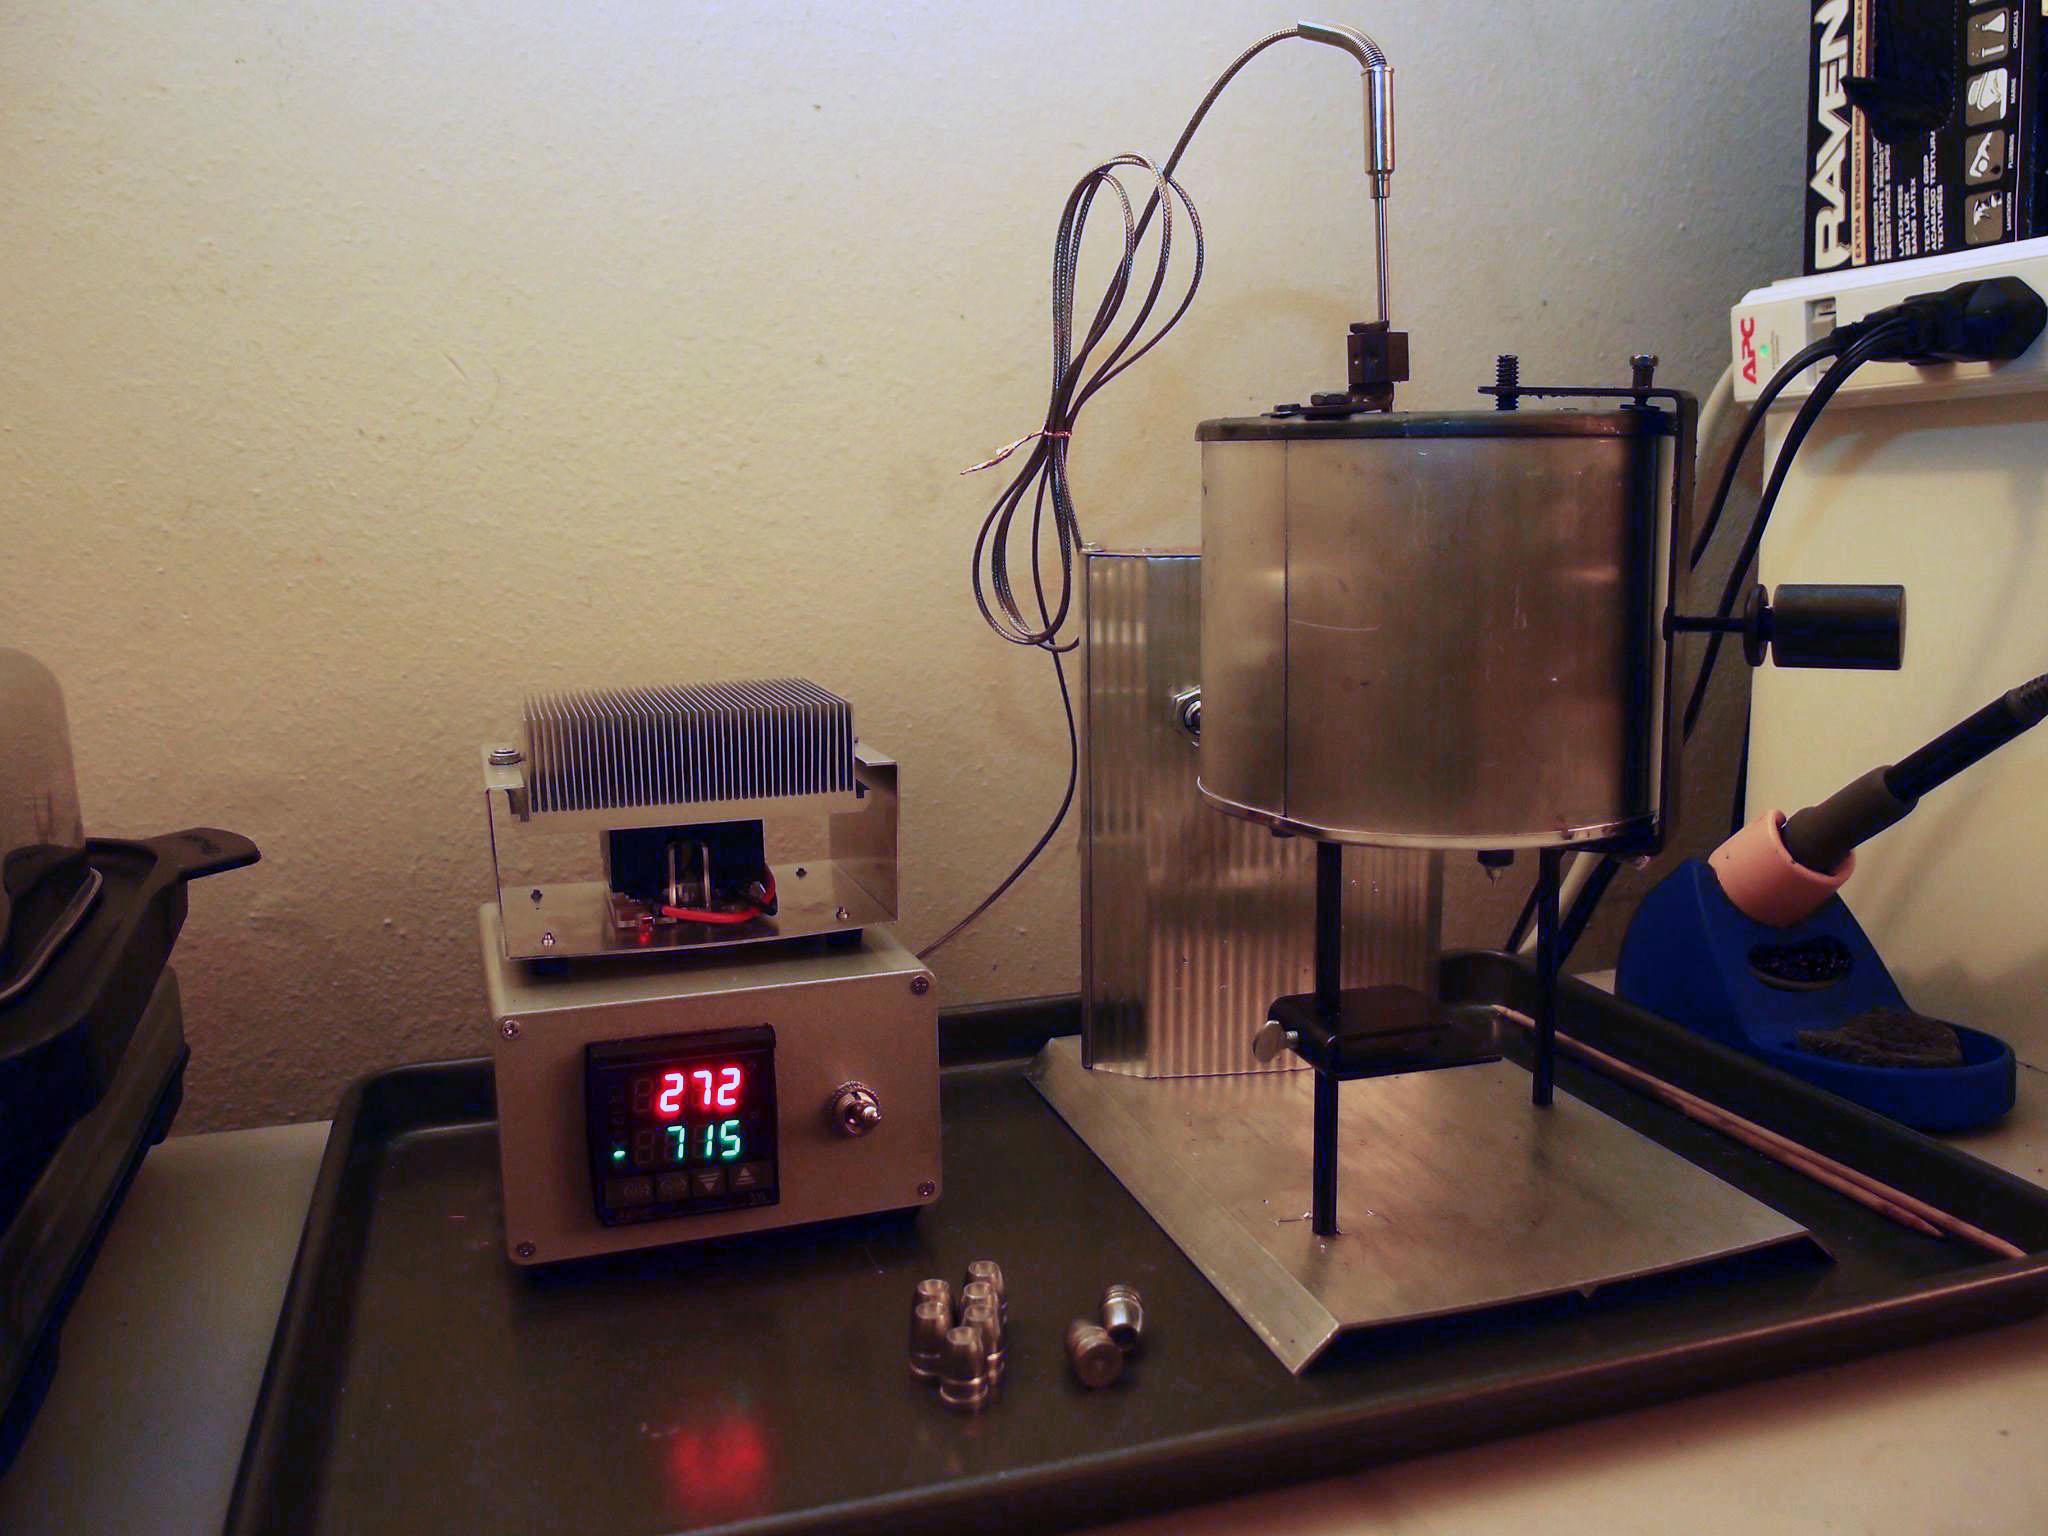
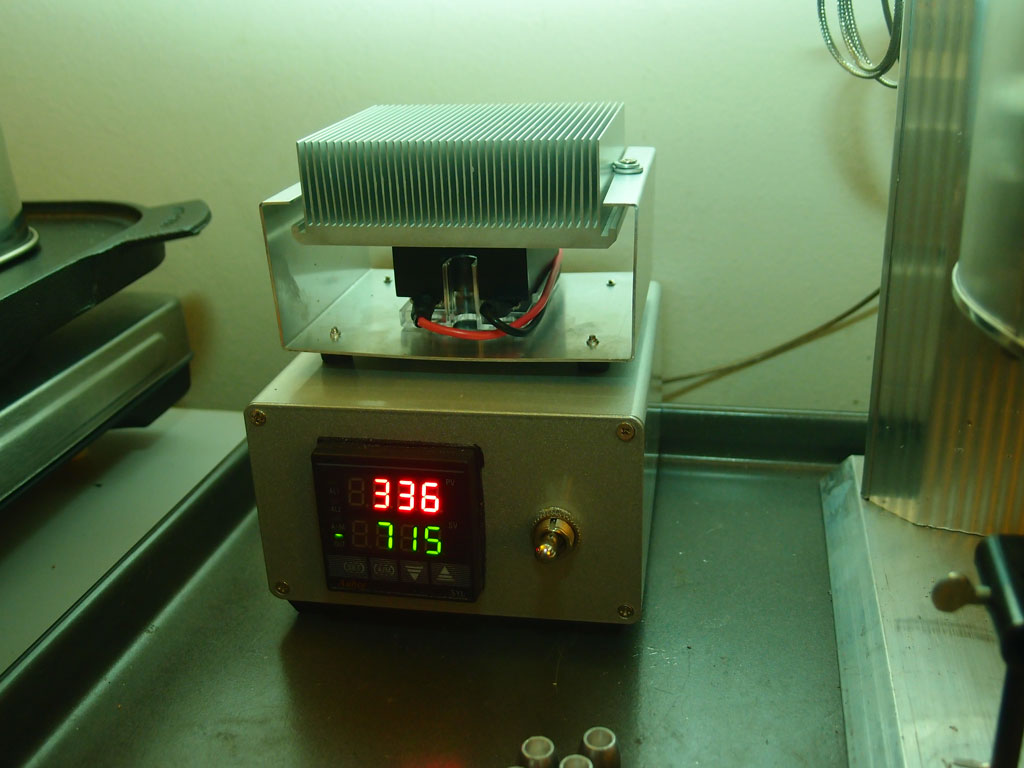
RepackboxWidenersMidSouth Shooters SupplyInline Fabrication
Reloading EverythingSnyders JerkyLoad DataLee Precision
Titan Reloading RotoMetals2
Page 7 of 10 FirstFirst 12345678910 LastLast
Results 121 to 140 of 182

Thread: How I wired a PID to control temperature

  1. #121
    Banned
    Join Date
    Nov 2010
    Location
    Casa Grande, AZ
    Posts
    5,526
    The PID control device allows one to do a number of things from one some what simple little electronic box. My bullet caster now turns on the cooling fans via the Mypin PID control unit automatically. It just takes a little extra wiring and programing to do so. I will point out that as the load on a SS relay increases so does the heat output from the SS relay thus the need for adequate heatsinking. The heat sinking and removal of heat IS necessary in order to maintain an adequate invironment for the PID control unit. In other words don't heat sink the SS relay in a small box that also contain the PID because you could end up with the temperature of the box going too high and thus the destruction of the PID unit.
    While you may not notice any heat when the SS relay is controlling say a 300 watt heater you will certainly notice the heat when controlling say a 2000 watt heating element.

  2. #122
    Boolit Bub nodda duma's Avatar
    Join Date
    Aug 2009
    Location
    Brookline, NH
    Posts
    55
    Very cool

  3. #123
    Boolit Buddy rattletrap1970's Avatar
    Join Date
    Jan 2010
    Location
    Torrington, CT.
    Posts
    361
    This is the one I built:


  4. #124
    Boolit Master Garyshome's Avatar
    Join Date
    Dec 2012
    Location
    South of the Mason Dixon line
    Posts
    2,166
    I got all the stuff just have to get after it. Thanks for the post!

  5. #125
    Boolit Bub
    Join Date
    May 2013
    Location
    Tennessee
    Posts
    49
    Thanks 6bg6ga! Very informative. I might have some follow up depending on which way I go.

    Thanks again!

  6. #126
    Boolit Master el34's Avatar
    Join Date
    May 2013
    Location
    N Texas
    Posts
    1,190
    Quote Originally Posted by rattletrap1970 View Post
    This is the one I built:
    Very well done.
    "The urge to save humanity is almost always a false front for the urge to rule." --H. L. Menchen

  7. #127
    Banned
    Join Date
    Nov 2010
    Location
    Casa Grande, AZ
    Posts
    5,526
    Quote Originally Posted by el34 View Post
    Very well done.
    I can't see the area around the SS relay but I will add this. If you didn't use heat sink compound to the back of the SS relay I would advise you doing so. A THIN layer of this helps to transfer the heat from the relay to the aluminum. Now, you do have a nice area/ amount of aluminum there to take heat away from the relay. As long as the temperature where the PID control is mounted does not hit 125 degrees or more the PID will live a long life.

  8. #128
    Banned
    Join Date
    Nov 2010
    Location
    Casa Grande, AZ
    Posts
    5,526
    Quote Originally Posted by Uptickk View Post
    Thanks 6bg6ga! Very informative. I might have some follow up depending on which way I go.

    Thanks again!
    I just wanted to answer your questions and offer an alternative way (old school way) of doing it. Sometimes trying to put a SS relay in a small electrical box with the PID just builds up too much heat.

    With mine I can provide the power for my relay control and also power a counter with the same supply. This comes in handy if you wish to have a rough idea of the number you have produced. This works well with the bullet sizers and also some bullet casting machines like the Ballisti-cast Mark IV, X or the Magma bullet caster.

  9. #129
    Boolit Mold
    Join Date
    Oct 2013
    Location
    North Little Rock, Arkansas
    Posts
    19
    just finished mine.. fun little project. thanks to all the posters who posted diy's like this one. tried to jam everything in the medium auberins box but was a little too crammed so I had to rig up the relay on the outside. might try again though then hang a heatsink off the back. wanted to be able to stack two individual rigs on top of each other and maybe use some pc power supply power supply type jacks to allow me to pack them without cables hanging off of it.


  10. #130
    Boolit Buddy rattletrap1970's Avatar
    Join Date
    Jan 2010
    Location
    Torrington, CT.
    Posts
    361
    Just finished my fume hood vented to outside.


  11. #131
    Boolit Mold
    Join Date
    Nov 2013
    Posts
    1

    Incorrect temp

    I have a MYPINS T series PID.
    I have it set at 210f and works fine.
    I now want to raise the temperature to 250f, I can set the desired temperature (sv) to 250f but the recorded temperature (pv) stops at 212f and the unit just keeps on running as it never meets the desired temperature.
    I can run it at lower temperature's but will not indicate above 212 in PV.
    Is there a reset that I have to do or is my unit faulty.
    When i first received it I had it indicating higher temp.
    any help would be appreciated.

  12. #132
    Boolit Bub nodda duma's Avatar
    Join Date
    Aug 2009
    Location
    Brookline, NH
    Posts
    55

    How I wired a PID to control temperature

    Funny, I actually set out to do this on my own. I hadn't realized PID controllers could be had for so cheap until I searched eBay out of Idle curiosity. When I saw they could be had for so cheap I knew I just had to control the temp (I'm an engineer so I'm naturally slightly OCD). I have a Lee 4-20 Pot

    I didn't even think to check the cast boolit forum until after I had ordered parts and had them on the way (tagged the thread up above when I found it).

    I bought a mypin controller & ssr kit, with the difference from this post being I ordered a j-type thermocouple. Wired mine up to just plug the melting pot in through the controller. Put everything in a cardboard box since that's what I had available. Don't worry I taped it shut so I wouldn't open it while it was running!

    Once I found this thread (after I got it running lol), I did adopt the idea above to solder the thermocouple up thru the bottom to read the temperature near the spigot.

    Here is "first heat" before drilling thru the bottom.


    Total cost was about $40.

  13. #133
    Boolit Bub
    Join Date
    May 2013
    Location
    Tennessee
    Posts
    49
    If I am trying to mimic this setup for 220v and two 1500watt heaters is it recommended that I used two 25amp SSRs, one for each heater? One should do the trick since combined I am dealing with ~13.6amps but wanted to consult the brain-trust first.

    Thanks

    Quote Originally Posted by Shotgun Luckey View Post
    This is how I wired my temperature controller:

    Items purchased from http://auberins.com/

    Universal 1/16 DIN PID Temperature Controller http://auberins.com/index.php?main_p...products_id=90
    25 amp SSR (solid state relay) http://auberins.com/index.php?main_p...&products_id=9
    Heat sink for SSR (will help maximize the life of the SSR) http://auberins.com/index.php?main_p...products_id=45
    K type thermocouple high temperature http://auberins.com/index.php?main_p...products_id=22

    Item purchased or supplied locally:

    Crimp on wire connectors, spade type
    Short heavy duty extension cord – my Lee pot has a 2 conductor plug and is not grounded, so the my wiring does not include a ground as nothing in the wiring needs it.
    Small amount of extra wire for jumpers
    Terminal wiring block. Mine has 2 rows of 4 screws. Available in the automotive section.

    Procedure:
    1) Mount terminal block to base
    2) Cut extension cord in half. Strip wires and crimp in spade terminals.
    3) Attach 2 modified cords to one side of terminal block in order from left to right---
    a. Outlet black | outlet white | plug white | plug black
    b. This is the inlet/outlet side of the terminal block, the other row is all for internal connections. The Outlet refers to the end of the cord you will plug the casting pot into.
    4) Mount SSR to heat sink and mount this assembly to the base. Don't forget to put a dab of the white heatsink grease on the back of the SSR before you attach it.
    5) Wire T1 of SSR to screw terminal across from Black Plug Wire
    6) Wire L1 of SSR to screw terminal across from Black Outlet wire
    7) Install a short jumper wire from screw terminal across from White Outlet Wire to screw terminal across from White plug Wire
    8) Mount PID controller to base
    9) Run a pair of wires from screws across from White Plug Wire and the Black Plug Wire to PID AC/DC input contacts 1 and 2 on my controller, polarity does NOT matter with AC power
    10) Run a wire from PID SSR+ (contact #6) to SSR A1+
    11) Run a wire from PID SSR- (contact #7) to SSR A2-
    12) Connect the thermocouple to PID TC (contacts 9 and 10)

    I wanted to add some pictures but haven't figured out how to do that.

  14. #134
    Boolit Buddy
    Join Date
    Dec 2013
    Location
    Central OH
    Posts
    495
    What gauge wire is needed for all of the wiring?

  15. #135
    Boolit Bub
    Join Date
    Aug 2013
    Location
    Tannersville, VA
    Posts
    65
    I made a small metal bracket and mounted my T/C about 1/2" from the bottom & 1/2" from the side of the pot, just out of the way fluxing.
    Jeff

  16. #136
    Boolit Master
    Join Date
    Feb 2008
    Location
    Hartford WI
    Posts
    791
    Can I use Dielectrical grease as heat sink grease? I use this quite often on my job as an auto tech on electrical connectors.
    I'm the King of my castle---anytime my wife's not around
    Life NRA member

    "A Government big enough to give you everything you want, is big enough to take away everything you have"
    Thomas Jefferson

    LIFE, LIBERTY, AND THE PURSIUT OF THOSE WHO TREATEN US

  17. #137
    Banned
    Join Date
    Nov 2010
    Location
    Casa Grande, AZ
    Posts
    5,526
    Quote Originally Posted by ubetcha View Post
    Can I use Dielectrical grease as heat sink grease? I use this quite often on my job as an auto tech on electrical connectors.
    No!!

    You need to transfer the heat to the heatsink and you need heat sink grease for this. Dielectrical grease seals out moisture. Completely different

  18. #138
    Banned
    Join Date
    Nov 2010
    Location
    Casa Grande, AZ
    Posts
    5,526
    Easy to obtain from Rat Shack

    Attachment 118914

    Less than $4

  19. #139
    Boolit Master
    Join Date
    Feb 2008
    Location
    Hartford WI
    Posts
    791
    Thanks for the info. I ordered the pid, tc, ssr, and box yesterday. I did not order a heat sink as I understand that if I mount the SSR outside the box using heat sink grease it should keep cool. I do have a small fan near my pot to keep air flowing, so i hope that should work. If I decide to mount inside, I will add cooling hole and move the fan so air flows over the control box
    Last edited by ubetcha; 10-12-2014 at 10:20 AM.
    I'm the King of my castle---anytime my wife's not around
    Life NRA member

    "A Government big enough to give you everything you want, is big enough to take away everything you have"
    Thomas Jefferson

    LIFE, LIBERTY, AND THE PURSIUT OF THOSE WHO TREATEN US

  20. #140
    Banned
    Join Date
    Nov 2010
    Location
    Casa Grande, AZ
    Posts
    5,526
    Quote Originally Posted by ubetcha View Post
    Thanks for the info. I ordered the pid, tc, ssr, and box yesterday. I did not order a heat sink as I understand that if I mount the SSR outside the box using heat sink grease it should keep cool. I do have a small fan near my pot to keep air flowing, so i hope that should work. If I decide to mount inside, I will add cooling hole and move the fan so air flows over the control box
    There are things to be considered here....

    What is the current draw? What are you running with the PID? How many watts? If the current draw is low and your box is aluminum then there is a possibility of mounting the SSR to the box. If the box isn't aluminum then by all means purchase a heat sink for it. If your running a melting pot then I would say get a heat sink and mount the PID to it and be sure to use heat sink grease. If your running say a heater element for a bullet sizer then you don't need to purchase a heat sink providing the box is aluminum. I can tell you with 100% certainty that a 15A load will need a heat sink and or a fan in order to work.

Page 7 of 10 FirstFirst 12345678910 LastLast

Posting Permissions

  • You may not post new threads
  • You may not post replies
  • You may not post attachments
  • You may not edit your posts
  •  
Abbreviations used in Reloading

BP Bronze Point IMR Improved Military Rifle PTD Pointed
BR Bench Rest M Magnum RN Round Nose
BT Boat Tail PL Power-Lokt SP Soft Point
C Compressed Charge PR Primer SPCL Soft Point "Core-Lokt"
HP Hollow Point PSPCL Pointed Soft Point "Core Lokt" C.O.L. Cartridge Overall Length
PSP Pointed Soft Point Spz Spitzer Point SBT Spitzer Boat Tail
LRN Lead Round Nose LWC Lead Wad Cutter LSWC Lead Semi Wad Cutter
GC Gas Check