Inline FabricationSnyders JerkyLee PrecisionLoad Data
Reloading EverythingWidenersRotoMetals2MidSouth Shooters Supply
Repackbox Titan Reloading
Results 1 to 16 of 16

Thread: Cap box Question.

  1. #1
    Boolit Bub
    Join Date
    Jul 2017
    Posts
    39

    Cap box Question.

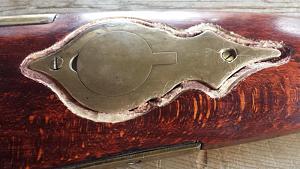
    A buddy of mine bought a Jukar rifle and who ever first bought it as a kit apparently started getting impatient to get it done. The cap box was whittled in a hurry and I'm trying to rectify the the situation. First I whittled out the hole better/deeper and in doing so had to get out most of the filler. The only way I can make it look good is to use a hardened filler/inlay that won't bust out or crack firing it. I figure the inlay around the box should be deep enough to do the job, maybe 1/8th or 3/16th.

    What type of filler/plastic/hardener whatever should be the best choice to do the job and not crack. I really don't know about plastics or such and any help would be great. Here's a pic of what I'm trying to do.

    Thanks guys.

    Click image for larger version. 

Name:	004.jpg 
Views:	45 
Size:	58.0 KB 
ID:	204157

  2. #2
    Boolit Master
    Join Date
    Apr 2016
    Location
    NC
    Posts
    2,878
    While time consuming, cutting a piece of ebony to fit would be functional and very fine looking.

    Plastic will be tough with the different movement rates of the stock and metal, but I'd expect there to be an epoxy product that would work.

  3. #3
    Boolit Bub
    Join Date
    Jul 2017
    Posts
    39
    Epoxy! That's the word I was looking for.
    If it was mine Jim I would take the time to do it up but my buddy is gonna be using it a lot. He only paid $80 for it. I offered a c-note for it but he said no.

  4. #4
    Boolit Grand Master pietro's Avatar
    Join Date
    Mar 2008
    Location
    New England
    Posts
    5,262
    .

    I would suggest experimenting with a dying a 2-part clear epoxy (google) to match the color of the stock wood or to a solid black that looks like Ebony.

    Once a match is achieved, just clean out the inletting, apply a thick coat of a paste wax release agent to EVERYWHERE on the patchbox, and to the finished wood surface all around the work area (right up to the edge of the inletting).

    When the epoxy is only half-dried, the excess epoxy that oozed out is easily shaved off with a scraper made from a popsicle stick than has a sharp edge cut into the ends with a pocket knife or single-edge razor blade.

    Alternately, a larger patchbox can be purchased fro Track of the Wolf, and inletted properly.

    .
    Now I lay me down to sleep
    A gun beside me is what I keep
    If I awake, and you're inside
    The coroner's van is your next ride

  5. #5
    Boolit Grand Master bedbugbilly's Avatar
    Join Date
    Sep 2013
    Location
    MI (summer) - AZ (winter)
    Posts
    5,098
    I'm with JimB - I'd be looking at inlaying an outline of contrasting wood around it. Ebony would look good as it would give a dark contrast. But as Louis Sullivan said, "Form follows function". I'm not big on fillers but if that is what you are planning on, then perhaps an epoxy dyed to match the best as possible. It will still stick out as it will have no grain - only color match.

    In looking at your photo, you need to address the screws as well. The front screw appears to be in crooked and almost pulling through the countersink. On original rifles, i.e. those built during the early to late percussion period as well as flint, steel screws were used. On your matchbox, you could clean up the counter sunk holes to take a larger screw and then use a slotted plain steel screw to secure it in place and blue or brown the screw head which will give it a nice contrast.

    Over the years, I have "grafted" repairs to stocks in such places as the forearm where a ram rod drill broke through or a chipped toe by using the same specie of wood and matching the grain as closely as possible. I'm guessing that your stock may be beech so it's going to be a problem coming up with some that could be grafted/inlayed in and then re-inletting the patch box - so some sort of a dyed epoxy filler may be the best "fix". Another "fix" would be to inlay a larger cap box over the motive that exists but most cap boxes are pretty much the same size and I doubt if you would find one that would work.

    Good luck to you - it will all work out and you'll have a good shooter to enjoy!

  6. #6
    Boolit Grand Master
    Join Date
    May 2007
    Posts
    5,296
    I'd go epoxy, too. One experience I had when making a bar top and using epoxy to fill in knot holes was that the deep pools of epoxy didn't dry. The surface dried but it remained soft under the areas that were pockets. Just a head's up that any deep pools of epoxy might dry different than the thin surface layers. Good luck.

  7. #7
    Boolit Master
    Join Date
    Oct 2012
    Location
    Las Cruces, NM
    Posts
    4,543
    I'd use epoxy as well, probably JB Weld. Tint it black or at least dark. As above, apply in layers (about 1/16" should be ok). Scuff each layer before putting on the next.

    I've used epoxy colored brown and black to match wood grain on a repair before and it looks OK, but, that was a very small section (about 1/8 x 2).

  8. #8
    Moderator Emeritus / Trusted loob groove dealer

    waksupi's Avatar
    Join Date
    Mar 2005
    Location
    Somers, Montana, a quaint little drinking village,with a severe hunting and fishing problem.
    Posts
    19,355
    No matter what you do, it will look like a sore thumb. I would recommend making or buying a larger patchbox, and eliminate the problem.
    The solid soft lead bullet is undoubtably the best and most satisfactory expanding bullet that has ever been designed. It invariably mushrooms perfectly, and never breaks up. With the metal base that is essential for velocities of 2000 f.s. and upwards to protect the naked base, these metal-based soft lead bullets are splendid.
    John Taylor - "African Rifles and Cartridges"

    Forget everything you know about loading jacketed bullets. This is a whole new ball game!


  9. #9
    Boolit Grand Master

    Join Date
    Mar 2005
    Location
    Bloomfield, Nebraska
    Posts
    6,073
    Throw the old cap box away and get a bigger one from Track and do it right. Any filler will be a bubba fix and look like...

  10. #10
    Boolit Master
    Join Date
    Sep 2010
    Location
    England
    Posts
    1,597
    Yes what waksupi says or alternately make and fit a Long Rifle Patchbox as if a Flint To Percusion conversion.I noticed the Cap Box is close to the Comb of the Stock so the position of the Patchbox could be moved to equalise the position.

  11. #11
    Boolit Grand Master pietro's Avatar
    Join Date
    Mar 2008
    Location
    New England
    Posts
    5,262
    Quote Originally Posted by 725 View Post

    One experience I had when making a bar top and using epoxy to fill in knot holes was that the deep pools of epoxy didn't dry.

    The surface dried but it remained soft under the areas that were pockets.

    Just a head's up that any deep pools of epoxy might dry different than the thin surface layers.


    That's somewhat puzzling to me, since AFAIK epoxy doesn't "dry" in the same sense that paint or adhesive glue dries - it cures, from the heat generated from the two chemically different parts being combined.

    I have, however, experienced epoxy that never cure, because the 2-part mix wasn't close enough to 50/50.

    Additionally, I have made epoxy repairs invisible by staining to a color match, and also blending some sawdust from the same stock (taken from under the BP) into the stained epoxy, to give it the appearance of graining.

    .
    Now I lay me down to sleep
    A gun beside me is what I keep
    If I awake, and you're inside
    The coroner's van is your next ride

  12. #12
    Boolit Master
    Join Date
    Apr 2008
    Location
    Monticello, KY
    Posts
    1,733
    That would be a easy, quick fix, with brownell's Acra glass, and their stains, cheap to, would last forever. I just finished epoxying a toe spilt off a 1894 Winchester for a guy, .32 special, and by using sawdust off old aged walnut scraps and accraglass, you could not see it when done, unless I pointed it out, looked like nice walnut grain! I think Pietro is spot on!

  13. #13
    In Remembrance
    Join Date
    Aug 2005
    Location
    Near Mazomanie, Wi.
    Posts
    1,195
    I agree with Waksupi. Or....if you go the epoxy route, you will have to make a uniform area all around the patch box in order to make it look half way decent. It will still stand out unless you stain the epoxy close to the stock color.
    NRA Life
    NMLRA Life
    F&AM

  14. #14
    Boolit Bub
    Join Date
    Jul 2017
    Posts
    39
    Well I just had my buddy Dustin read all the suggestions and he asked me to tell ya's thanks and all but he just want's the thing done. So....
    I'll go with his wishes and when I get done with it I'll post a pic or two so don't beat me up. I'll do what I can.

    *sigh*
    Here I go.

  15. #15
    Boolit Bub
    Join Date
    Jul 2017
    Posts
    39
    Ya ever hear the story when a man took his car to the mechanic and then proceeded to tell him how to fix it? Even when he had no idea how to do so?
    Yeah, no. I'm not even gonna post pics.
    *ggggrrrrrrr*

  16. #16
    Boolit Grand Master bedbugbilly's Avatar
    Join Date
    Sep 2013
    Location
    MI (summer) - AZ (winter)
    Posts
    5,098
    Blogman - I went through my stuff as I thought I might have a cap box that would be a bit larger than what you are working with that could be inlayed over the current mortise you have to work with. What I have is a different shape and isn't large enough to do the job. You'll get it worked out though and it'll be fine. Good luck to you!

Posting Permissions

  • You may not post new threads
  • You may not post replies
  • You may not post attachments
  • You may not edit your posts
  •  
Abbreviations used in Reloading

BP Bronze Point IMR Improved Military Rifle PTD Pointed
BR Bench Rest M Magnum RN Round Nose
BT Boat Tail PL Power-Lokt SP Soft Point
C Compressed Charge PR Primer SPCL Soft Point "Core-Lokt"
HP Hollow Point PSPCL Pointed Soft Point "Core Lokt" C.O.L. Cartridge Overall Length
PSP Pointed Soft Point Spz Spitzer Point SBT Spitzer Boat Tail
LRN Lead Round Nose LWC Lead Wad Cutter LSWC Lead Semi Wad Cutter
GC Gas Check