Inline FabricationRepackboxWidenersLoad Data
Titan ReloadingSnyders JerkyMidSouth Shooters SupplyLee Precision
RotoMetals2 Reloading Everything
Page 1 of 2 12 LastLast
Results 1 to 20 of 23

Thread: Need help disassembling RCBS A2

  1. #1
    Boolit Grand Master

    dragon813gt's Avatar
    Join Date
    Feb 2012
    Location
    Somewhere in SE PA
    Posts
    9,989

    Need help disassembling RCBS A2

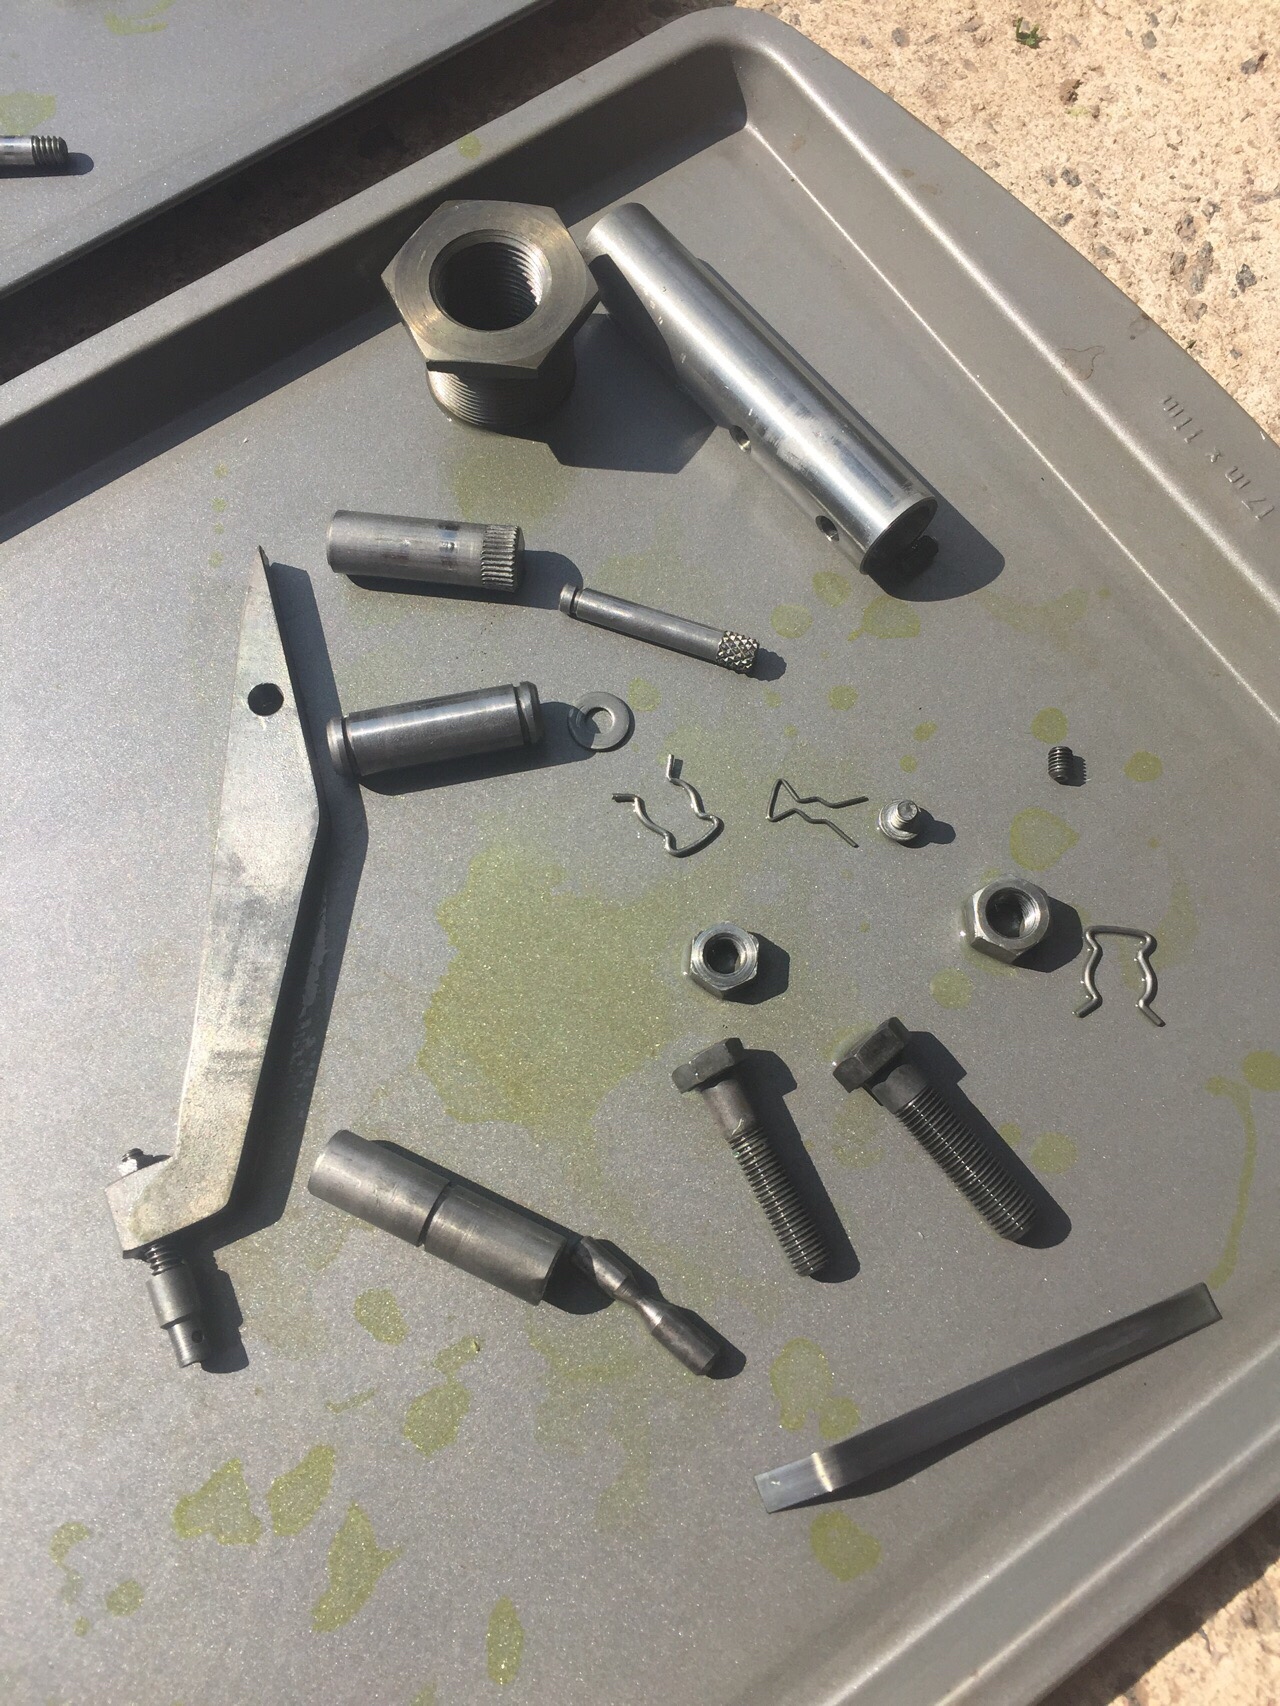
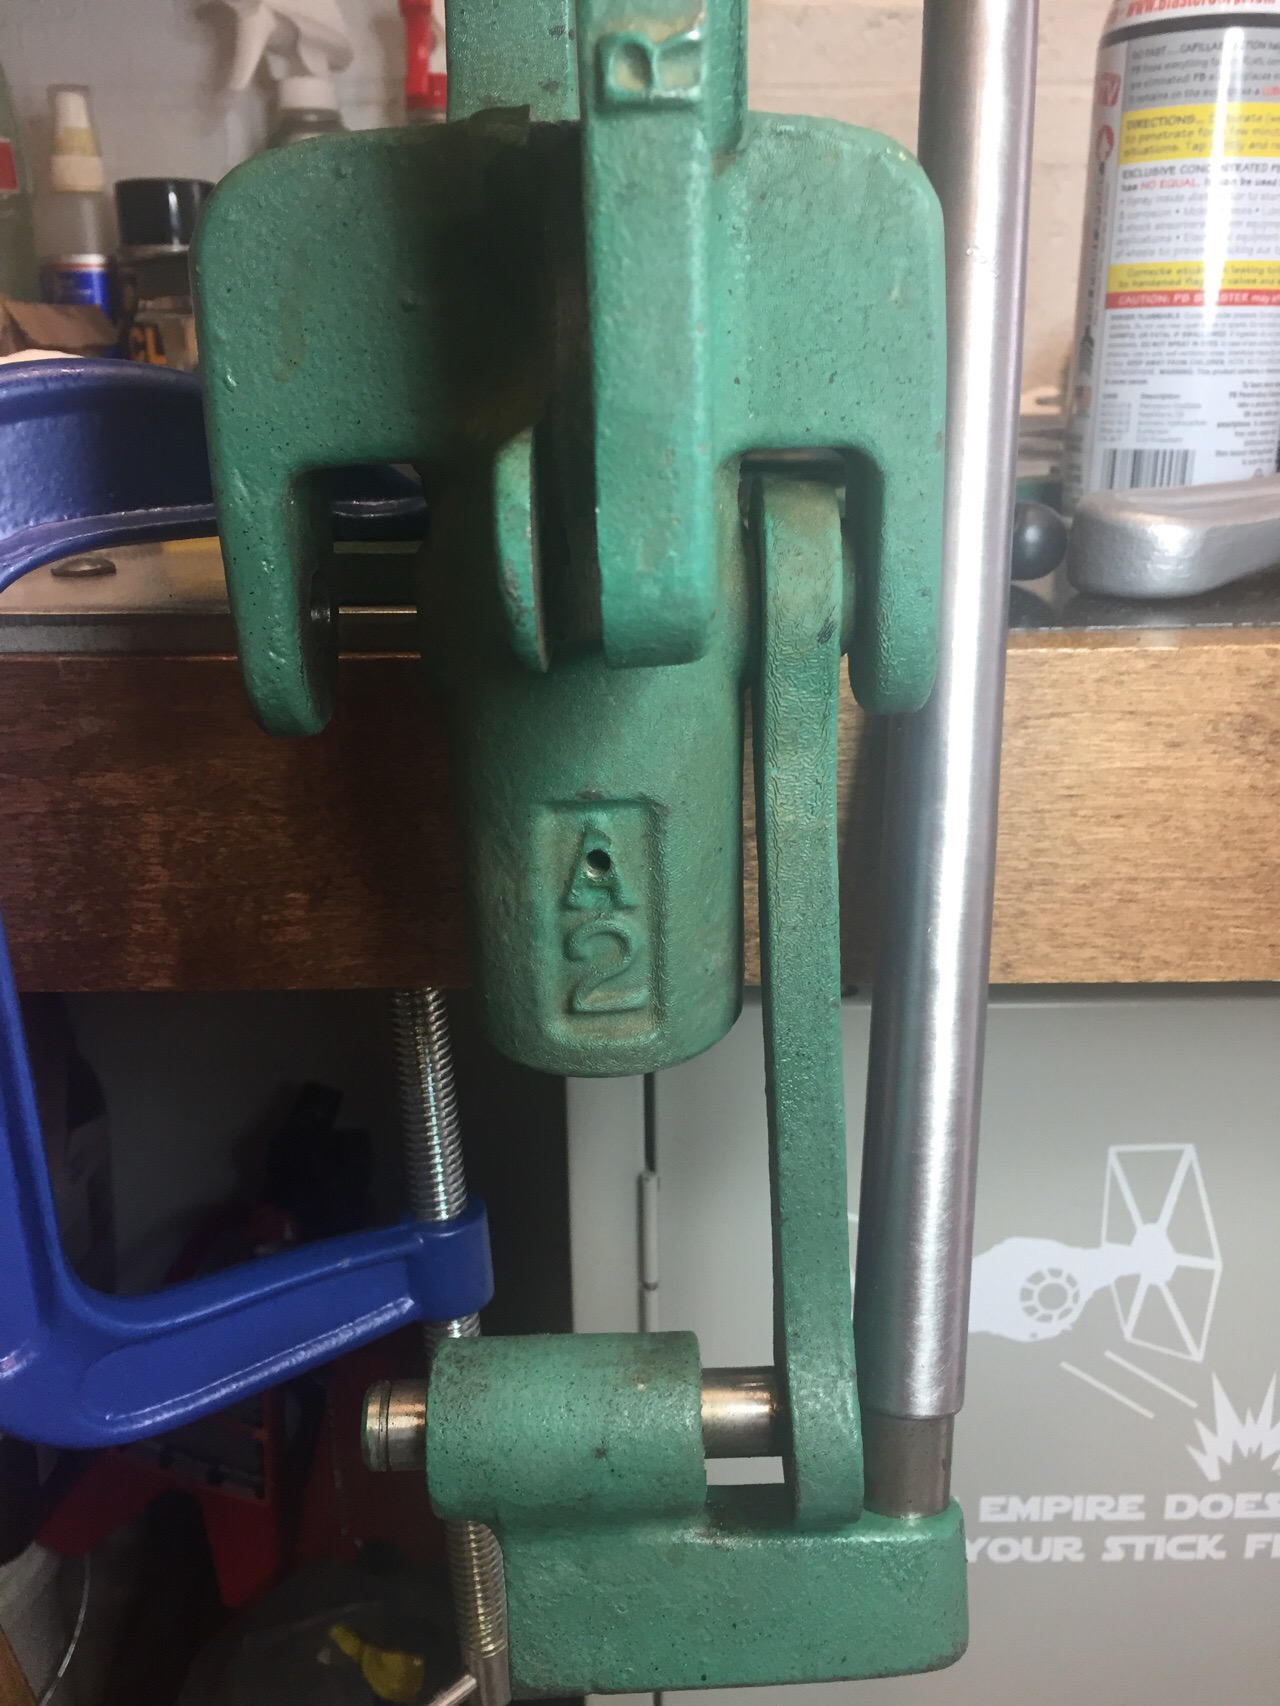
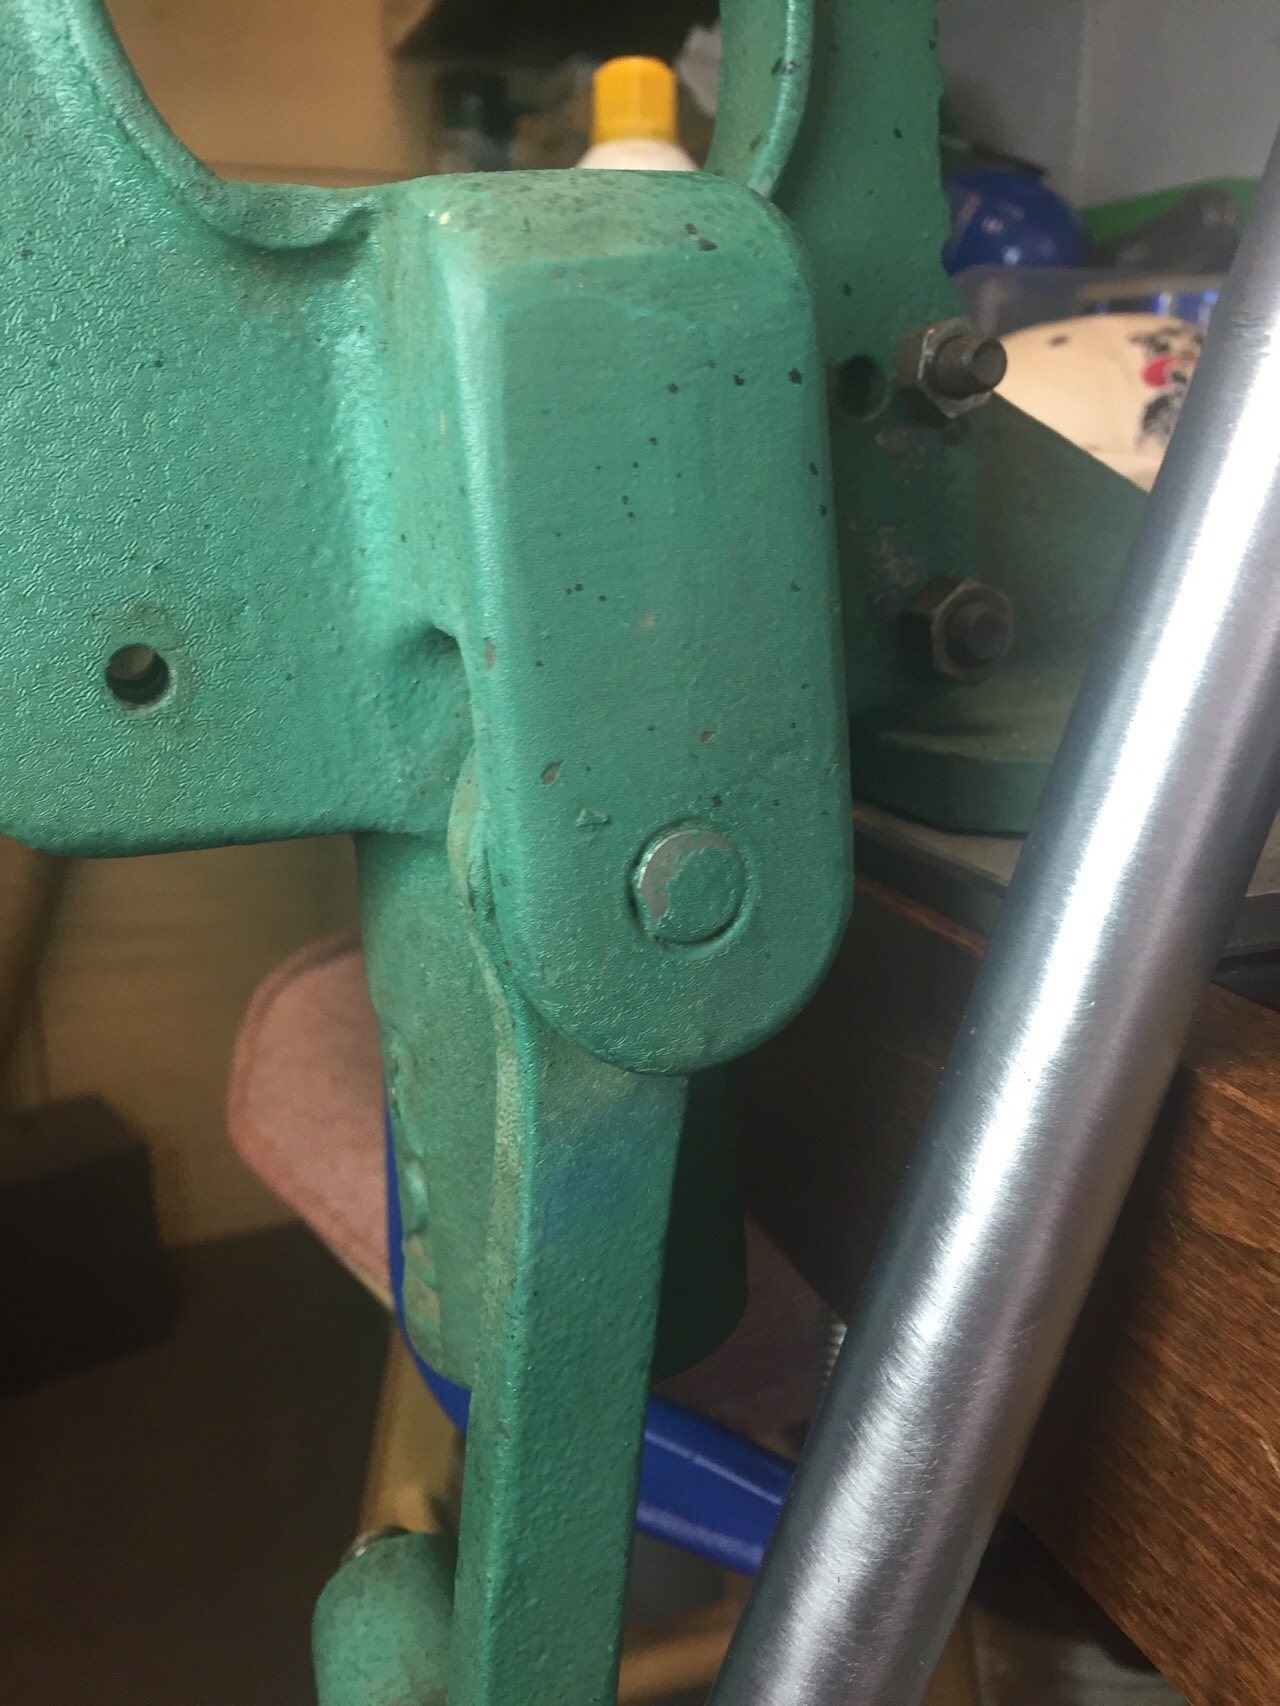
    Searched high and low and I can't find a parts breakdown of the A2 presses. I have almost everything apart but I can't get the right link arm off. This is the one I'm talking about.


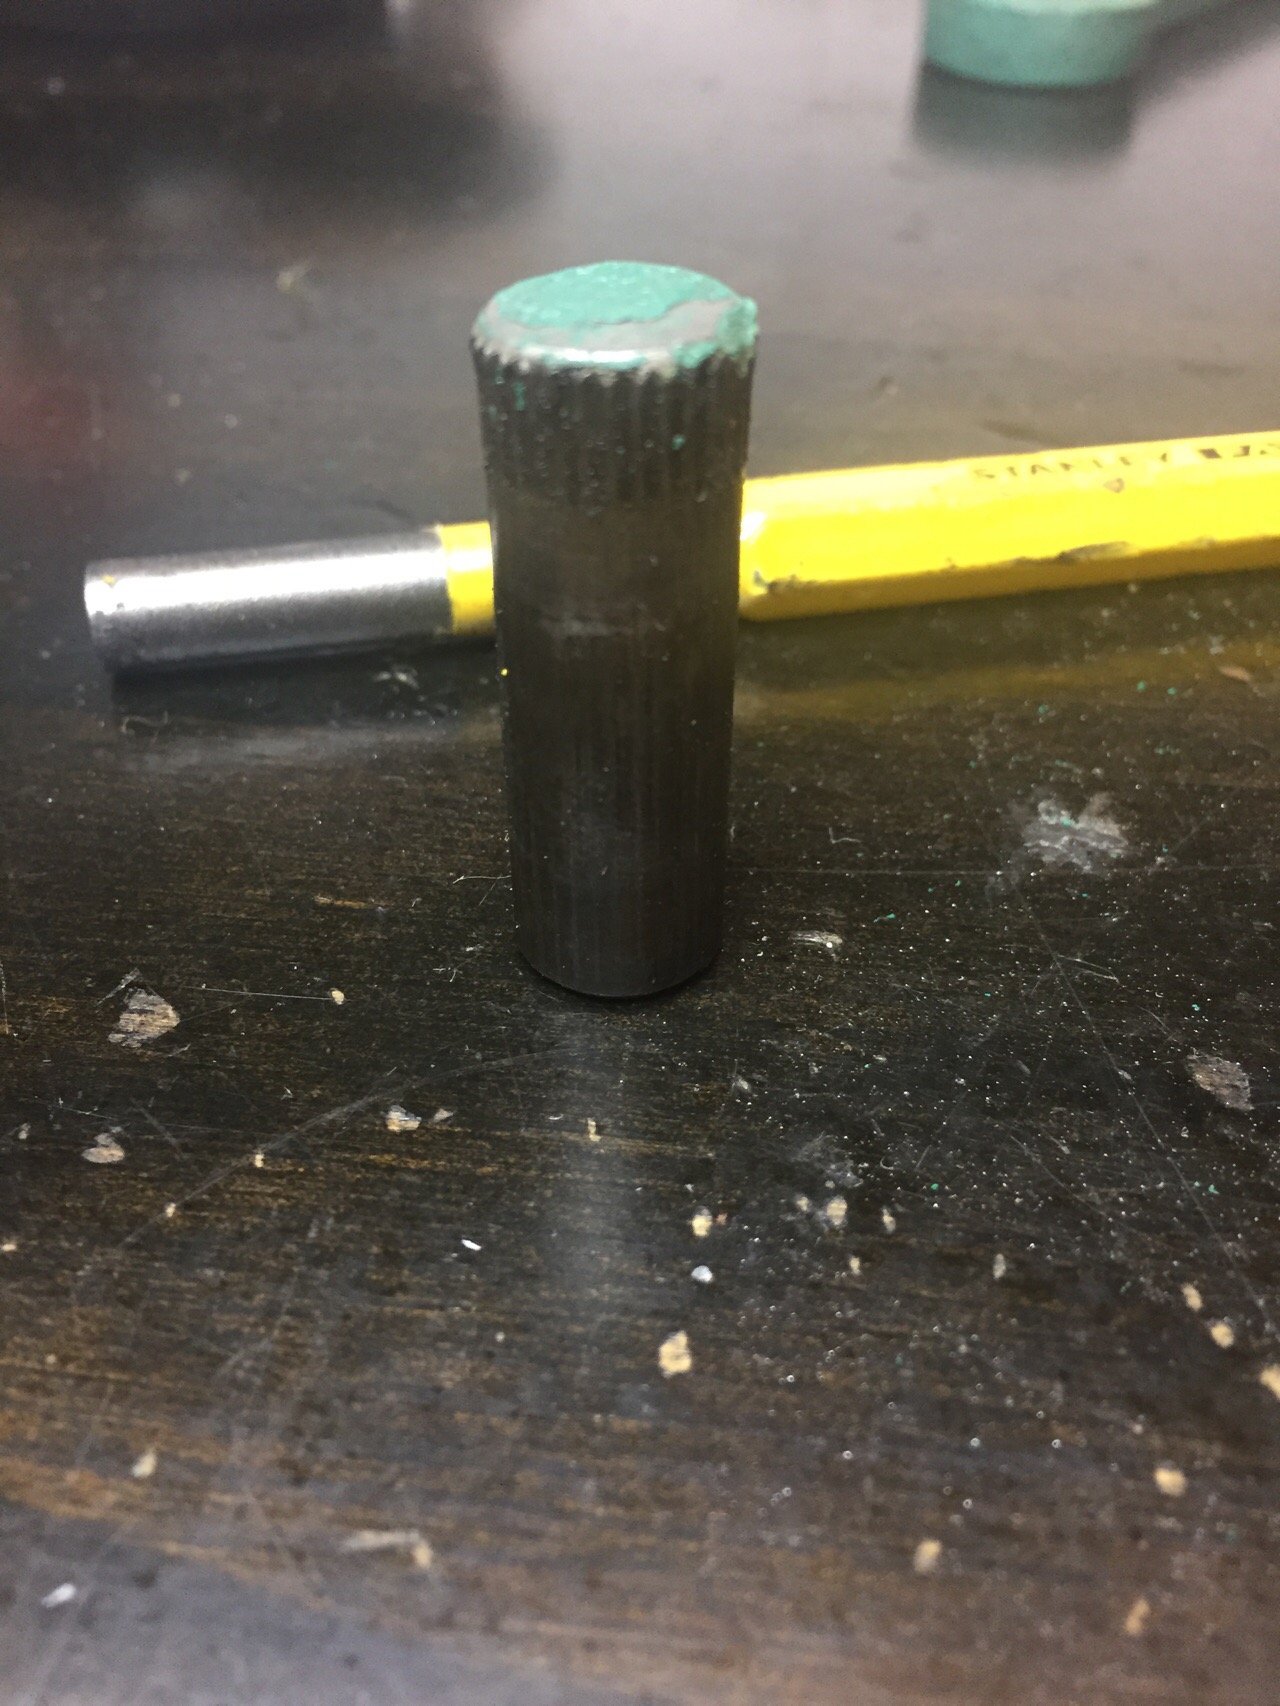
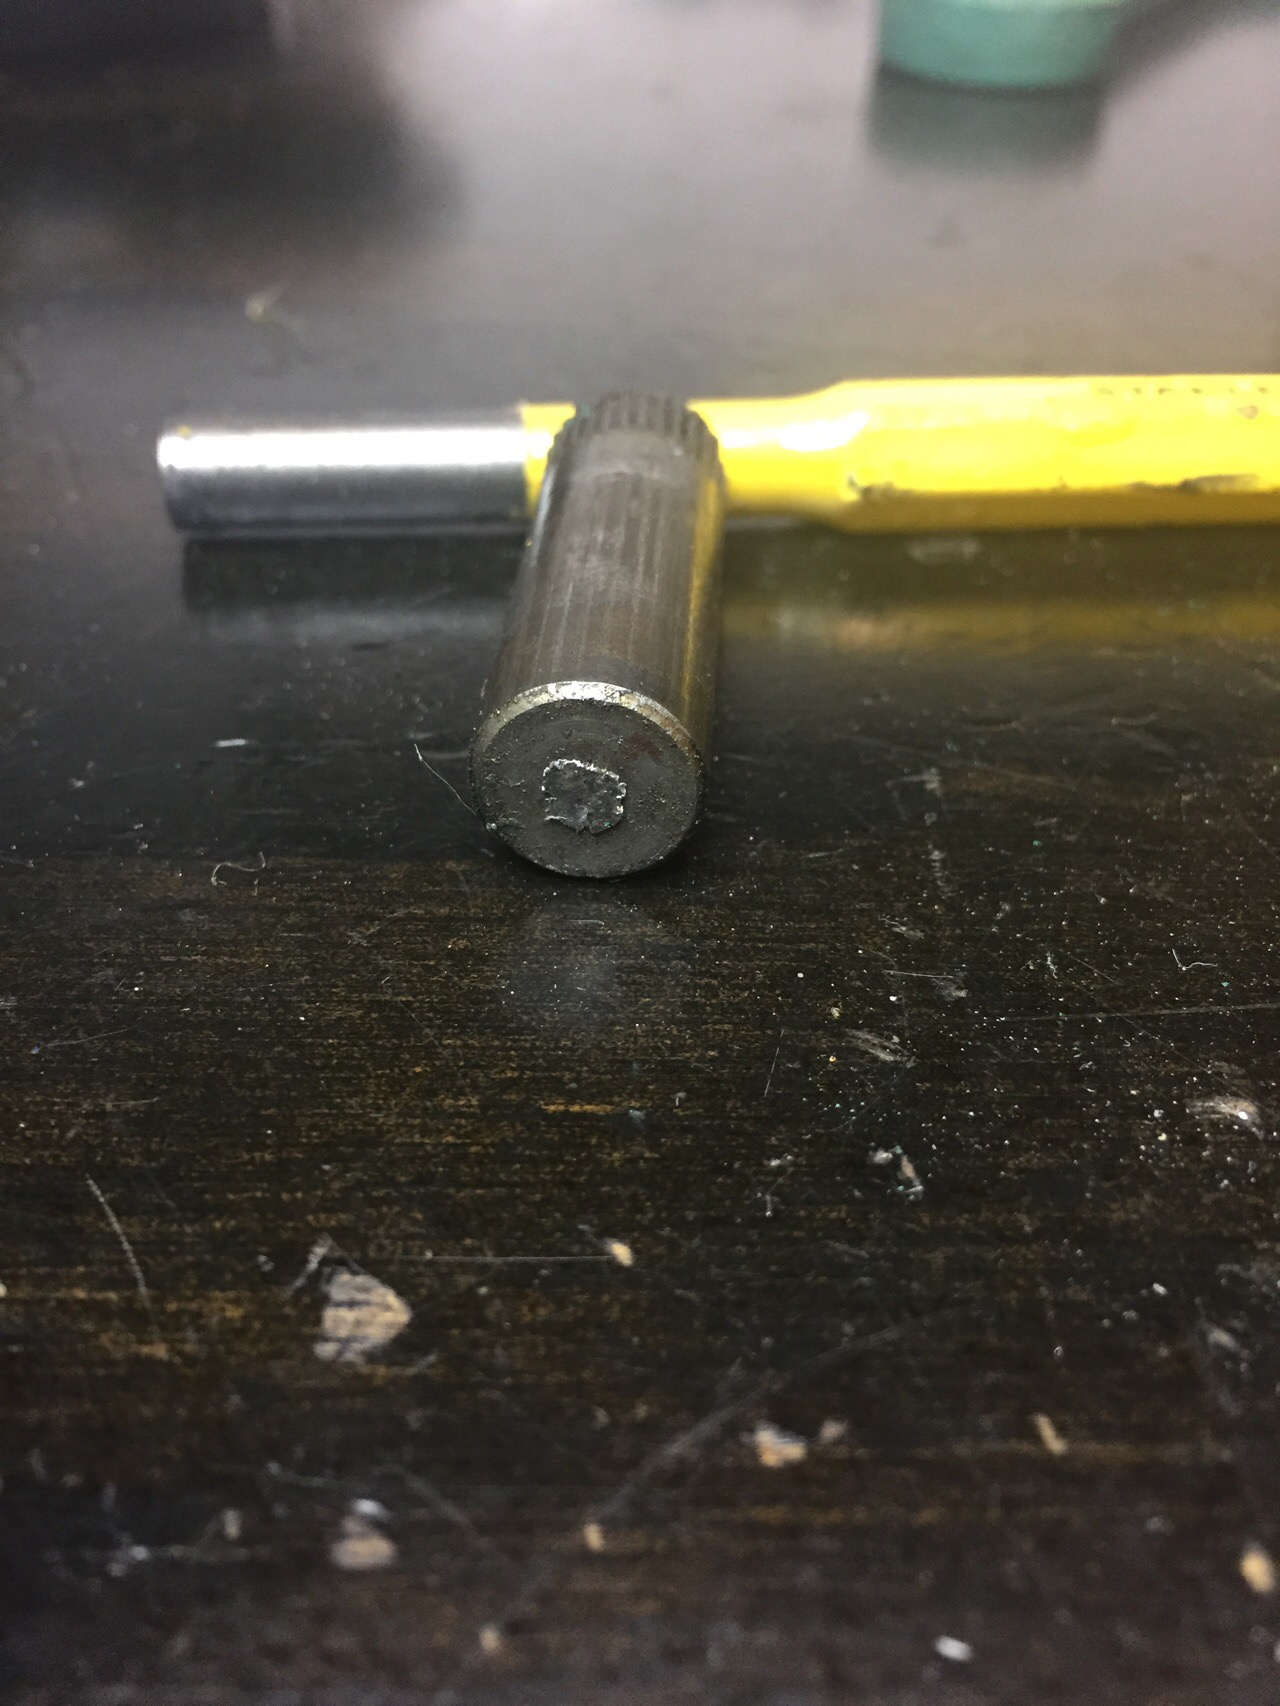
    Tried driving the link pin both in and out. I didn't want to really hammer it either way since I don't know which way it's supposed to go. It doesn't have a cotter pin on it like the left side did. This is the pin.


    The threaded part of the handle is currently seized in the toggle block. Just waiting for the penetrating oil to do its thing. Everything else came apart fairly easily. Top bushing was my biggest concern but it came right out w/ practically no pressure. Press is in great shape but I will most likely sand blast it and apply a fresh coat of paint. I'm taking it apart to give it a good cleaning and soak all the non frame parts in evaporust to remove any rust and start at square one.

  2. #2
    Banned


    Join Date
    Jan 2011
    Location
    Color Me Gone
    Posts
    8,401
    I will be following this. My A2 is in excellent shape, but have thought about disassembly. Miss seagiant, he would probably know the answer. Illinois Coyote Hunter might have an answer.

  3. #3
    Frosted Boolits

    IllinoisCoyoteHunter's Avatar
    Join Date
    Feb 2009
    Location
    Eureka, MO
    Posts
    1,808
    If I remember correctly (That is a big IF LOL), you have to use a punch and go through the frame and knock it out. You basically remove the pin with the cotter pin first (as you did), then put a punch through the frame and knock it out. Assembly will be opposite of disassembly. I "think" that pin may have a slight straight knurl or taper to keep it in place without a pin (so it clears the handle). Let us know how it goes! Good luck!

    PS - Get a big hammer! If you booger that pin I will make you a new one LOL!!! (And I am serious!)
    My Feedback : http://castboolits.gunloads.com/show...iscoyotehunter

    An armed society is a polite society.

    the BB knows

  4. #4
    Boolit Grand Master

    dragon813gt's Avatar
    Join Date
    Feb 2012
    Location
    Somewhere in SE PA
    Posts
    9,989
    Thanks for the info and the offer. I kind of figured you had to knock it out through the frame. Pushing it in would mean it would have to come out the other hole. I don't like braking out the hammer if I don't know how I'm supposed to use it. I need to get a longer lunch. The one I have clears the frame on the opposite side by maybe an inch or so. It may be enough so I will try it before I order a longer one.

  5. #5
    Banned


    Join Date
    Jan 2011
    Location
    Color Me Gone
    Posts
    8,401
    Like the punch Dillion sells for the 550, a long landscaping/log nail with the point cut/ground off. A fine punch. You might be able to get the extra long landscaping nail make the point flat and get it done.

  6. #6
    Boolit Grand Master

    dragon813gt's Avatar
    Join Date
    Feb 2012
    Location
    Somewhere in SE PA
    Posts
    9,989
    Just attempted it. Longest punch I had was brass. The link pin has a nub in the center of it. So the brass punch now has a hole in the middle of it
    I need a new punch set anyway. If I can't get the pin out I will just clean the press up as best I can.

    I still can't get the threaded piece for the handle off. It's been soaking all day long in PB Blaster. Just put a liberal application of Kroil on it. Will attempt to remove it tomorrow. I never like putting a pipe wrench on a fine piece of equipment. But I tried it earlier today. It won't even grip the stub. Same for channel locks. If I can't break it free tomorrow it will have all week long to soak while I'm at work. I want it come out so I can switch the operation to upstroke if I wanted to.

  7. #7
    Frosted Boolits

    IllinoisCoyoteHunter's Avatar
    Join Date
    Feb 2009
    Location
    Eureka, MO
    Posts
    1,808
    If you are planning on painting it maybe add a bit of heat to it to get the handle off? And might help the linkage pin come out too.
    My Feedback : http://castboolits.gunloads.com/show...iscoyotehunter

    An armed society is a polite society.

    the BB knows

  8. #8
    Boolit Grand Master

    dragon813gt's Avatar
    Join Date
    Feb 2012
    Location
    Somewhere in SE PA
    Posts
    9,989

    Need help disassembling RCBS A2

    While searching for new punches on Amazon I came across a set I had in my work van. I forgot I had it in there. Pin came out really easily w/ the right punch. Now getting it back in will be the tough part.


    You can see the nub that destroyed the brass punch. Now it's punched down but it stuck out quite a bit to begin w/.


    I will use heat as a last resort. I'm not sure if I'm going to paint it. Going to require a good bit of taping off unlike the LAMs I've rebuilt. After stripping it down I should have just cleaned it up. Taking out the ram for a cleaning would have taken all of two minutes. Hindsight is always 20/20 and it's to late now.

    All the parts I've been able to remove are soaking in Evaporust over night. The only part that had significant rust was the shell holder adapter. If that comes out clean I should be good to go.

  9. #9
    Boolit Buddy Ozark Howler's Avatar
    Join Date
    Nov 2009
    Location
    Somewhere in America
    Posts
    125
    Click image for larger version. 

Name:	DSC_0053.jpg 
Views:	73 
Size:	34.8 KB 
ID:	203735

    Interesting ?...I've rebuilt quite a few A Series presses and haven't run across one where the upper link pin was pressed into the casting. The press pictured here is a 1967 (just rebuilt) and the pins (both) were held in place using spring clips. Anyway you look at it these A series are about the best presses ever produced by RCBS (not like today's Chinese models).

  10. #10
    Frosted Boolits

    IllinoisCoyoteHunter's Avatar
    Join Date
    Feb 2009
    Location
    Eureka, MO
    Posts
    1,808
    Just went down to the shop to take a look. My Pre A, A, B, and 2A utilize pins that are pressed in on the right side. My Models A2 and A3 use pins with cotter pins to hold them on. So it seems like somewhere along the production of the A2s they changed how they held that pin in on the right side???
    Last edited by IllinoisCoyoteHunter; 09-09-2017 at 09:51 PM.
    My Feedback : http://castboolits.gunloads.com/show...iscoyotehunter

    An armed society is a polite society.

    the BB knows

  11. #11
    Boolit Grand Master

    dragon813gt's Avatar
    Join Date
    Feb 2012
    Location
    Somewhere in SE PA
    Posts
    9,989
    Quote Originally Posted by Ozark Howler View Post
    Anyway you look at it these A series are about the best presses ever produced by RCBS (not like today's Chinese models).
    None of their presses are made in China. I will take them at their word until it's proven otherwise. This press is definitely heavy duty. I can see why they changed the design and materials. I have one of the newer Rockchuckers and while it's strong it's nothing like this one.

  12. #12
    Banned


    Join Date
    Jan 2011
    Location
    Color Me Gone
    Posts
    8,401
    They had castings made in China. I ordered the Handloader issue to see for myself. It is right there
    It was probably short lived, cast in China. Press frames. The A2 is steel. If I run across the Handloader issue in question I will scan the page. RCBS has a lot of Made in China products. Sadly the new Pro Melt look like it made in China just like the Lyman Mag 25

  13. #13
    Boolit Grand Master

    dragon813gt's Avatar
    Join Date
    Feb 2012
    Location
    Somewhere in SE PA
    Posts
    9,989

    Need help disassembling RCBS A2

    I've seen the article. That "experiment" was short lived and all their presses are made in the US. It was a dumb move on their part but not surprising because of who owns them. As for the other products that's par for the course. Not saying it's right, just that it's the reality of a global economy.

  14. #14
    Banned


    Join Date
    Jan 2011
    Location
    Color Me Gone
    Posts
    8,401
    Look I am a fan.
    Two A2s
    And a Big Max
    Short of CH4D, there are no current production reloading presses that compare.
    You have a heirloom there.
    And yes, if you embed eletronics, you might as well go China, as I agree, that is the reality.

  15. #15
    Boolit Grand Master

    dragon813gt's Avatar
    Join Date
    Feb 2012
    Location
    Somewhere in SE PA
    Posts
    9,989
    Pulled the parts out of the Evaporust. Everything is clean and rust free. The bolts are darkened but I knew that would happen. Dipped them back in the Evaporust and I'm letting them air dry. Won't have time today to put it back together and this will protect the pieces from rust until next weekend.


    Still a no go w/ the handle part. It's really seized. Going to let the kroil soak over the week as well. I'm hesitant to submerge the part in it. If it doesn't break free next weekend I will determine which route I want to go w/ it.

  16. #16
    Boolit Master flashhole's Avatar
    Join Date
    Jan 2007
    Location
    Azle, TX
    Posts
    919
    Looks like progress to me.
    ,,, stupidity comes to some people very easily. 8/22/2017 Pat Lengyel (my wife) in a discussion about Liberals.

  17. #17
    Boolit Master

    Join Date
    Mar 2010
    Location
    NC Arkansas
    Posts
    1,410
    Heat the handle, then let it cool. Do it at least two times. There is no finish on it to ruin. If it is still stuck, then try removing while it is hot. If it starts to change color it is more than hot enough and the color can be polished off after the handle is removed. Heating the block the handle is in would be better, but then re-painting would be required

  18. #18
    Boolit Grand Master

    dragon813gt's Avatar
    Join Date
    Feb 2012
    Location
    Somewhere in SE PA
    Posts
    9,989
    That was the plan of action I was going to take. After getting it apart this far I realized it's in really good shape. I kind of want to repaint it but at the. same time I don't. It's tough to get it smooth w/ no runs. The actual handle was in the worse shape. Got it cleaned up but it needs a good polishing now. Not real motivated to go any further than the hand polishing I did. It's just a handle after all and looks don't effect it's operation. I will start another thread if I decide to strip it down to bare metal and repaint it.

  19. #19
    Boolit Grand Master

    Join Date
    Mar 2013
    Location
    Northwest Ohio
    Posts
    14,526
    You might try a solid fast tapping on it with a 10 oz - 12oz hammer occasionally while soaking it. Just a solid tapping not really what you would call a blow. This sets up a vibration pattern that can suck the penetrating oil in deeper, loosen corrosion in the joint and sometimes even back it out slightly loosening it up some. Also try tapping when trying to actually break it loose. The jarring helps a lot. On a round part its tricky to get a good grip on them. I have used a clamp style action wrench with the correct size aluminum inserts and powdered rosin to grab and turn these parts with out serious marring of them. Once it breaks loose it can be turned by hand easily.

  20. #20
    Boolit Grand Master

    dragon813gt's Avatar
    Join Date
    Feb 2012
    Location
    Somewhere in SE PA
    Posts
    9,989
    I'm away for work all week so we will see if Kroil does it's thing. First time I've attempted to use it so the jury is still out for me. The threaded portion of the handle has a hole drilled through it. A screwdriver fits through. Not the best option but since I can't grip it w/ a wrench I don't have another option.

Page 1 of 2 12 LastLast

Posting Permissions

  • You may not post new threads
  • You may not post replies
  • You may not post attachments
  • You may not edit your posts
  •  
Abbreviations used in Reloading

BP Bronze Point IMR Improved Military Rifle PTD Pointed
BR Bench Rest M Magnum RN Round Nose
BT Boat Tail PL Power-Lokt SP Soft Point
C Compressed Charge PR Primer SPCL Soft Point "Core-Lokt"
HP Hollow Point PSPCL Pointed Soft Point "Core Lokt" C.O.L. Cartridge Overall Length
PSP Pointed Soft Point Spz Spitzer Point SBT Spitzer Boat Tail
LRN Lead Round Nose LWC Lead Wad Cutter LSWC Lead Semi Wad Cutter
GC Gas Check