RotoMetals2RepackboxInline FabricationWideners
MidSouth Shooters SupplySnyders JerkyLoad DataTitan Reloading
Lee Precision Reloading Everything
Results 1 to 16 of 16

Thread: Show me your OLDE re-de primer tool for use at the range

  1. #1
    Boolit Master
    barrabruce's Avatar
    Join Date
    Feb 2009
    Location
    Far Nth Qld Australia
    Posts
    1,988

    Show me your OLDE re-de primer tool for use at the range

    I'm currently working on a new to me rifle.
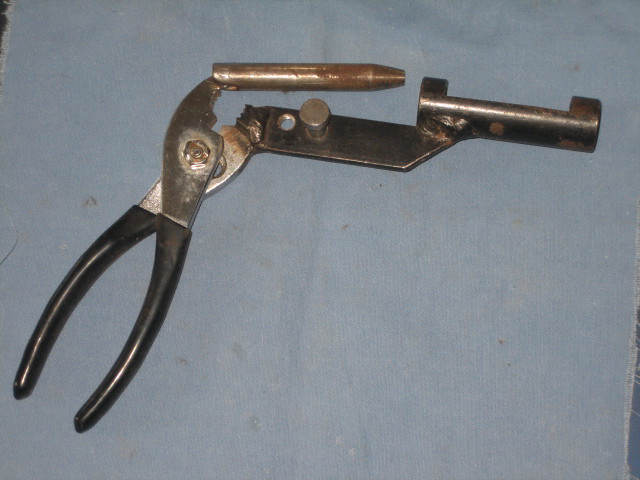
    I'm currently loading my cases hammering with a de-primer pin and hammering the primers in on a flat surface with a rod in the case.
    I have no dies and breachseat with a plugged case with a dipper of powder.

    Apart from all the hammering it doesn't bother me...but it does freak some people out and I'd rather not the attention.

    Plus a hand tool would be cool.

    thnx

  2. #2
    Boolit Master
    Join Date
    Mar 2017
    Location
    Center Point, Texas
    Posts
    605
    Here's a pic of one I use with my old single shot 38-55. Very simple folding tool. Didn't picture the wood mallet that goes with it. Primer tool is front left center of the wide shot.
    Attached Thumbnails Attached Thumbnails RAM_0985x2.jpg   xRAM_0990.jpg  

  3. #3
    Boolit Grand Master GhostHawk's Avatar
    Join Date
    Mar 2014
    Location
    Fargo ND
    Posts
    7,094
    Frankford arsenal sells a very nice depriming tool that works on virtually all rifle and pistol brass. It is a hand tool, has a clear plastic piece that catch's and holds the spent primers.

    They sent 3 plastic "collets" but I have only had to use the one for all my needs thus far. Just remember to back off the nut when done.

    As for priming, I have the RCBS Universal hand tool, it has spring loaded clips that fit anything up to a .410 shell. Does not work for them, but works fine with the .444marlin.

    My only mistake was in not buying 2 so I have to switch parts between large and small primers. Not a big hassle, and not hard. Tray looks to hold 200 primers but I normally settle for 100 at a shot. Often only load 50. Slide the primer holder half out of the cardboard sleeve. Place the base of the primer tray face down on the primers, squeeze together, flip. Slide cardboard sleeve shut, get them all right side up and put on the cover.

    Takes longer to write it than do it.

    Those 2 hand tools let me do what I want where I want. And to go with them I love my Lee Hand press with the quick change bushings.

  4. #4
    Boolit Master
    barrabruce's Avatar
    Join Date
    Feb 2009
    Location
    Far Nth Qld Australia
    Posts
    1,988
    Thnx
    Keep them coming if you gottem.
    Using a dumb smart phone as the internet is not working.
    God help us.
    Last time I embarrassed technology was by growing beans over a satellite dish.
    Ha

  5. #5
    Boolit Master
    barrabruce's Avatar
    Join Date
    Feb 2009
    Location
    Far Nth Qld Australia
    Posts
    1,988
    Attachment 199482
    This is what I'm using at present
    Not the flashest gun and the bullets are too long to stabilize at a 20 inch ptich.....but you gotta start some where
    310 cadet 150 grn pp'ed 308241 size 0.311
    A std cadet bullet painted with some sort of black paint as well I got off a bloke but needs lube to stop leading.

    Better get back to the program.
    De and re cappers.
    I like the hinge tool it seems to have survived regardless.
    Thanx ghosthawke but thats not my cuppa tea.
    Practical and non messy setup that takes care of the rubbish soot and all.
    But too bulky.

    See if I can find a picture of something.
    Last edited by barrabruce; 07-11-2017 at 09:26 AM.

  6. #6
    Boolit Grand Master

    Join Date
    Mar 2013
    Location
    Northwest Ohio
    Posts
    14,526
    While I'm not normally able to post pictures on here unless they are sent to me on the internet. I will suggest looking at the pope style tools the newer ones use a standard press shell holder for priming and a lip for depriming. They are a double handle type set up with one handle on each side of the body. Kind of a pain to change shell holders as mine has to be disassembled to do so. I believe these are going for around $60.00 now. There are several styles available. I believe distant thunder, has one listed also. The deprimer isn't a hard tool to make and can be made from nice wood aluminum, brass steel, or some plastics even. It really dosn't take a lot to push out the spent primers leverage wise. I have a deprimer made with aluminum flat stock and a used decapping rod from a rcbs die. Its a pliers style with 2 handles. Do a search on the internet for prime deprime tools youll be surprised whats out there.

  7. #7
    Boolit Master
    Join Date
    Dec 2016
    Posts
    1,091
    An old Ideal tong type tool in 32-20 might work, but unfortunately I have never actually seen a 310 cartridge to compare. If you could find a cheap rusty one it probably could be altered easily to work with the 310. Like you, I too have de- reprimed many old cartridges with my block of wood, pin and rod.

  8. #8
    Boolit Master
    barrabruce's Avatar
    Join Date
    Feb 2009
    Location
    Far Nth Qld Australia
    Posts
    1,988
    Had a bit of a look around on the Internet couldn't find any pope style tools cheap anywhere.

    Went out to the shed and bummed around for a bit and come up with this instead.

    You'll have to guess which precious tool I used to make this abomination from but I finally found some thing usefull for them after lying around useless as made item.

    A half moon plier type reseater with the latest adjustable pin technology and my idea of a decapper tong type tool.

    Made rough to take it tough as they say.....haaahaaha

    I was gunna blue the black steel bits but it'll get some character soon enough.


    Attachment 199592
    Thanks for the advise
    Bruce
    Last edited by barrabruce; 07-13-2017 at 08:37 AM.

  9. #9
    Boolit Master


    TNsailorman's Avatar
    Join Date
    Dec 2006
    Location
    Northeast Tennessee Hills
    Posts
    2,610
    I like that sophisticated primer seating depth adjustment. Long way around a small problem but I bet it works just fine. james

  10. #10
    Boolit Grand Master

    Join Date
    Mar 2013
    Location
    Northwest Ohio
    Posts
    14,526
    Looks useable. If it will fit throw in some corncobs in the polisher over night LOL.

  11. #11
    Boolit Master
    barrabruce's Avatar
    Join Date
    Feb 2009
    Location
    Far Nth Qld Australia
    Posts
    1,988
    Arlon that is a very fine set up you have.
    I like those bullet boxes.
    I may try and make some of my own.

    I don't do case polishing at all.
    So no corn cobs etc.
    I wasn't pleased with it so shiny so I bird ****zed some more weld on and end up blueing it so it won't rust at least.
    Works real slick....

    Looks like something a mother could only love now so I'm sure there will be no orders and no-one will want to lift it off me.

    Attachment 199703

    Attachment 199704

  12. #12
    In Remembrance
    Join Date
    Aug 2005
    Location
    Near Mazomanie, Wi.
    Posts
    1,195
    Here is another home-made primer seater I got sometime ago....don't remember where though.
    Last edited by mazo kid; 07-18-2017 at 08:27 PM.
    NRA Life
    NMLRA Life
    F&AM

  13. #13
    In Remembrance
    Join Date
    Aug 2005
    Location
    Near Mazomanie, Wi.
    Posts
    1,195
    Can someone tell me what the stud us for? There evidently was another smaller one that is missing.
    NRA Life
    NMLRA Life
    F&AM

  14. #14
    Boolit Master Dan Cash's Avatar
    Join Date
    Jun 2008
    Location
    Western North Dakota
    Posts
    3,327
    That is a Cash tool made by my cousin Mike Cash up until his death. The large stud was used to seat bullets or compress the powder, I forget which. The smaller one was used to seat the primer. Both studs fit over the decapping pin. If you are having trouble replacing the pin on your tool, let me know as I can probably supply a replacement pin and holder.
    Dan
    To paraphrase Ronald Reagan, the trouble with many shooting experts is not that they're ignorant; its just that they know so much that isn't so.

  15. #15
    In Remembrance
    Join Date
    Aug 2005
    Location
    Near Mazomanie, Wi.
    Posts
    1,195
    Would you have a de-primer pin, or picture of it? Thanks.
    NRA Life
    NMLRA Life
    F&AM

  16. #16
    Moderator

    W.R.Buchanan's Avatar
    Join Date
    Mar 2011
    Location
    Ojai CA
    Posts
    9,879
    I was going to suggest a 3" square piece of 1/4"steel plate and a piece of rod. The steel plate would serve as a solid base so that the primer didn't get pushed in too far.

    As far as hammering,,, if the primer goes in strait it won't go any deeper than the base of the case so there is little danger of setting it off. Just tapping it with a piece of wood dowel for a mallet would be enough pressure. You don't have to beat on them very hard and I bet every single Lee Classic Loader Primer set off was caused by continued beating on the rod after the primer was already seated.

    I see you already solved this problem.

    Randy
    "It's not how well you do what you know how to do,,,It's how well you do what you DON'T know how to do!"
    www.buchananprecisionmachine.com

Posting Permissions

  • You may not post new threads
  • You may not post replies
  • You may not post attachments
  • You may not edit your posts
  •  
Abbreviations used in Reloading

BP Bronze Point IMR Improved Military Rifle PTD Pointed
BR Bench Rest M Magnum RN Round Nose
BT Boat Tail PL Power-Lokt SP Soft Point
C Compressed Charge PR Primer SPCL Soft Point "Core-Lokt"
HP Hollow Point PSPCL Pointed Soft Point "Core Lokt" C.O.L. Cartridge Overall Length
PSP Pointed Soft Point Spz Spitzer Point SBT Spitzer Boat Tail
LRN Lead Round Nose LWC Lead Wad Cutter LSWC Lead Semi Wad Cutter
GC Gas Check