Inline FabricationLoad DataRotoMetals2Titan Reloading
Reloading EverythingWidenersSnyders JerkyLee Precision
MidSouth Shooters Supply Repackbox
Page 1 of 2 12 LastLast
Results 1 to 20 of 40

Thread: An Overview of Making Jackets from Flat Strip

  1. #1
    Boolit Buddy


    Join Date
    Apr 2009
    Location
    Cleveland, OH
    Posts
    427

    An Overview of Making Jackets from Flat Strip

    I know that the majority of folks like to make bullets from pistol brass, but for those who are interested in how to do it with flat copper strip, this might be useful. I shoot a lot of big bore stuff, .510, .500 and .458 and wanted to be able to make quality jackets from flat stock. Last year I bought a Corbin Hydro press on the cheap, so once I learned how to use it, I plunked down the coin for a manual jacket making kit from Corbin. The pictures that follow shown that in use.

    The stock I use is 1.4" wide and .093" thick. Don't even think about trying this with a hand press unless you have a lever about 10' long and have arms like Popeye. The gauge pressure is about 1350# when blanking the flat discs that ultimately become jackets.

    This is what the business part of the blanking die looks like:
    Click image for larger version. 

Name:	blankingdie.jpg 
Views:	79 
Size:	31.6 KB 
ID:	198112

    Views of the strip being fed through the die. I found it easiest to cut strips about 5' long and work with them rather than the full coil which is heavy:
    Click image for larger version. 

Name:	blankingdie2.jpg 
Views:	73 
Size:	53.8 KB 
ID:	198113
    Click image for larger version. 

Name:	blankingdie3.jpg 
Views:	71 
Size:	43.1 KB 
ID:	198114
    Click image for larger version. 

Name:	blankingdie4.jpg 
Views:	73 
Size:	39.0 KB 
ID:	198115

    The finished product:
    Click image for larger version. 

Name:	blanks.jpg 
Views:	75 
Size:	54.8 KB 
ID:	198116

    I got just about 1000 disks out of a 50# coil.

    Next up we turn the blank disks into a shallow cup. The cup that results is .800 in diameter with .080 thick walls. The system is supposed to work by putting the disk in the cup which is facing down and then running the punch through the die. I found that the disk was too heavy to work in that way, so I just placed it on top of the spring loaded platform which worked just fine. There is a nice lead in ramp which centers the disk in the cupping die, so no need to worry about getting it perfect. The blanks are lubed on both sides with a very light coat of castor oil:
    Click image for larger version. 

Name:	cupdie.jpg 
Views:	68 
Size:	31.4 KB 
ID:	198117

    In this view, you can see the finished cup, attached to the punch after it has exited the die:
    Click image for larger version. 

Name:	cupdie2.jpg 
Views:	80 
Size:	36.4 KB 
ID:	198118

    There is a trick stripper plate that removes the cup from the punch. It is slid to allow the punch and cup to exit the die, and then once it has cleared the plate, you slide it the other way which gives a ledge for the cup to catch on and get pulled off the punch as shown here:
    Click image for larger version. 

Name:	cupdie3.jpg 
Views:	71 
Size:	38.7 KB 
ID:	198119

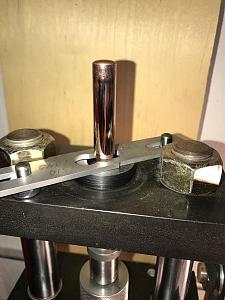
    At this point, you are just reducing the diameter of the cup and making it longer with each draw. The next die takes the .800 cup and reduces it to .700. The next draw takes the .700 cup and reduces it to .560. In the photos below, the .560 cup is being drawn into the finished product, a 1.9" long .510 diameter BMG jacket. The walls are .041 thick. Corbin advises that you can draw down up to 80% of the previous cup's diameter with each draw. This is particularly handy as in my case, with the right punch, I can go from .560 to .510, .500 or even .458 in the final draw saving a lot of work. In theory, I should be able to go to .560 * .8 = .448 diameter if I wanted to. The punch has a collar that centers the cup on the punch so it is centered in the die. It drops away as the jacket is being reduced:
    Click image for larger version. 

Name:	drawfinal2.jpg 
Views:	79 
Size:	34.4 KB 
ID:	198120
    Click image for larger version. 

Name:	drawfinal.jpg 
Views:	85 
Size:	35.0 KB 
ID:	198121
    Last edited by Zbench; 06-22-2017 at 11:08 AM.
    Zbench

  2. #2
    Boolit Buddy


    Join Date
    Apr 2009
    Location
    Cleveland, OH
    Posts
    427
    Below you can see the finished product and the sequence of draws. All that remains is to trim the finished product in a trim die which is provided. I didn't get to that point yet. I was surprised at how low the pressure was on the dial when drawing. It floated between 500-600 psi regardless of the draw. When doing the final draw, the long jackets heated up to be pretty hot!
    Click image for larger version. 

Name:	cuptojacket.jpg 
Views:	73 
Size:	62.1 KB 
ID:	198124

    Thanks for looking!
    Zbench

  3. #3
    Boolit Master

    Join Date
    Feb 2008
    Location
    Bozoland Mt.
    Posts
    1,698
    Thanks for showing!
    To lazy to chase arrows.
    Clodhopper

  4. #4
    Boolit Buddy bpatterson84's Avatar
    Join Date
    Feb 2016
    Location
    Ft Worth, TEXAS
    Posts
    217
    This s really neat. I'd like to see more of the process, especially as it relates to BMG bullets.

  5. #5
    Boolit Buddy


    Join Date
    Apr 2009
    Location
    Cleveland, OH
    Posts
    427
    Well, that is the process. Once the jacket is trimmed to the right length, you seat a core in it and form the nose in a point form die. I dont have a die set for this yet as the first step is to make jackets. That will be coming soon though.
    Zbench

  6. #6
    Boolit Mold


    Join Date
    Jan 2014
    Location
    North East Ohio
    Posts
    19
    Thanks Zbench for posting this. Please show the rest f your process as you get there. Very interesting. Thanks again.

    Rich

  7. #7
    Vendor Sponsor


    BT Sniper's Avatar
    Join Date
    Jan 2009
    Location
    Oregon next to the river
    Posts
    5,654
    Awesome!

    Swage on!
    BTX Star Crimp Die
    Back in stock with new low price!
    Click link below!
    http://castboolits.gunloads.com/show...Star-Crimp-Die


    also check in and say hello on my new face book page!
    https://www.facebook.com/BTSniper-153949954674572/

  8. #8
    Boolit Mold
    Join Date
    Jun 2016
    Posts
    20
    Beautiful, I'm hoping to make a die set to do this at some point in the future, (still have to machine the ram for my press though...), I assume the base more or less stays 0.08" thick?

  9. #9
    Boolit Master 308Jeff's Avatar
    Join Date
    Dec 2016
    Location
    Tempe, AZ
    Posts
    1,488
    Too cool. It actually looks like a lot of fun!

    Thanks for posting this.

  10. #10
    Boolit Buddy


    Join Date
    Apr 2009
    Location
    Cleveland, OH
    Posts
    427
    As it relates to the base, I think it gets thinned too. I remember Dave telling me that is really the limiting factor on how much you can reduce the jacket in each draw. Too much reduction equates a lot of pressure on the end of the jacket and the punch can poke through when that happens. It is a lot of fun.
    Zbench

  11. #11
    Boolit Buddy
    Join Date
    Apr 2014
    Posts
    118
    that is great. Where do you buy the copper strip an how much is a 50# roll?

  12. #12
    Moderator


    Join Date
    Dec 2005
    Location
    Oregon Coast
    Posts
    10,248
    Many years ago, about 1978, I was given a tour of the Sierra Bullet Company shop when they were in Santa Fe Springs, CA. They were using World War II punch presses to do this very process, only really fast. I still have the samples the plant manager gave me of each step. I've also toured the Nosler plant twice, and for their cup and core bullets, they make their jackets the same way.

    Hope this helps.

    Fred
    After a shooting spree, they always want to take the guns away from the people who didn't do it. - William S. Burroughs.

  13. #13
    Boolit Mold
    Join Date
    Jun 2015
    Location
    Middelburg, MP. South Africa
    Posts
    13
    What is the wall thickness variation of your drawn jackets?
    A fool with a tool, is still a fool!
    Its the Injun, not the arrow!

  14. #14
    Boolit Master
    Join Date
    Apr 2010
    Location
    Oklahoma
    Posts
    872
    Are you using pure copper or 95/5 gilding metal strip?
    Bob

  15. #15
    Boolit Buddy


    Join Date
    Apr 2009
    Location
    Cleveland, OH
    Posts
    427
    I'm using pure copper strip which is fully annealed. The wall thickness varies by about a .001. Seems like a lot, but the jacket is 4 times as thick as most .224 or .308 jackets so the error multiplies. I only did a very small limited run. Corbin seems to indicate that the amount of lube impacts concentricity, so I intend to experiment with that to see the impact it has.
    Last edited by Zbench; 06-23-2017 at 12:36 PM.
    Zbench

  16. #16
    Boolit Buddy


    Join Date
    Apr 2009
    Location
    Cleveland, OH
    Posts
    427
    I had time this morning to set up the trim die to trim those BMG jackets. I discovered I could get a full 2.000" from the jackets I made. Below are some pictures of the process.

    The trim die properly set up. This is the special "magnum" die which does not require an adapter:
    Click image for larger version. 

Name:	trim1.jpg 
Views:	45 
Size:	30.1 KB 
ID:	198338

    Jacket loaded and ready for trimming:
    Click image for larger version. 

Name:	trim2.jpg 
Views:	47 
Size:	18.0 KB 
ID:	198339

    PINCH! When using the hydro, you don't rely on getting the die set just right. Instead, you make it so the die and the punch are sure to come into interference fit and adjust the pressure to just give the result you need. It's pretty slick. I was at around 550 psi:
    Click image for larger version. 

Name:	trim3.jpg 
Views:	48 
Size:	23.1 KB 
ID:	198340

    The finished result:
    Click image for larger version. 

Name:	trim4.jpg 
Views:	58 
Size:	39.7 KB 
ID:	198341

    I weighed the trimmed jackets to see how consistent they were. You can check out the results below. The extreme spread was .92 grains. For a 290 grain jacket, that is only .3%! Pretty close tolerances if you ask me:
    Click image for larger version. 

Name:	trim5.jpg 
Views:	63 
Size:	48.8 KB 
ID:	198342
    Zbench

  17. #17
    Boolit Master
    woodbutcher's Avatar
    Join Date
    Feb 2008
    Location
    LaFollette Tn
    Posts
    1,398
    Very nice sir.Please post up dates as you are able to.
    Good luck.Have fun.Be safe.
    Leo
    People never lie so much as after a hunt,during a war,or before an election.
    Otto von Bismarck

  18. #18
    Boolit Buddy marvelshooter's Avatar
    Join Date
    Sep 2011
    Location
    SE Mass
    Posts
    464
    You mention that it takes 1350 pounds of force to punch your disks. Is your blanking punch flat or does it have a concave surface?

  19. #19
    Boolit Buddy


    Join Date
    Apr 2009
    Location
    Cleveland, OH
    Posts
    427
    It's flat, but relieved in the center. Looks like about .100" ring that does the cutting. I assume it's like that to not press any bits of copper dust into the blank when cutting.
    Click image for larger version. 

Name:	cuuter.jpg 
Views:	28 
Size:	35.4 KB 
ID:	198384
    Zbench

  20. #20
    Boolit Mold
    Join Date
    Feb 2016
    Posts
    20
    Now lets do this in 20mm

Page 1 of 2 12 LastLast

Posting Permissions

  • You may not post new threads
  • You may not post replies
  • You may not post attachments
  • You may not edit your posts
  •  
Abbreviations used in Reloading

BP Bronze Point IMR Improved Military Rifle PTD Pointed
BR Bench Rest M Magnum RN Round Nose
BT Boat Tail PL Power-Lokt SP Soft Point
C Compressed Charge PR Primer SPCL Soft Point "Core-Lokt"
HP Hollow Point PSPCL Pointed Soft Point "Core Lokt" C.O.L. Cartridge Overall Length
PSP Pointed Soft Point Spz Spitzer Point SBT Spitzer Boat Tail
LRN Lead Round Nose LWC Lead Wad Cutter LSWC Lead Semi Wad Cutter
GC Gas Check